Hands-On Review
Revopoint MIRACO 3D Scanner
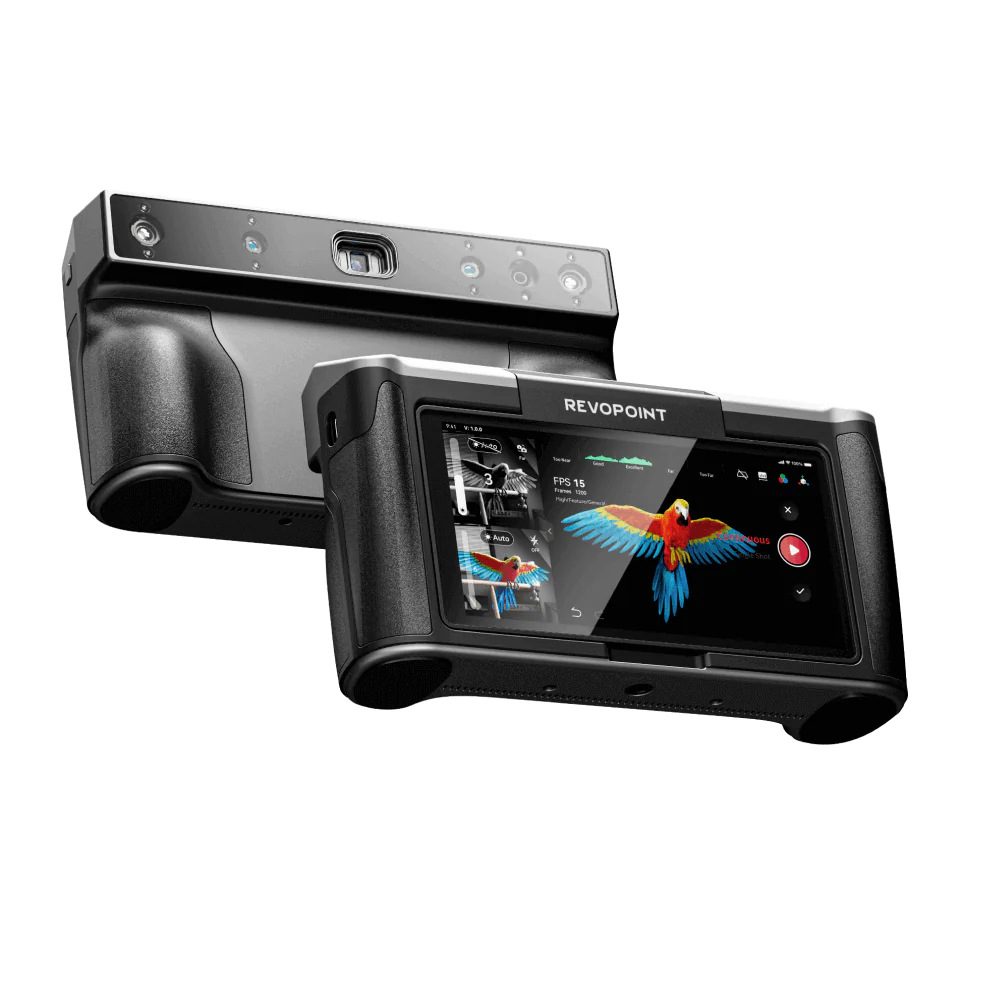
Recently, Revopoint received a Red Dot Award in the Best of the Best category for their MIRACO 3D scanner. We have been testing the MIRACO for the last couple of weeks, and in this article we’re going to review it and see what all the fuss is about.
Overview
The Revopoint MIRACO’s main USP is that it is a completely standalone unit, meaning that it is totally portable and users do not need to plug it into a laptop to use it.
Interactions are performed via the UI located on a 6 inch 2k AMOLED touch screen at the rear of the unit.
On the front face of the unit, there is a structured infrared light system with quadruple depth cameras (2x near distance and 2x far distance), and a 48 MP RGB camera for color scanning. The front face also contains lighting including infrared fill lights and the flash LEDs.
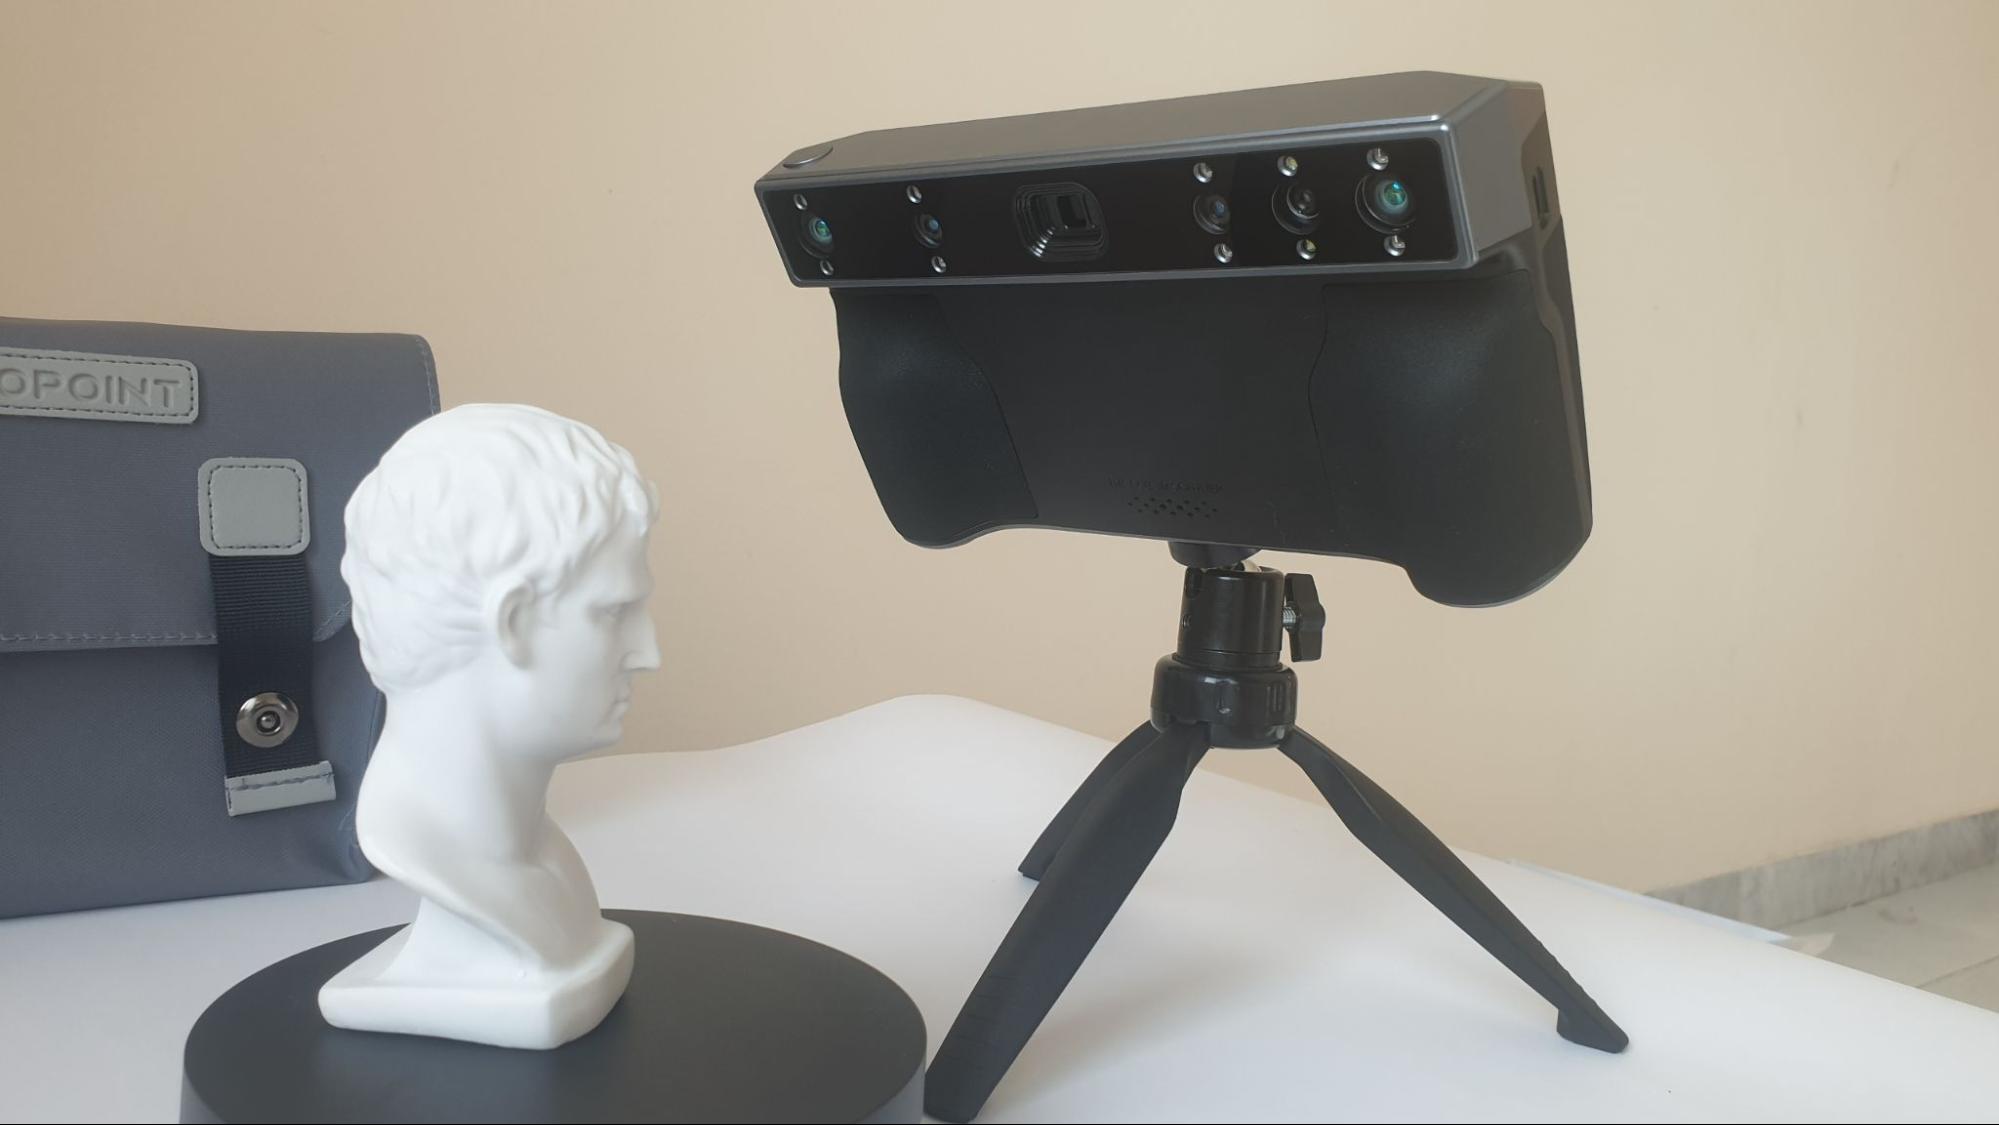
Upon opening the box, users will be presented with the MIRACO itself, a nice little carry bag, a turntable, power and data cables, a tripod, and a Greco-Roman style bust to test the scanner on (pictured above). The scanner can be used in two modes, detecting objects by their features, or in the case of items lacking features, with the markers or marker mats. A few sheets of markers and 3 marker mats of different sizes are included in the box.
The AMOLED screen can be flipped 180 degrees, allowing 3D selfies, or anything else that might require scanning from a different position.

The unit weighs in at 750 grams, and it fits nicely in the hands thanks to its contoured grips. Capturing the scan can either be done with a button on the touchscreen, and there is an-old school physical button located on the top face, which is handy.
Scans can be processed within the scanner itself, or with the Revoscan 5 software, which can be downloaded for free from the company website.
So, that’s the overview out of the way, now let’s see what it’s like in action.
Getting Started
When you power up the MIRACO for the first time, there is a small guided setup process, including language selection, WiFi connection, and whatnot.
Once this process is complete, the scanner is ready to use.
The picture below shows the UI on the MIRACO screen. As you can see it’s fairly minimal which makes it easy to use. I barely needed to consult the manual, except to read more about connecting to PC via wire for data transfer.
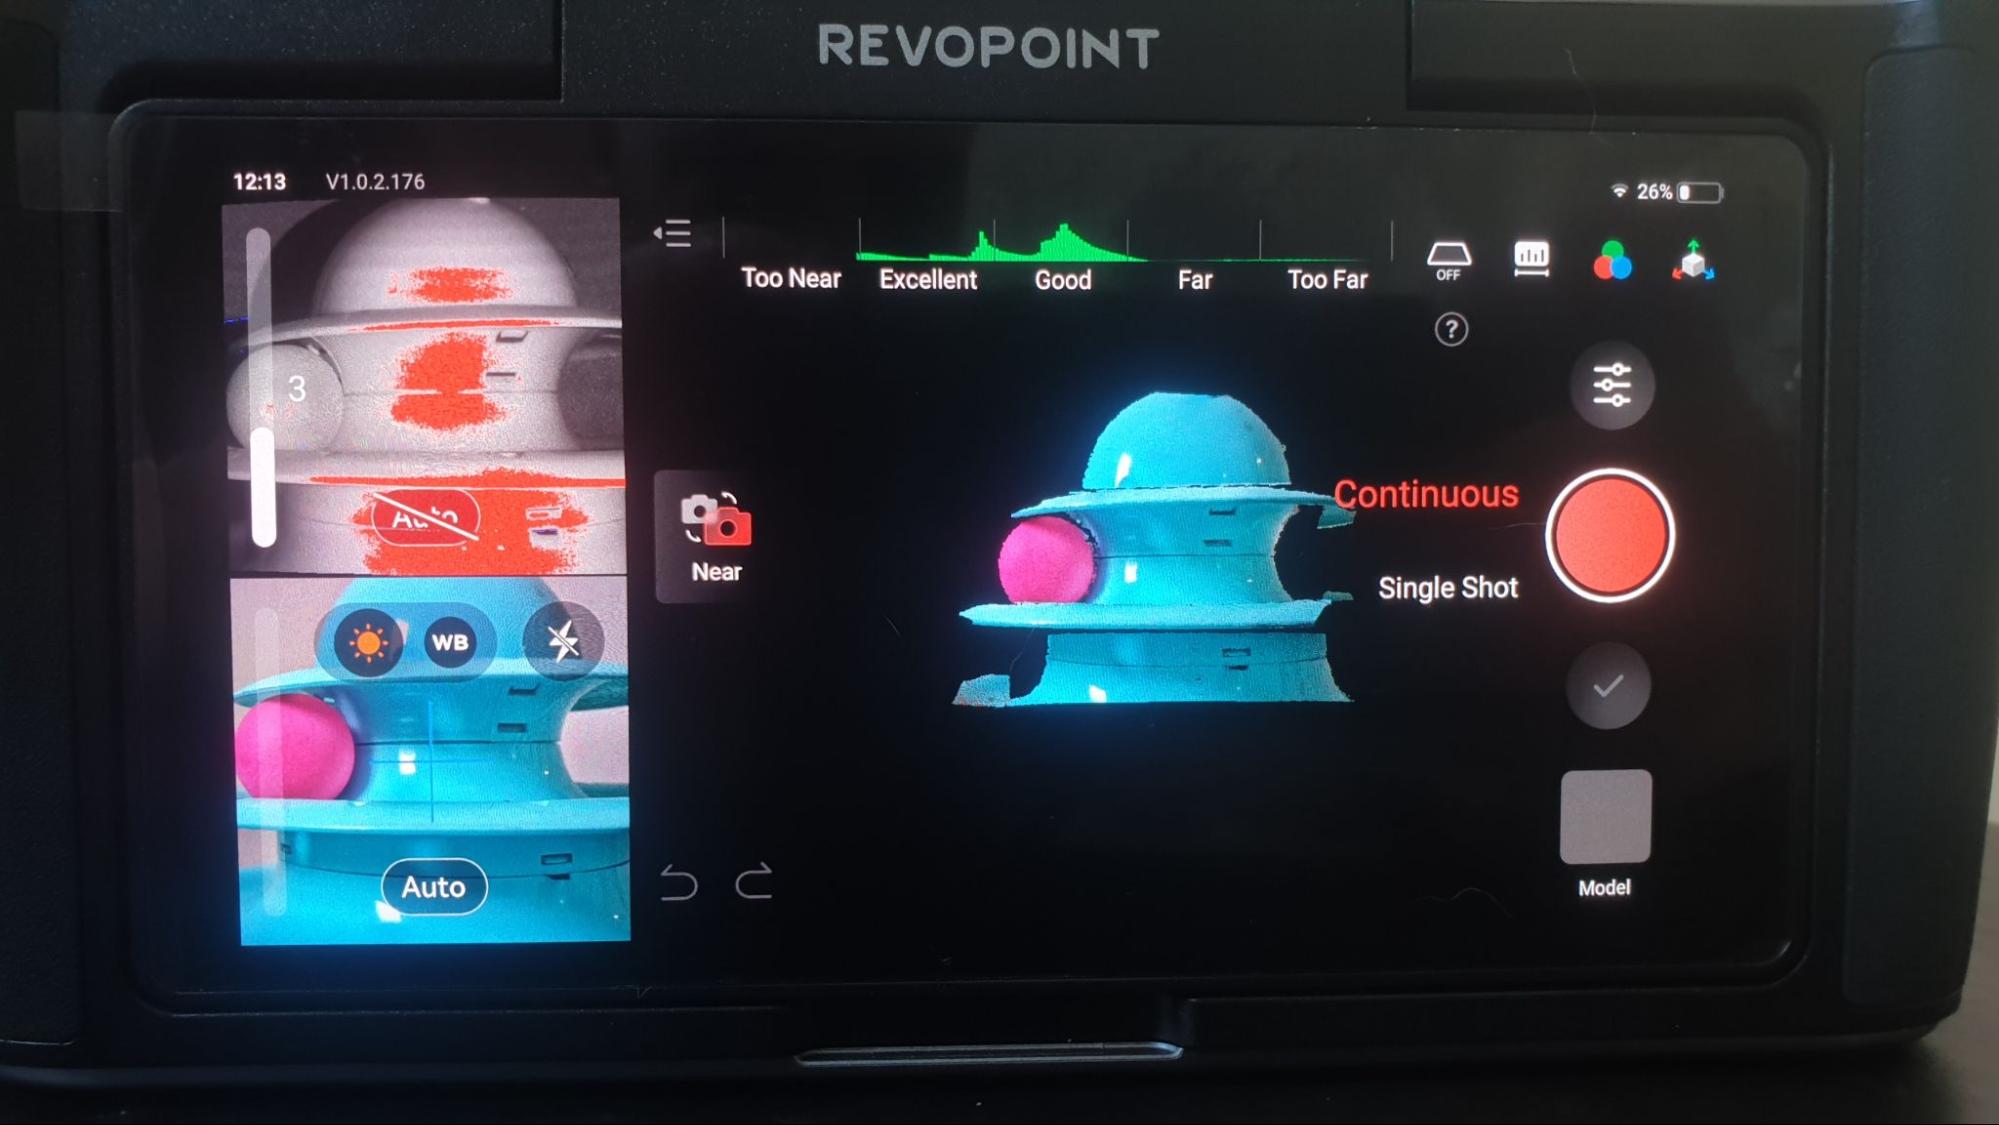
The first thing you will probably notice is the big red button and two scan mode options next to it. These are for Continuous mode scanning, and Single Shot scanning.
These are self explanatory. Continuous scanning allows you to scan the entirety of an object, and Single Shot takes a single scan from one angle, creating a sort of 2.5D snapshot.
The viewport square in the top left (with the red smudges) is for controlling the exposure of the depth camera, and the viewport at the bottom left shows the RGB camera and allows you to control the white balance and activate the LEDs for color scanning. The main viewing area seems to show a combination of the depth image and the RGB image.
The bar at the top of the screen with the green waveforms is the distance meter, which shows the idea distance for scanning, and this scale changes depending on whether the Near scanning mode or Far scanning mode is selected.
Scan settings can be accessed via a button on this screen also. The scan settings allow you to select the accuracy, the alignment mode (feature or marker), the object type (general or dark), and to activate color mode.
Swiping downwards on the main screen also brings up the general settings, including WLAN, screenshot/screen recording and other features.
Scanning with the MIRACO
The MIRACO offers up to 0.02 mm precision and 0.05 mm accuracy, and can scan at speeds of up to 15 fps in high speed mode.
I skipped scanning the Greco Roman bust and proceeded to scan some real-life examples, as I had some reverse/engineering and modeling work that needed completing. This seemed like a good opportunity to put the MIRACO through its paces.
I am modifying a tripod to use on another project, and for this project I need to 3D print an adapter for the tripod. The top of the tripod is made out of shiny ABS plastic.
At first I tried to scan the black plastic with the MIRACO, but it was not detecting enough features for a clear scan. Next, I affixed some of the marker stickers to the plastic and tried again. The MIRACO has a dark mode for black objects, but even with dark mode active, it had issues with the shiny plastic surface.
To resolve the issue with the shiny surface I applied some talcum powder to the object and scanned it. It scanned no problem with the talc applied, and you can use a scan spray also if you are having similar issues.
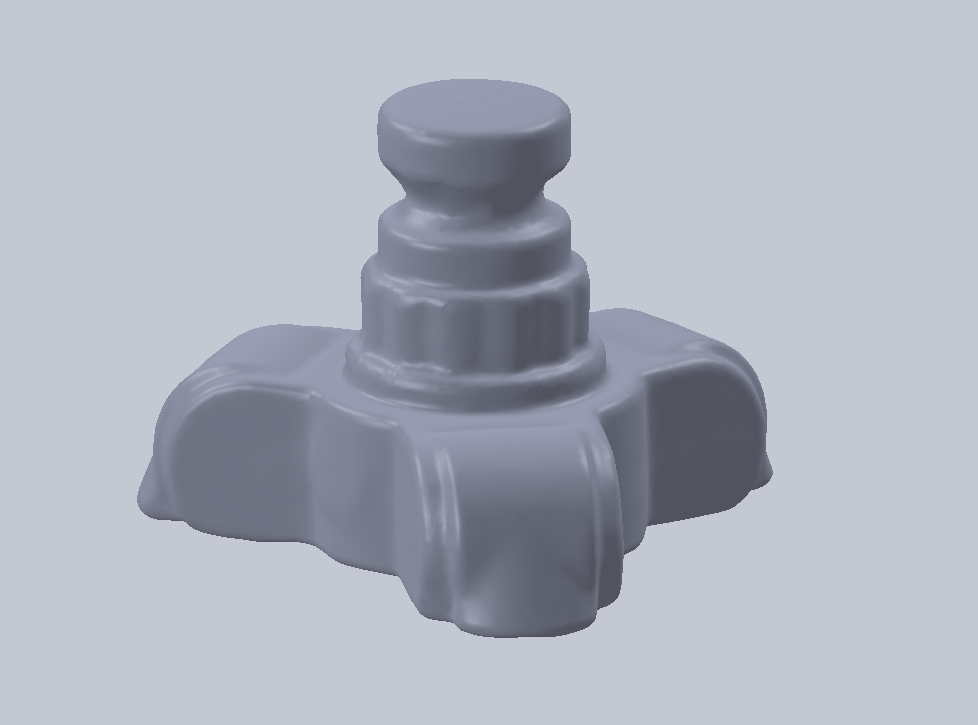
You can see the object in the image below (left) and the scanned and edited model (right).

As mentioned previously, scan data can be processed in the MIRACO itself. This includes fusion, mesh and texture features. There is a one-tap edit mode also, which allows you to do all the functions at once, resulting in a 3D model.
If you require more in-depth editing options, then the data needs to be exported into the Revo Scan 5 software, either via WiFi, or with the included USB-C data cable.
Note: Be sure to use the included data cable for transferring, rather than using any old USB-C cable you might have lying around. Not all USB cables are data cables, and will probably not work, as I found out myself.
The Revopoint and its software permits export of mesh-type 3D files such as OBJ, STL or PLY. So if you need to convert your exported model to a usable CAD model, then you will need to use a third party software. I converted my own scan into a STEP file using such a software, and then imported it into Solidworks to finish the job (pictured below). Now I can use this STEP file to make a negative, and finish designing the attachment.
Overall, I can say the scanning process for such a part was pretty easy, and one thing I noticed over other scanners, is that when the MIRACO loses tracking, it picks it up again pretty easily. With my other scanners, if I lose the tracking and resume, it can leave a lot of ghostly artifacts on the final scan which are not repaired in the scan alignment process.
I had no such issues here. I tried both the near and far scanning methods on this part, and both methods were able to capture the details that I needed. The benefit of scanning with the far distance camera is that you don’t need to bend over and get up close to the part, which is great if you are getting old (like me) and dislike being hunched over for too long.
So that’s an example of a more engineering-focused scan complete. Now onto the litmus test – can the MIRACO scan my cat (or other living being)?
Scanning Uncooperative Targets
With my previous scanners, I had tried to scan my cat, and had failed miserably. Either the camera was unable to pick up the fur, or else the target was uncooperative and would move around.
Because a typical 3D scanner needs to be connected to a laptop, it is inconvenient to get an animal to sit in the right place within reach of the scanner/computer setup. Previously I had tried to get my cat to sit still in front of the scanner (impossible), or else I would wait until she fell asleep, and then attempt to move the laptop and scanner over to her sleeping area (resulting in her waking up). And then there is the issue of poor scan quality. I am not prepared to cover my cat in talcum powder, so oftentimes the scans would be patchy at best.
With the Revopoint MIRACO, this is no longer a problem. I simply wait for the target to fall asleep, pick up the MIRACO, and quietly sneak over to do a scan. And it works!
A resting cat is one thing…how about something a little more challenging: how about a nesting pigeon with its offspring? I have one of those nesting on my balcony right now.
I first attempted a continuous scan of the father pigeon, but he got really annoyed and would start beating his wing at me when I got up close. I left the male alone,and came back later when the mother pigeon returned for her shift inside my poop-covered spray booth (which is now their home).
The continuous scan did not work so well, as the female’s head kept watching the scanner move around, and it was making her nervous. However, the single-shot mode worked fine, as you can see below.
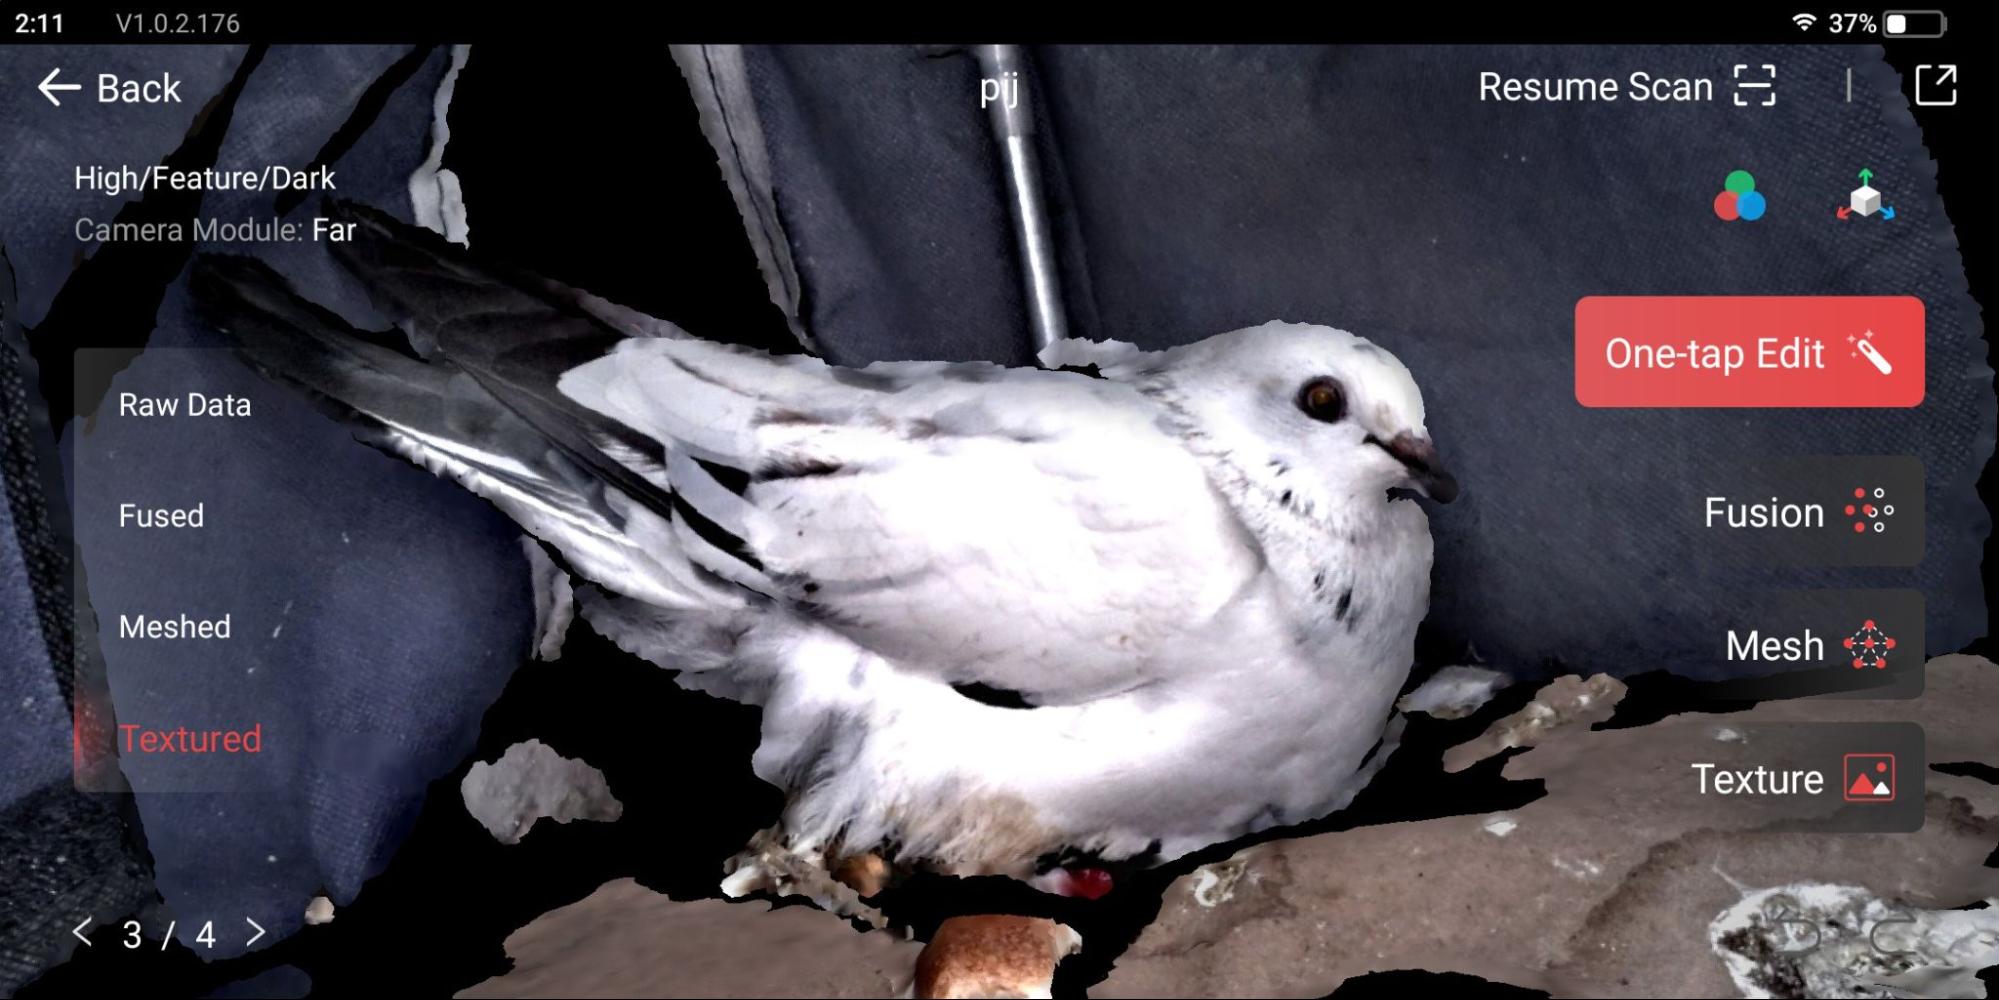
I returned a couple of days later to try another scan, and both of the adults had temporarily departed the nest, leaving the baby pigeon alone.
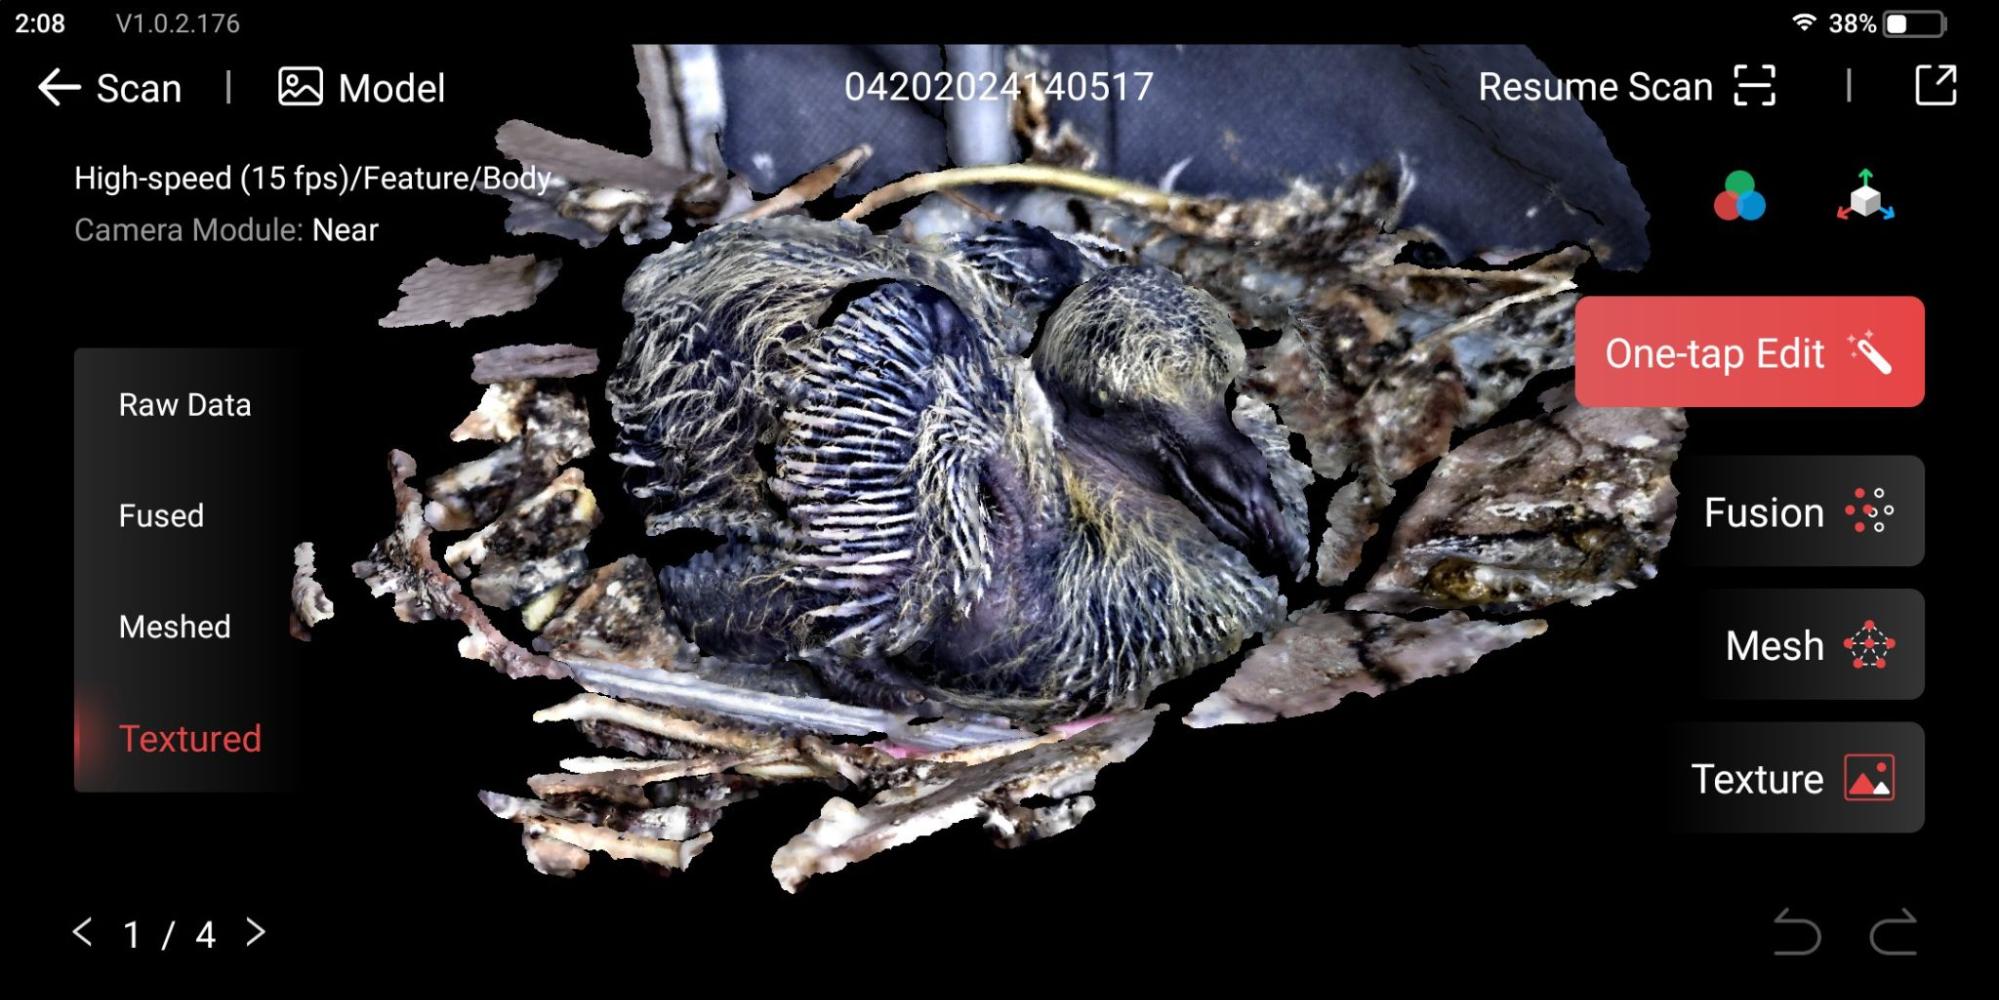
The baby was much more cooperative with the continuous scan, and I was able to get a proper 3D scan from a range of angles.
Here is a static image of the chick using the screenshot feature on the MIRACO:
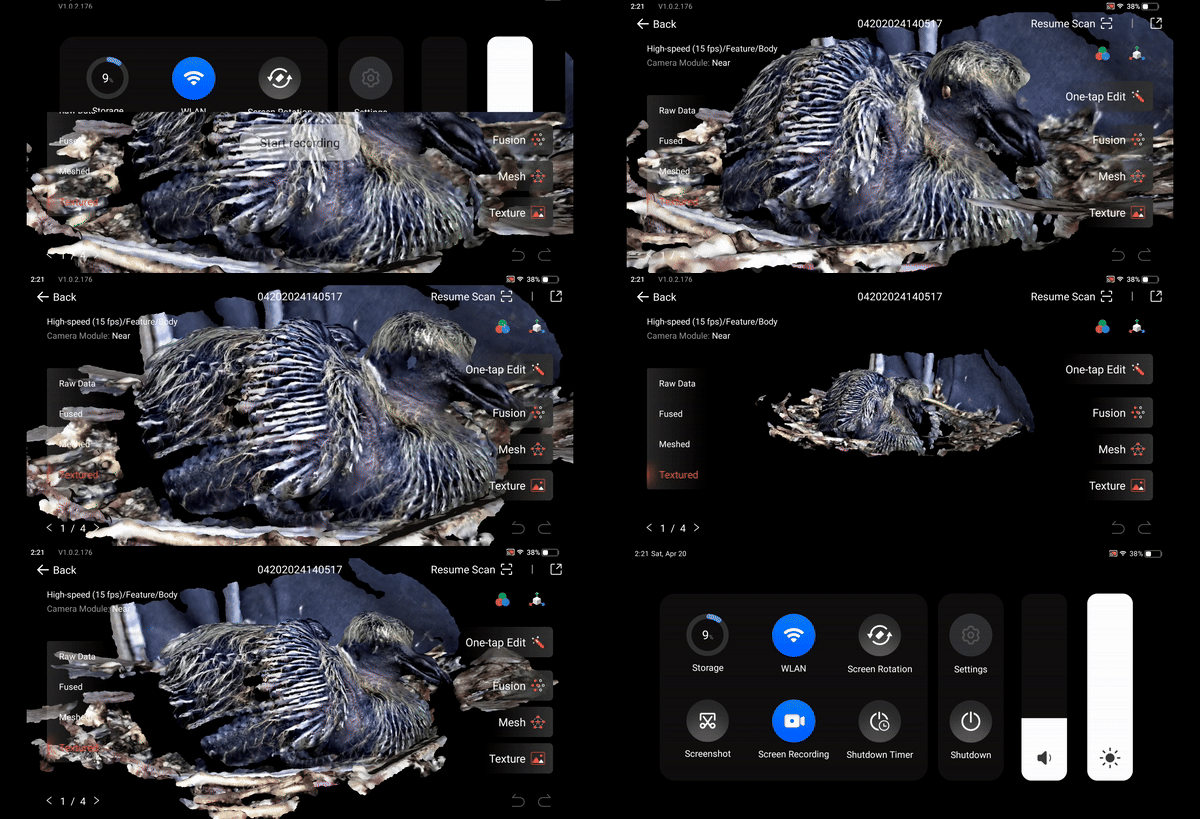
And here you can see the chick from a range of angles, made with continuous scan mode and shown using the screen recording feature. There are some gaps in the scan, as I didn’t want to stress the bird out, so it was a quick scan. But you get the idea; scanning wildlife can be achieved with the MIRACO!
Conclusion
I have only scratched the surface of what the MIRACO can do so far, but hopefully the diverse scanning subjects covered in this article will give you some idea of its capabilities.
Overall, it is a well designed and feature rich 3D scanner, and the Revo Scan 5 software is also pretty excellent.
I have one small gripe, and that is regarding connecting to the laptop for data transfer.
When you connect the USB to the scanner and computer, it auto-detects and gives the option for data transfer mode, or to scan in PC mode (where you can live scan directly to the PC).
However, if you do a soft-disconnect from the UI and leave the data cable plugged into the scanner, there is apparently no way to soft-reconnect in the UI. If you want to go back into data transfer or PC scanning mode, you physically have to disconnect the USB from the scanner, then reconnect the cable for it to auto detect the device. This is annoying, and will eventually cause wear on the USB connector and USB port.
I hope that in a future firmware update, they will fix this by adding a button to the scanner UI which will enable a reconnect without having to remove and reinsert the USB cable.
Obviously, if you are connected via WiFi then this isn’t an issue.
Other than that, it’s a great product, it’s easy to use, and it is an attractive design, aesthetically speaking. It is indeed worthy of that Red Dot Award, and we highly recommend this 3D scanner, especially if you are requiring a bit of mobility or are scanning some large (or tricky) objects.
You can get your hands on a Revopoint Miraco at the link below.
RevoPoint MIRACO
The RevoPoint MIRACO is an award-winning standalone scanner with its own screen, and is well suited for scanning both large and small items. Scan processing and 3D file creation can be done within the scanner itself - there is no need to carry a laptop for scanning jobs.
- - Accuracy: 0.05mm
- - Resolution: 0.02mm
- - Frame rate: 15fps
- - Work distance: 120 ~ 250 mm
- - Single capture range: 100 ~ 1000 mm
- - Dimensions: 200 x 50 x 110 mm
- - Weight: 750g
- - 8K color capture
- - Quad-camera Infrared Structured Light
- - 48 megapixel RGB Camera
