Hands-On Review
Revopoint Trackit 3D Scanner
One of the problems with many “consumer grade” scanners is that they have a tendency to lose tracking very easily. This can result in longer scanning times and frustration in general.
Revopoint is apparently so confident that their recently released system is free from such issues, they have named it as the “Trackit”, just to reiterate that whatever “it” is that is being scanned, will be “tracked” with relative ease.
We got our hands on this funky looking kit, to put it through its paces. Read on to learn more about the “Trackit” and see if this offering from Revopoint is for you.
Why is it Different?
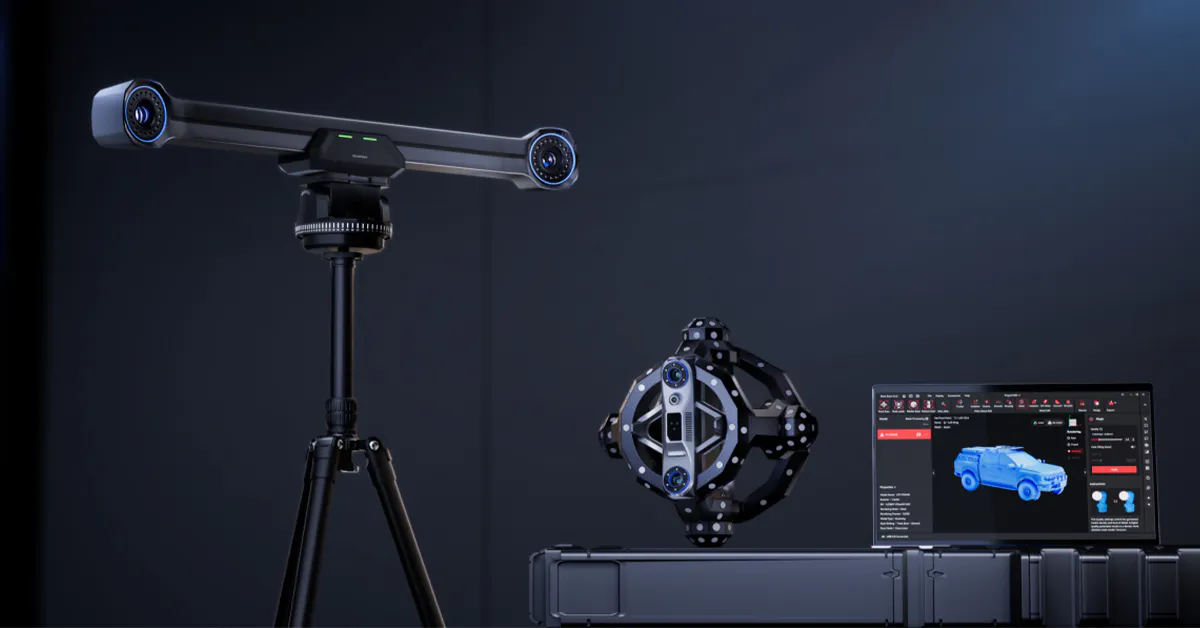
Looking at the image above, you can tell straight away that this isn’t your average consumer-grade 3D scanner. It features this long device that resembles the face of a Hammerhead Shark, and a spaceage-looking, orb-like contraption.
The sharky bit is actually the tracker, and the orb-thing, is the scanner itself. The orb is made of carbon fiber, and is covered in markers.
This dual-component setup is designed for efficient 3D scanning. The tracker module with stereo infrared cameras monitors the marker-covered scanner’s position, allowing for real-time spatial tracking.
This eliminates the need to place markers directly on the object. The scanner captures geometry using structured blue-laser light, while the tracker ensures precise alignment and reduced drift. Benefits include faster setup, simplified workflow, and reliable scanning of complex or reflective surfaces. Because the tracker only needs to see the scanner (not the object) the Trackit enables accurate, markerless scanning even in confined or partially occluded environments.
Now, this concept is not a new one. These types of “outside in” 3D scanners with their external tracking sensors have been around for a while in industrial applications.
They generally retail for over $50,000 USD.
So for the first time, this type of scanner tech is now available to consumers who do not wish to sell a kidney to buy one.
That is the main reason why the Revopoint Trackit is different. Because it’s affordable.
Specifications
So now you know why it’s different (and how it works), let’s take a look at the specs before we crack the box open and look at what is included.
| Category | Specification |
|---|---|
| Scanning Technology | Blue laser (30 cross lines + 1 single line), marker-free with external optical tracker |
| Single-Frame Accuracy | Up to 0.02 mm |
| Point Spacing (Resolution) | Up to 0.05 mm |
| Scan Speed | 1,500,000 points/second |
| Working Distance (Scanner) | 200 – 400 mm |
| Capture Area @ 200 mm | 160 × 70 mm |
| Capture Area @ 400 mm | 320 × 215 mm |
| Output Formats | PLY, OBJ, STL, ASC, 3MF, GLTF, FBX |
| Tracker Working Distance | 1.5 – 4.0 m |
| Tracking Frame (Min / Max) | 1304 × 1067 mm @ 1.5 m / 3260 × 2845 mm @ 4 m |
| Tracking Volume | 11 m³ |
| Volumetric Accuracy (System) | 0.02 mm + 0.04 mm × L (m) |
| Recommended Part Size Range | 0.01 – 6 m |
| Weight (Scanner / Tracker) | 1.2 kg / 2.0 kg |
| Dimensions (Scanner / Tracker) | 295 × 295 × 205 mm / 686 × 106 × 111 mm |
Starting with the top of the table we can see it has two blue laser modes, being 30 cross lines (for fast scanning of larger areas) and a single line mode, for scanning deep holes and other awkward features. You can see both modes at work in the video below.
In terms of accuracy and scanning area, the Trackit delivers a single-frame accuracy of 0.02 mm with point spacing down to 0.05 mm, capturing up to 1.5 million points per second. Its working distance ranges from 200 to 400 mm, with a field of view expanding from 160 × 70 mm at close range to 320 × 215 mm at full reach.
The TrackitTrackit system can handle parts ranging from a few centimetres up to around six metres in size. Its external tracker defines the working volume, capturing a frame of about 1.3 × 1.1 metres at 1.5 metres distance, and expanding to roughly 3.3 × 2.8 metres when moved back to 4 metres, giving an overall tracking volume of 11 cubic metres.
In plain terms, the farther you pull the tracker back, the larger the object you can scan, although the volumetric accuracy follows the formula 0.02 mm + 0.04 mm per metre, meaning bigger scans lose a touch of precision over distance.
This makes it ideal for inspection tasks, reverse engineering, or the capture of larger objects for various digitization needs. It is ideal for detailed automotive tasks of all sizes, ranging from engine components, right up to the full car itself. Although depending on the size of the car and the distance of the tracker, you might need to move the car a bit, scan it in parts, and merge the parts in the software.
PC Requirements
If you have read our previous review for the Revopoint MetroX, you will know that the MetroX had some pretty high PC requirements for a “consumer” grade metrology scanner.
Well, the PC requirements for the Trackit are even higher.
And while there was some flexibility for the MetroX (we know because we tested it), the requirements for the Trackit are fairly rigid. For example, the MetroX requires the minimum of a Corei7 processor and optional GPU. We used a newer generation i5 with no GPU, and it still worked OK.
You won’t get away with such changes with the Trackit however. We purchased a new laptop just to run the Trackit somewhere in between the minimum and recommended requirements.
The official requirements for the Trackit are below.
| Category | Minimum Requirement | Recommended Requirement |
|---|---|---|
| Operating System | Windows 10 / 11 (64-bit) | Windows 10 / 11 (64-bit) |
| Processor (CPU) | Intel Core i7 13th Gen / AMD Ryzen 7 7000 series or above | Intel Core i9 12th Gen or better |
| Memory (RAM) | 32 GB or higher | 64 GB or higher |
| Graphics (GPU) | NVIDIA GeForce RTX 3060 (8 GB VRAM) | NVIDIA GeForce RTX 4060 (8 GB VRAM) or better |
| Storage | SSD recommended | NVMe SSD high-speed storage |
| USB Interface | USB 3.0 port or higher | Multiple USB 3.0/3.1 ports recommended |
| Other | Stable power supply, dedicated GPU drivers up to date | Same as minimum + high-performance cooling and dual monitor setup recommended |
We used a 2024 Asus TUF Gaming laptop, with 13th gen Core i7, RTX 4060 (8gb) and we upgraded it with 64gb of RAM, just to be sure.
We can safely say that this setup is more than adequate for the Trackit, and scanning was as smooth as butter. More on that later.
Three Ways to Scan
The Revopoint Trackit allows for three ways of scanning objects within the Revo Track software.
Track Scan
The first mode is Track Scan, and makes use of the big tracking module. This uses the blue laser light modes, and is for precision scanning of both large and small objects.
In Track Scan mode, the part to be scanned is positioned between the tracker and the scanner. In this mode, the tracker must be kept stationary, and there must be a line of sight between both of the tracker’s “eyes” and the moving scanner.
Multi Position Scan
Multiposition Scan Mode lets you scan the large objects from different angles or orientations by repositioning the tracker, then automatically align and merge the partial scans into a single complete 3D model.
Marker Scan
The third and final scanning method is the more traditional way of scanning, and is basically the standalone mode, using the scanner without the separate tracker.
This is ideal for smaller objects, and as you can guess from the name, requires the use of markers.
Testing The Trackit
Before scanning with the Trackit, both the scanner and tracker need to be calibrated, by use of the tripods, gimbals and calibration plate. It’s a fairly laborious task, and we don’t have the space to go into details on how it all works here. But you can see this video from the company for an idea of how calibration works.
After calibrating the Trackit (not easy due to the extreme temperatures in this part of the world), it was time to put the Trackit through its paces.
I set up the tracker, and put a raised plywood platform in front of it, where I would place the items to be scanned.
Test 1 – Impromptu Cat Scan (Tracking Scan / Cross Lasers)
Before getting into a properly accurate scanning session, I decided to just scan some random objects to see how well the tracking system worked.
In previous reviews, I have mentioned how difficult it is to scan live animals, due to their lack of cooperation, and due to the difficulty of carrying hardware to a sleeping animal without waking it.
I had no such issues this time, as my cat randomly flopped onto my scanning platform and refused to move, while I was looking for something to scan.
I assumed this was her way of volunteering, so I quietly grabbed the Trackit and launched a scan in Track Scan mode (with blue crossed lasers).
OK so it wasn’t a proper test, and I only scanned half my cat (I didn’t want blue laser light going in her face). But one thing that was immediately noticeable was how smooth the scanning process was.
Keeping one eye on my laptop to see how quickly the data was being captured, I could see the point cloud turning green very quickly, indicating that the scan was good quality. It took just ten seconds to scan half of the cat.
After my first quick impromptu test, I removed the unwanted guest from the scanning table, and found something more appropriate to scan.
Test 2 – Large Fan (Tracking Scan / Cross Lasers)
With the cat removed, I put a 16 inch floor fan on the platform. I figured this would be a good test, as it is matte black plastic, and has some interesting geometry (lots of gaps in the fan housing). It’s also quite a large item.
I began the scan, and was quite surprised at how fast it was to capture large areas in a coarse first pass. I managed to get a significant part of the main geometry in under a couple of minutes.
I paused the scan using the play/pause button on the scanner unit, and went to check out the scan on the laptop. It was clear that there was quite a lot missing from the scan, despite the quick first pass, so I unpaused the scanner, and resumed, attempting to get all of the surfaces and angles that I had previously missed.
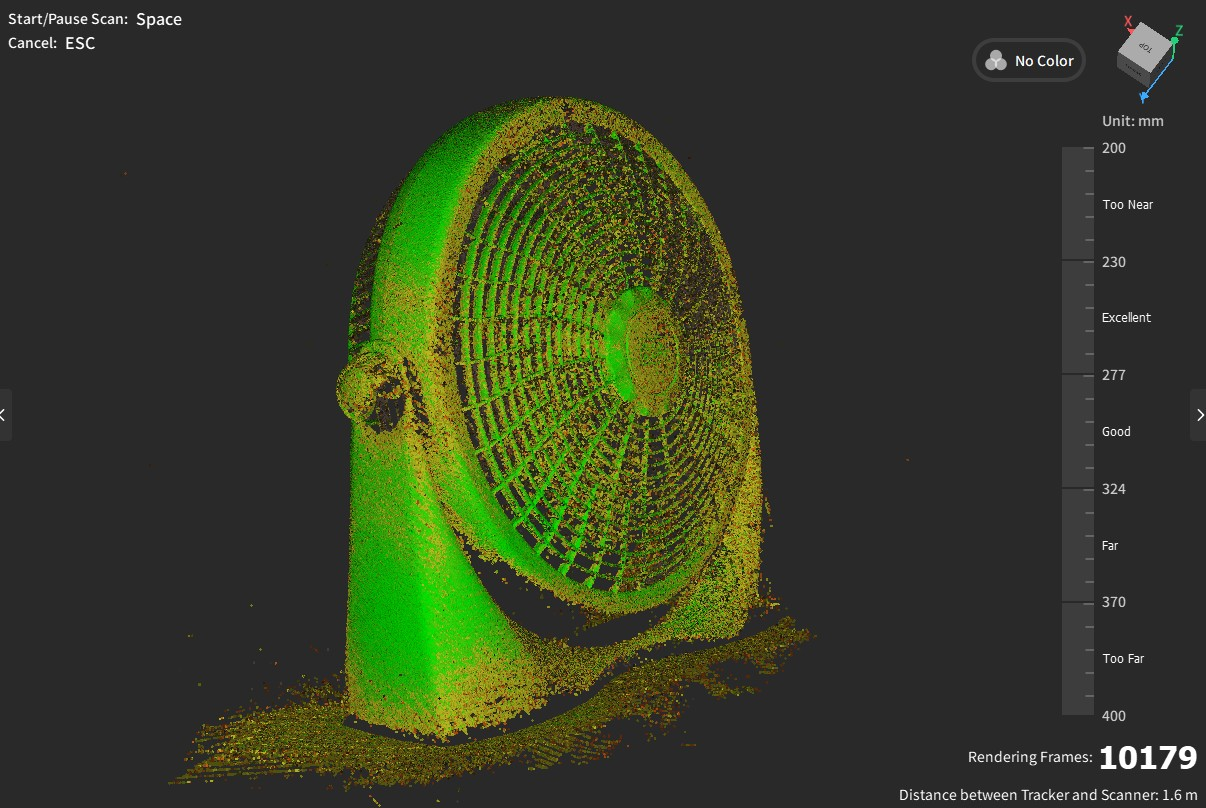
This was a good exercise in how to maintain the tracking, as the tracker flashes two big red lights whenever the tracking drops. Usually in Revoscan software, you have to stare at the computer screen and wait for the “tracking lost” message to appear.
This message still appears in this version of Revo Track, but the big lights on the tracker really help a lot, especially if your eyesight isn’t happy with squinting at a laptop screen. If the tracker lights are green, then the tracker can “see” the scanner”. If it’s red, you just have to move it back into the line of sight.
I spent another 10 minutes scanning the fan, just to carry on getting a feel for it and seeing what it could do. The first raw scan was not perfect, but this was due to the position of the platform which didn’t give me much space to move around behind with the scanner. There are also some bits at the lower rear that were obscuring the line of sight between the tracker and scanner, so they weren’t captured.
After watching some videos from Revopoint, I have learned that it is better to face the thinnest side of an object towards the tracker first, so it causes less of an obstruction when scanning the rearmost areas furthest from the tracker.
Overall, for a second attempt at scanning with the Trackit, I was very pleased with the results (especially the fan grille), and had learned a few tricks to ensure future scans would be better.
Test 3 – Cat Feeder (Tracking Scan / Cross Lasers)
Having got a feed for the scanner and point cloud generation, it was time to attempt a scan and turn it into a mesh. For this test, I used an automatic cat feeder. It had good geometry and didn’t need any spray as it has a mostly matte black finish.
During this test, I started experimenting with the Target Point Distance. By default it is set to 0.2mm At this value, the scan can often require multiple passes in order to get the point cloud to turn green (indicating a good scan). However, cranking that distance to between 0.8mm and 1.2mm really speeds things up. At this setting, I found that I could capture larger areas with one or two passes. For an object this size and this level of detail, it was perfectly fine.
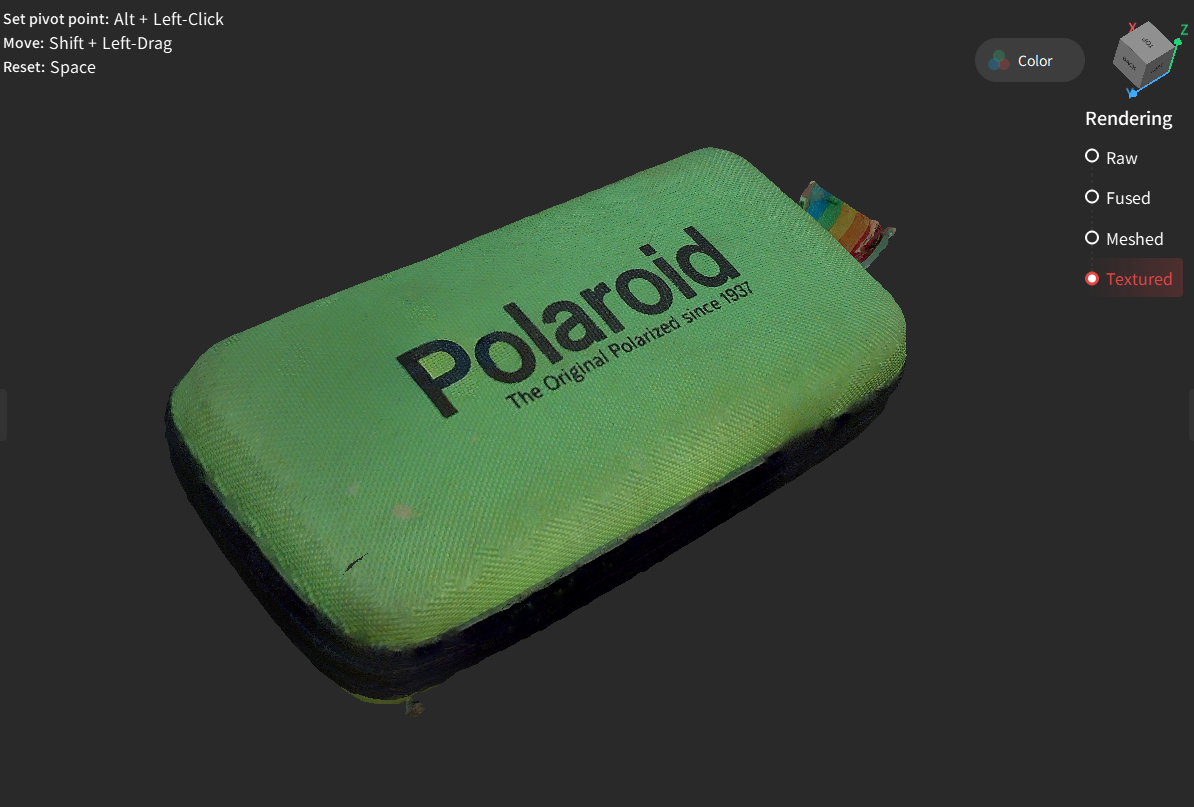
Test 4 – Glasses Case (Color Scan / Tracking Scan / Cross Lasers)
When the Trackit was first released, color scanning mode had not yet been enabled. The color scanning update was made available via a firmware update in September.
Once the update was complete, I tested a few different objects to see how well it works compared to the MetroX.
First up was a small glasses case. I wanted to test a smaller object first just to get a hang of it before moving onto something bigger.
Color scanning works like this:
First, you scan the object in regular scanning mode to obtain the point cloud.
When you are happy with the point cloud, then you activate color (texture) scanning in the software, and you use the scanner to take “photos” from various angles around the object.
It is important not to move the object between taking the point cloud and capturing the textures. Both the point cloud and textures are located with regards to the tracker information, so both datasets have to match in terms of coordinates. Moving the object after you scan it and before you take the textures will result in a blurred, messy texture.
Once the point cloud and texture data is captured, simply process the point cloud (fusion and mesh) and then click the texture button in the software. It will then apply your texture to the cleaned mesh.
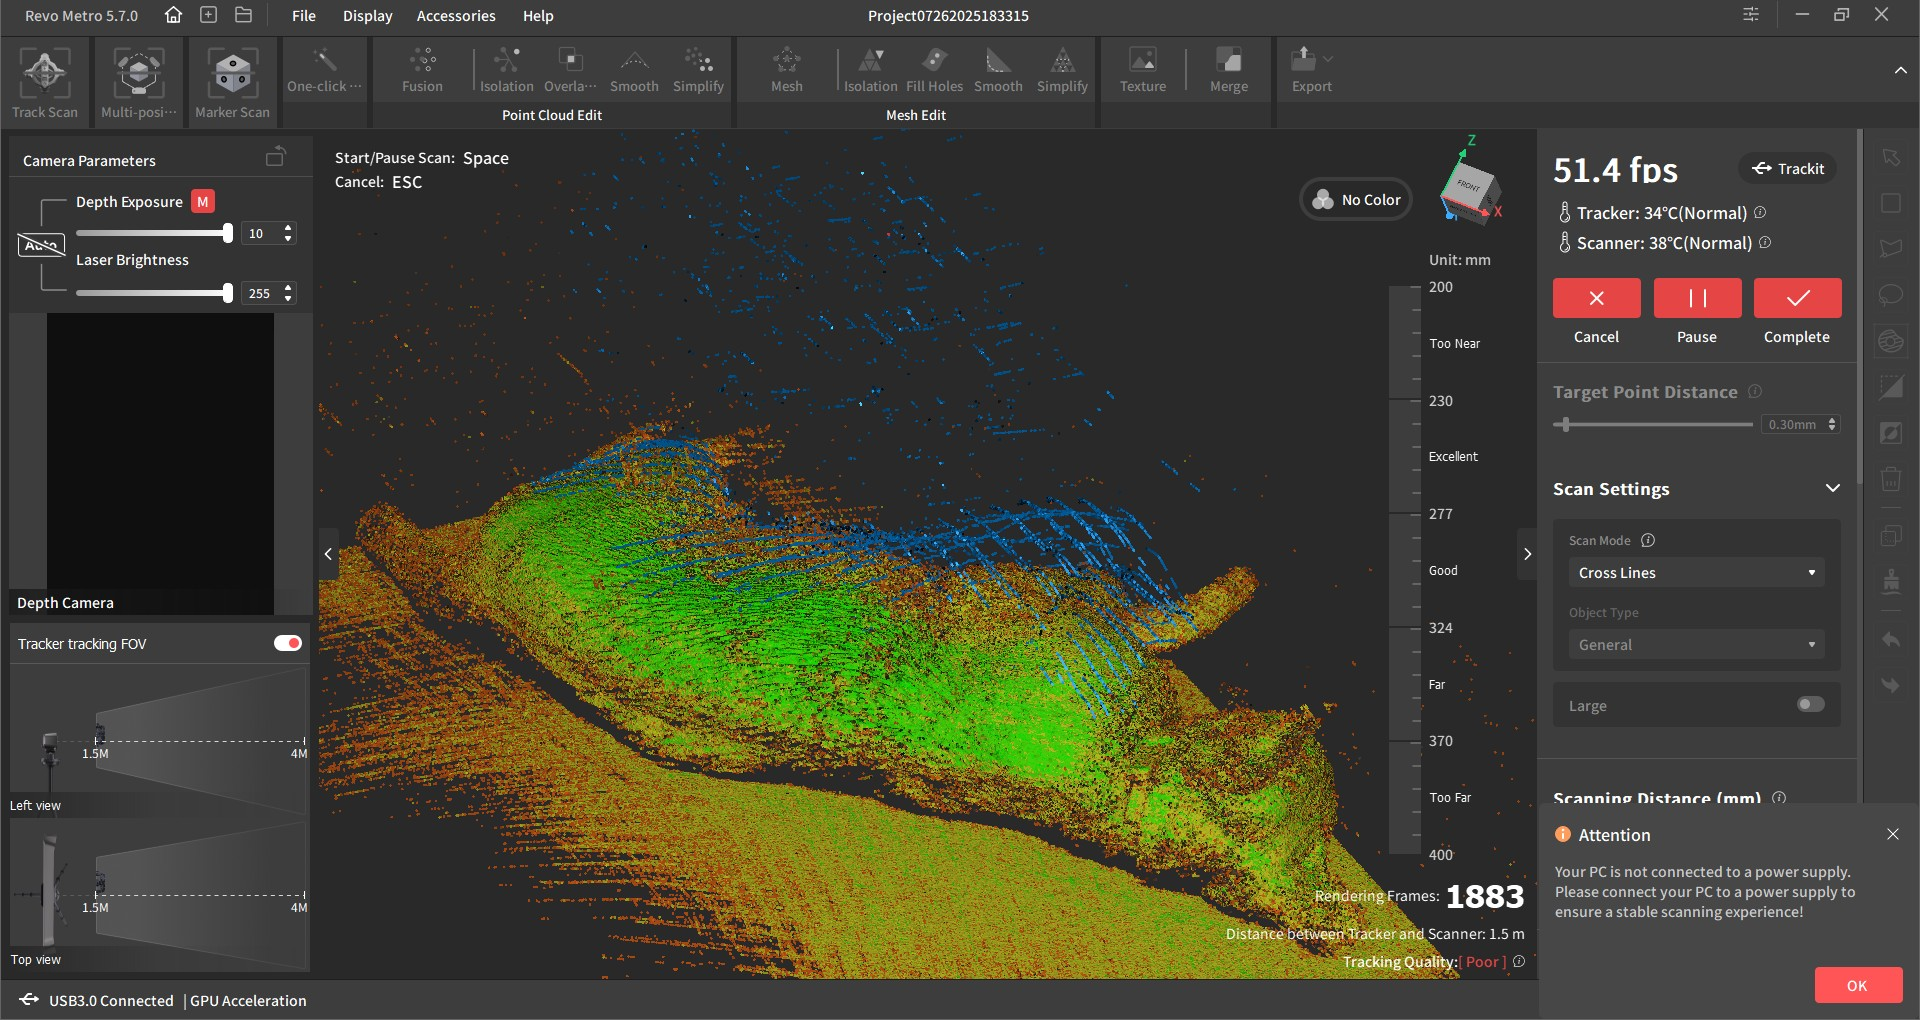
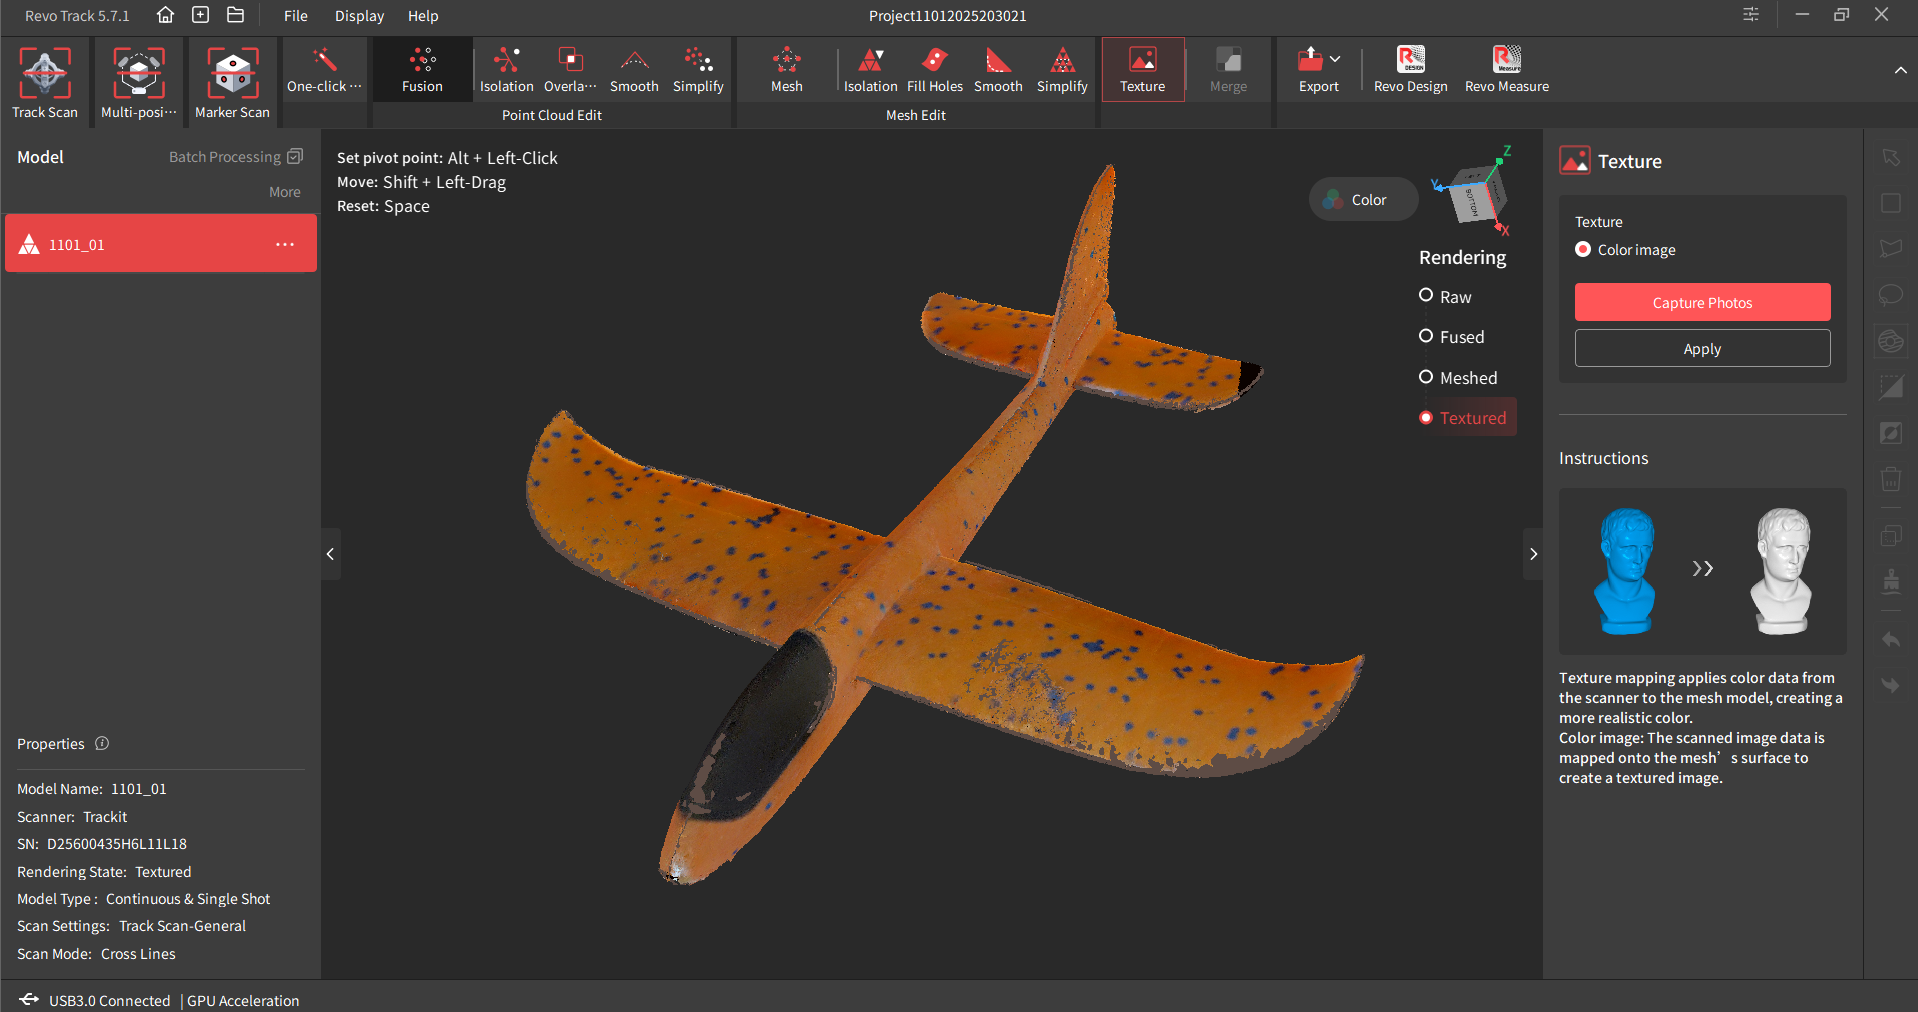
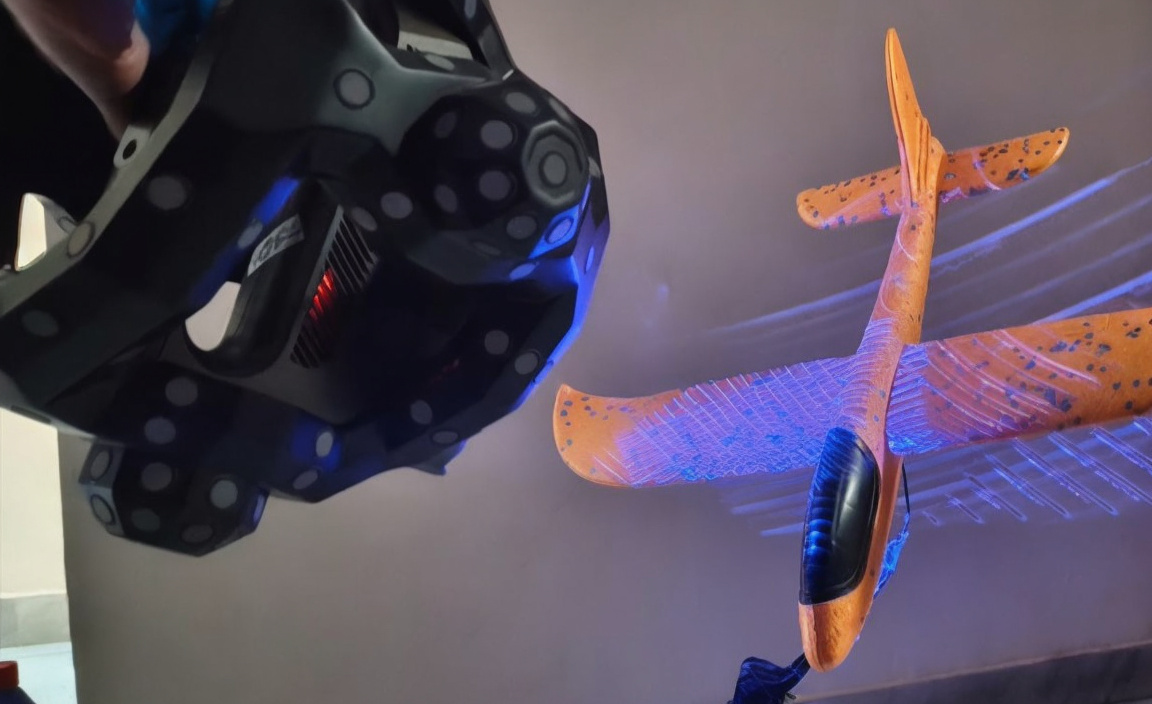
Test 5 – Foam Glider (Color scan / Tracking Scan / Cross Lasers + Single Laser)
Reviewing scanners as I do, I often run out of suitable things to scan.
For this test, I purchased a colorful foam glider with a wingspan of around 60cm. I figured that the foam would be easy to scan, and it would be a good color test of a larger object. The glider also has a cockpit canopy made of black plastic, which is somewhere between shiny and matte. So the addition of this black mildly reflective component would be a good test to see if a spray was needed.
The first scan was performed with the cross lasers, with the foam glider impaled on a wire coat hanger (for easy scanning access from all angles).
Generally, the larger surfaces scanned with no issue, but as you can see in the picture below, there were some gaps on the wings’ leading edge. I tried rotating the scanner so the center of both of the sensors were collinear with the leading edge, but to no avail.
This seemed like a good opportunity to test single line laser mode. Single laser mode is best for scanning deep holes, or features that the cross laser mode might struggle with. It takes a lot longer to scan with the single laser mode (naturally) but it seems to produce a lot less noise in the scan. After some minutes going back and forth over the wing leading edge, it seemed to do the trick.
The nice thing about the two different laser modes is that you can pause the scan, switch mode mid-scan, then resume in the other mode, so you can combine modes in a single scan.
The image below shows a previous attempt at adding textures to the glider.
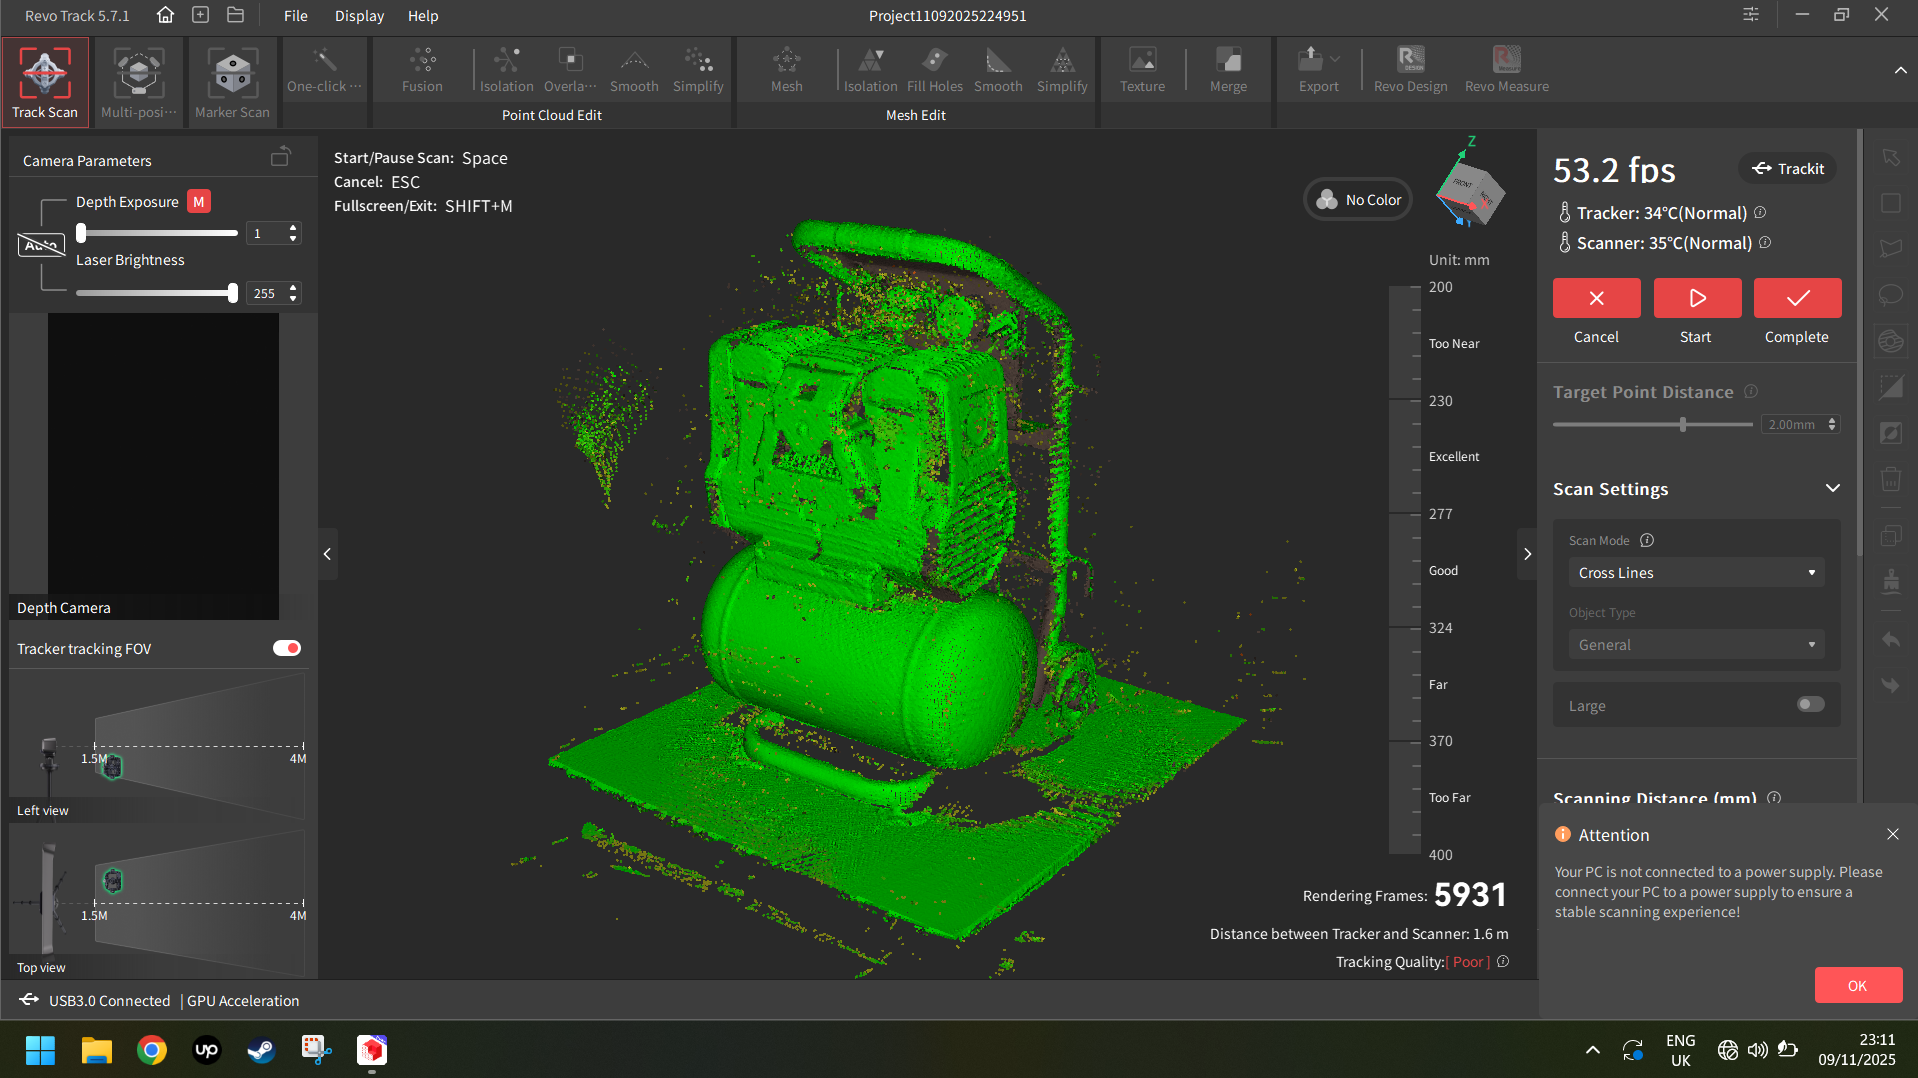
Test 6 – Air Compressor Speed Run (Tracking Scan / Cross Lasers)
The air compressor was the final test, building on everything learned from the prior tests.
I chose this object, because I have used it in scanner tests before, so it would serve as a good benchmark in terms of scanning time. This is the speed run!
With previous consumer grade scanners, this item took around 20 to 25 minutes to get a good scan using feature mode (without markers). This is because the previous scanners would often lose tracking.
So how long did it take with the Trackit? A ridiculously short time, that’s how long.
I was able to produce a reasonable quality point cloud in just 5 minutes. You can see the raw scan in the image below. There was a bit of noise floating around because it was a speed run and I was moving quickly. But this was easily fixed with the editing tools in the software.
You can see how quickly the Trackit was able to scan the compressor in the video below.
You will notice a few gaps in the scan. These gaps were unavoidable as some of the compressor hardware obstructed other parts of the compressor and I could not access those parts with the laser. But still, 5 minutes to get this scan without any markers is fairly impressive.
With the final test complete, let’s take a look at what the overall experience of the Trackit was like, and reach some kind of conclusion.
Things That We Love About The Revopoint Trackit
During our review of the Revopoint MetroX scanner, there were a couple of suggestions that we said might improve the overall experience.
It seems for whatever reason, Revopoint has actually implemented a couple of them.
Long Cables
The data cable on the MetroX was fairly tiny, which could be problematic if you were using a desktop PC. This is not the case with the Trackit – the cables here are HUGE. Like several meters long (check how long later). They are now so long, I didn’t even need to worry about buying a new extension cord, as I could plug the power into the kitchen outlet, setup the scanner in the living room, and have plenty of room to move about. So yay! That’s a win!
Revo Measure
Another minor gripe we made in the MetroX review was regarding the lack of measurement software included with the MetroX. Sure, you could scan things nicely, but if you actually wanted to know the distance between two points, you would have to spend potentially a lot of cash on some inspection software, or end up using some freeware that looks like it was designed in MS DOS.
Well, Revopoint fixed this too, and now you can get the Revo Measure software, Support point cloud and mesh to CAD comparisons, and provide measurement, parameter extraction,
volume measurement, GD&T analysis, etc.
Things That Could be Improved on the Revopoint Trackit
We like to be fair and balanced here. While the Trackit is reasonably priced for a device of this kind, it’s still a fair old chunk of change to drop on a piece of equipment.
So for you (the consumer) to get both sides of the story and make an informed choice about your purchase, we will share both the rough and the smooth.
To that end, here are a few things we think could be improved.
Color Mode
For certain parts, there is no way to create a texture that fully wraps around all sides of the part in Track Scan mode. For example, with the cat feeder test, I was able to make a color texture of the top, front, back, left and right sides, but if I wanted to scan and texture the bottom face (requiring a merge of scans) then this seems to be impossible for now.
If you want to scan an item from each side, then for the moment, the only way seems to be to place the item to be scanned on a thin pole (like the glider scan). This allows you to create a texture from all sides without needing to merge a multi part scan.
USB-C Computer Cable
The cables connecting the scanner to the tracker and calibration pole are all chunky and robust connectors, with screws to fasten them securely to the respective pieces of hardware.
The cable from the tracker to the laptop, however, is anchored in place to the tracker with the aforementioned screws, but terminates on the laptop side with a flimsy USB-C connector.
Given that the cables have a potential to be dragged across the floor, you’d think that something a little more secure would have been selected as the connector. With a gentle force caused by moving the heavy cables around, it is very easy to pull the USB-C connector out of the laptop.
It is such a strange design choice to use a tiny USB-C connector, given that the connection between the scanner and computer is so critical to operating the device. Even a USB-A would have provided some more grip.
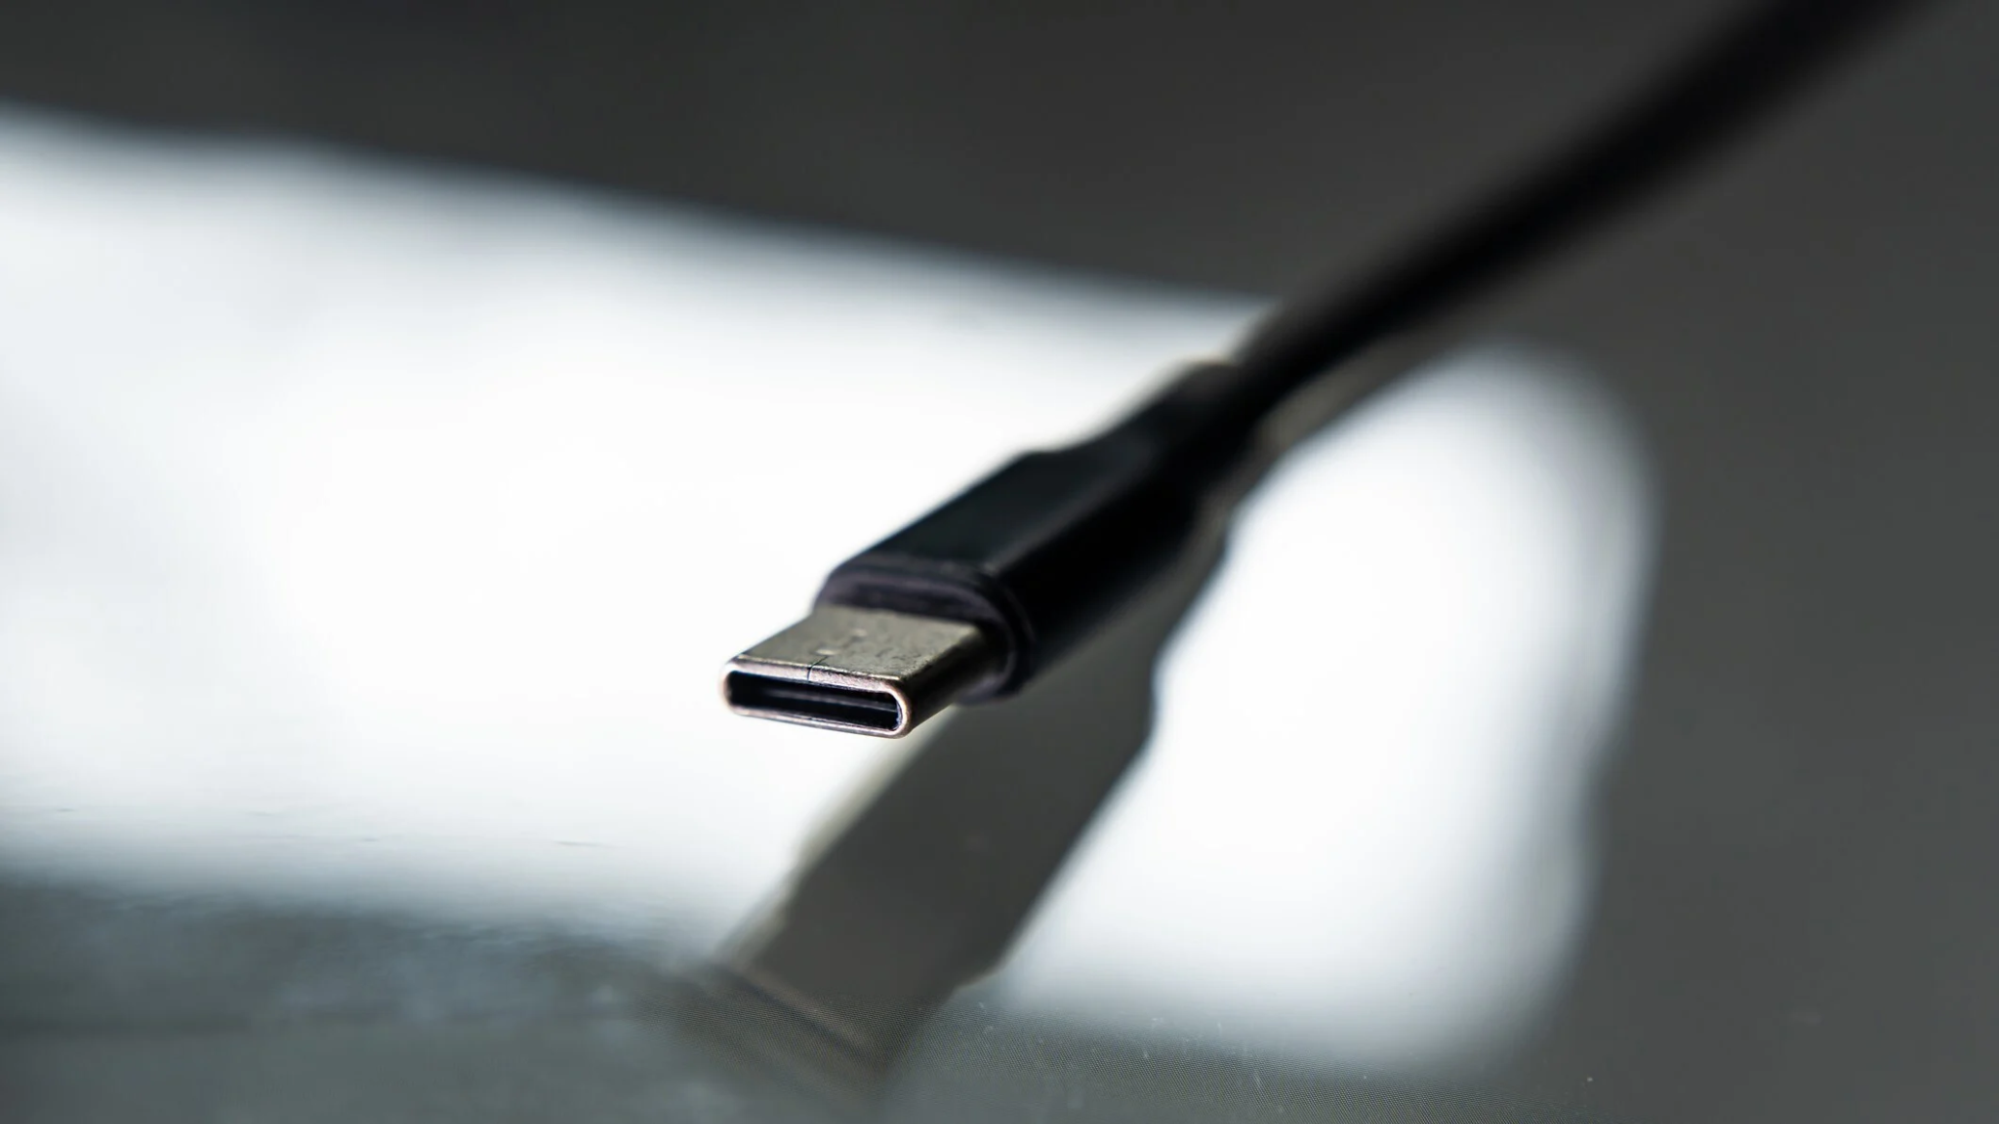
I hope they release some other solution further down the line. For now, if you don’t want your scanner cable popping out of the computer while scanning, I would recommend using a USB-C 3.0 hub with a longer cable, and possibly fastening the scanner cable to that hub with tape, or some other means.
Calibration
The scanner must be calibrated, and the tracker itself must be calibrated, at various distances from the calibration pole. Also, the calibration takes place at a certain temperature too. Both the scanner and tracker must be at a certain temperature. Luckily, the tracker features internal heating, so it will slowly (very slowly) raise its own temperature to match that of the scanner.
If you’re in a temperature-regulated lab or workshop, or in a part of the world that isn’t suffering from extremes of weather, this isn’t an issue.
But if you live in the desert like I do, on the top floor of an apartment block where all the heat from the floors rise up to my own unit, then this part can be tricky.
Documentation
The documentation for the Trackit is not especially detailed. In particular, there is no reference to color scanning, or how to do it.
Is it possible to scan a larger object in parts, then merge them with the textures intact?
How many photos are needed and how much overlap (if any) is needed to make a good texture?
We have no idea. We had to guess. Putting this information in the manual would make life a lot easier.
Conclusion
So, we have reached the end, and you are probably asking if you should invest in a Revopoint Trackit.
This depends on your budget and needs.
As mentioned, systems like this typically cost tens of thousands of dollars, so to be able to buy one and get some of those capabilities at this price point is pretty tempting.
And what it is, is a very fast scanner that is capable of scanning objects large and small, without the headache of adding markers all over the place. Seriously, adding markers is a chore, especially when you add all the markers, set your scanner up, only to be told you have to add even more markers once you start scanning. This is common among the cheaper scanners.
And if you are running a business, and paying someone a decent hourly wage to faff around placing and removing markers all day, then this wasted time is going to affect your bottom line.
And compared to cheaper scanners, when you consider the rapid scanning and decent scanning area of the Trackit, this all contributes to reducing time and saving cash.
Who is the Trackit For?
So with those things in mind, I would recommend the Revopoint Trackit to those running small businesses who want to improve their bottom line with efficient scanning. If the main element of your business involves scanning things 8 hours a day, the Trackit will pay for itself in terms of recovered time after just a couple of months. It’s a good business investment, as long as you are fine with the 0.02 mm single frame accuracy. And for most large scans, this is totally fine.
Would we recommend it for hobbyist use?
If you’re a hobbyist with disposable income to drop on such things, then why not.
I cannot think of another scanner in this price range that will scan larger objects as quickly right now, so if you can find a use for the Trackit, then go for it.
Sure, the Trackit has a few idiosyncrasies and things that could be improved (as listed above) but these things aren’t the end of the world. And we expect a few of these issues will be fixed in firmware updates, or by adding new features, and hopefully more complete documentation in the future.
Anecdotally, this scanner really annoyed the heck out of me when I first started using it. But as with most scanners, they have a bit of a learning curve. And once I had figured out the knack of scanning things, I was won over by the Trackit. So much so, I am quite enamoured with it now, and I am not looking forward to going back to my old scanners with their cumbersome markers and whatnot.
So yeah, give the Trackit a try. Compared to traditional type scanners, this is quite a beast, and offers a lot of bang for its (very reasonable) buck.