Before any part gets 3D printed, it must first be designed. Designing 3D models is done in CAD/CAM software, and when designing a part, it’s important to consider the limitations of the 3D printing technology that will be used to produce the part. While it’s generally true that 3D printing can fabricate any geometry, it’s also true that most geometries can be optimized for more efficient printing. Let’s examine how.
Filament 3D Printing
Although FDM / FFF 3D printing is still the most accessible form of 3D printing, it does, however, have more design limitations than most of the other 3D printing technologies. The most important considerations are bed adhesion, overhangs, thin features, and layer bonding.
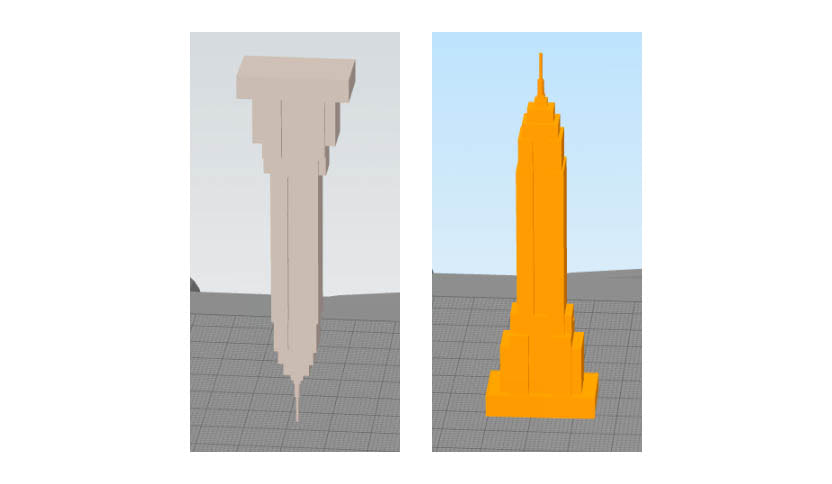
FDM prints rely on bed adhesion to hold the objects in place while they’re being printed. The hotend nozzle applies a bit of lateral force onto the object when it’s laying down plastic on top of it and if there’s poor bed adhesion, the object can fall over or slide around, resulting in a failed print. Good bed adhesion is achieved with a flat bottom side that has a good amount of surface area. Let’s say we want to print a model of the Empire State Building; if we orient it upright, we have a nice flat bottom on the bed, whereas if we flip it upside down, it’ll have only a fine tip to stick to the bed and will surely fall over.
Images that are greyed-out are examples of what not to do.
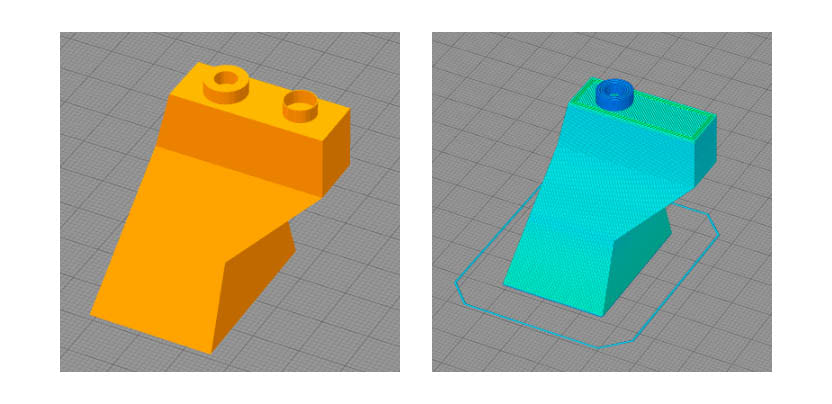
Layer bonding is important to keep in mind because it helps us orient and design models to make them as strong as possible. The Z axis will be the weakest axis for FDM prints as that’s where the layers bond. FDM prints are strongest in the X and Y axes as continuous strands of material are deposited in those directions. Sometimes a part can be oriented to increase strength, but doing so may require using support structures on overhangs, and vice versa. So it’s important to think about orientation when designing parts that need to be strong. The bracket below will be much stronger if it’s printed laying flat rather than standing up.

If an object doesn’t have any flat sides (like most organic shapes and the one pictured below), support pillars can be used to connect the object to the bed and hold it in place. Alternatively, organic/irregular models can be cut in half to create two objects that each have a flat base; the two pieces are then assembled after printing. Some users prefer having a single seam over having to deal with support material, a source of waste and imperfect surface finishes. Large, flat parts are more prone to warp so if they don’t have flat bottoms, it’s usually a good idea to cut them to create flat surfaces.

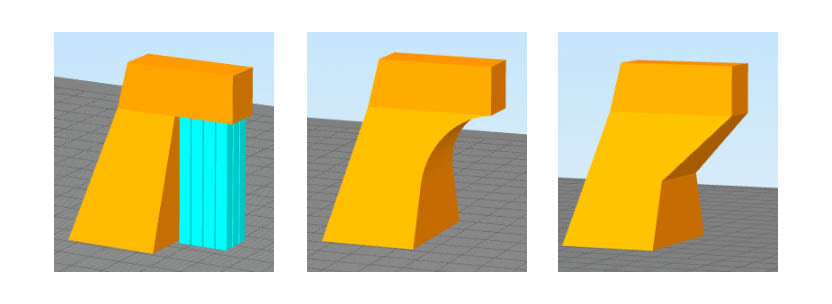
Overhangs refer to angles that are steeper than ~50° as each layer of deposited material is held up by the previous layer. Overhangs can be eliminated with the use of filets and chamfers (gussets). The part below could be printed with the 90° overhang using support material or the model could be optimized with a filet or chamfer to remove the overhang.
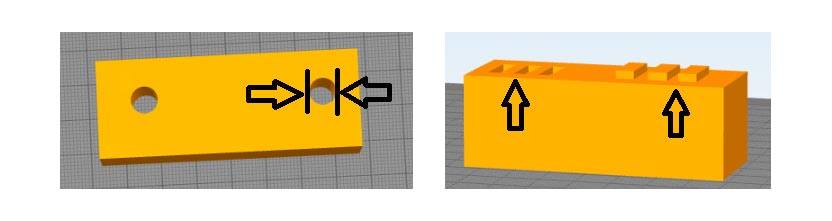
Thin features refers to features that are too thin for the hardware of the printer to fabricate. If an object has a wall that’s 0.2mm wide and the nozzle diameter of the printer is 0.4mm, then the printer can’t produce that wall. The slicing software won’t even generate the toolpath, as seen below. The limits of thin features vary by printing technology and material.
Tips
- Good bed adhesion is achieved with a flat bottom side that has a good amount of surface area.
- If an object doesn’t have any flat sides, support pillars can be used to connect the object to the bed and hold it in place.
- Some models can be cut in half to create two objects that each have a flat base; the two pieces are then assembled after printing.
- Overhangs can be eliminated with the use of filets and chamfers (gussets)
- Think about orientation & print direction when designing parts that need to be strong.
Resin 3D Printing
Designing for resin-based 3D printing methods like DLP and SLA is a bit less constrained, though there are a couple limitations. One issue is the warping of thin or unsupported walls so adding ribs or end caps to narrow walls can make a big difference.

Another concern is the separation of large flat layers that can get stuck to the bottom of the vat after curing. This problem is usually avoided by orienting objects at an angle, which does come with the unfortunate side effect of requiring support structures but that’s the standard practice with SLA/DLP printing. Fortunately, these prints are isotropic, meaning their mechanical properties are the same for every axis so printing them at an angle doesn’t hurt their strength like it does with FDM prints.

Generally, SLA/DLP prints are solid. To save material and make parts lighter, prints can be made hollow. If you go this route, a drain hole must be added, otherwise uncured resin will be trapped inside the object; pressure imbalances caused by the trapped resin will cause prints to crack and break.
Tips
- Add ribs or end caps to narrow walls.
- Position objects at an angle.
- If you print a hollow part, add a drain.
Powder Bed 3D Printing
SLS
Some of the same guidelines for SLA/DLP are used here, such as supported and ribbed walls as well as the inclusion of escape holes.

SLS is one of the most geometry-agnostic 3D printing technologies because objects are supported by the bed of unsintered powder, meaning overhangs can be printed without support structures.
Tips
- Holes should be at least 1.5mm in diameter.
- Embossed and engraved details shouldn’t go below 1mm.
MJF
Nearly all the same design guidelines of SLS apply here. Parts can be made hollow and even have internal lattice structures but escape holes are necessary.
Tips
- Large flat planes should be avoided as they will usually warp.
- Holes should be at least 1.5mm for slim parts and 5mm for longer holes.
- While walls as thin as 0.3mm are possible, it’s recommended to keep walls no thinner than 1mm.
- Moving parts need a gap of 0.7mm and sharp corners will be less brittle if a 0.25 mm radius is added.
Follow these design guidelines and you’ll save yourself some time, material, and frustration. Contact us for more specific guidance on your 3D printing project.