The surface quality of FDM (fused deposition modeling) 3D prints has improved drastically in the last few years, mostly thanks to improved slicing software that extrudes / retracts more consistently and machine firmware that better handles acceleration. It’s also easier than ever to find high-quality, affordable filament that’s free of impurities and has only minor deviations in diameter. All of that leads to smoother walls on prints. Still, there’s no way around those pesky layer lines on every part. Or is there?
Is 3D Printing Actually 2.5D Printing?
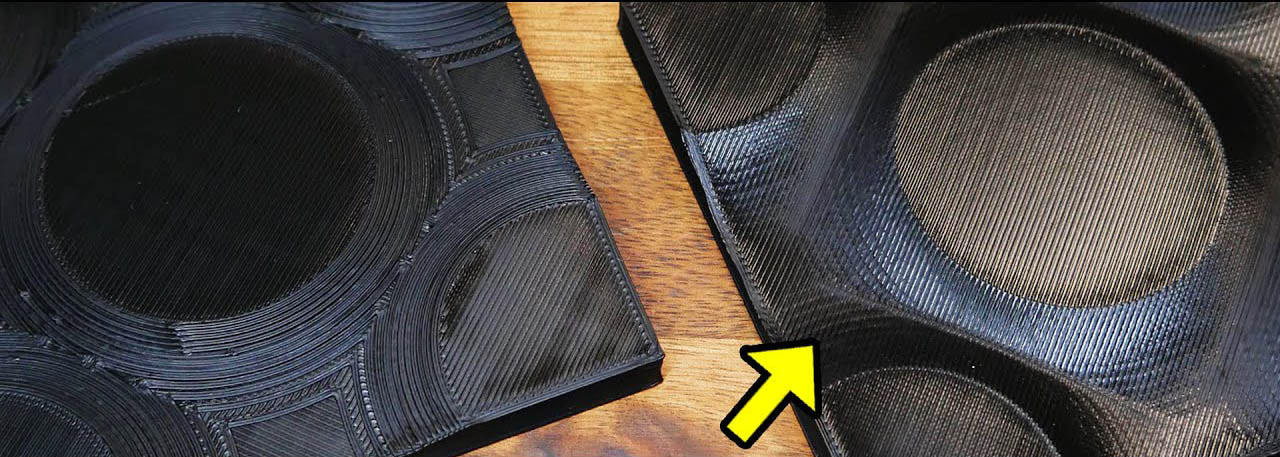
Michael Laws of the Youtube channel Teaching Tech recently released a video demonstrating non-planar 3D printing on a desktop 3D printer, or what he calls “true 3D printing.” He points out that, technically, all desktop printers use only 2.5 dimensions to make objects, even though they can move in three dimensions. That’s because anytime there’s Z motion, there’s no X or Y motion; if there’s X and Y motion, there’s no Z motion. 3D printed objects are just many planar layers stacked on top of each other and the Z axis is only used to move up to the next plane. This leads to the infamous layer lines on the walls of parts as well as the stair-step effect that becomes more noticeable on objects that have shallow angles and contours on the top.
How to Achieve Non-Planar 3D Printing With Your 3D Printer at Home
If the printer could be told to follow those contours with the extruder, both of those problems go away. So Michael dove in deep to make his printer function that way, real deep. Daniel Ahlers of the University of Hamburg did a Masters Thesis on non-planar 3D printing and provided a custom version of Slic3r on GitHub; unfortunately, it needed to be run on a Linux machine, which Michael did not have. After a few hours of installing a virtual Linux machine on his Windows computer and copy/pasting hundreds of lines of code to build the Slic3r, he was finally able to start non-planar 3D printer. Well, not quite. He still had to modify the toolhead of his 3D printer to ensure no cooling shrouds or probes were near the hotend nozzle, otherwise they could collide with the printed part. I tell you all this so you understand why this feature isn’t already available as an option in all slicing software and probably won’t be any time soon.
It was a long journey but Michael finally achieved non-planar 3D printing and, oh boy, is it cool! The surface quality goes through the roof. Even geometry is improved as he printed a wing to show off how aerodynamics change with non-planar printing. While he didn’t test this, parts printed this way would also be stronger because they have material that’s crossing the Z plane, the weakest dimension of FDM printed objects due to the layered effect.
There are, however, several limitations to non-planar 3D printing. For one, the 3D printed object can’t have valleys that are deeper than the nozzle length or angles that are steeper than the nozzle clearance or the nozzle will collide with the object. This is the biggest issue because it means that commercial non-planar 3D printing will likely only come about in a 3D printer that has been specifically engineered for the task. Slicing software distributors can’t account for all the different shapes of hotends to build this feature into the software alone. Part cooling is another issue as cooling shrouds have to be moved to allow for clearance, though that’s an easier problem to solve. Finally, as Kerry Stevenson over at Fabbaloo notes, Autodesk may have patented non-planar 3D printing in 2015, meaning these individual efforts to harness the technology may soon be squashed.


