3D Printing
News Videos Newsletter Contact us
Home / How to / Post-processing 3D printed Objects with DIY Ultrasonic Vapor Polisher
revopoint

Post-processing 3D printed Objects with DIY Ultrasonic Vapor Polisher

May 16, 2015

Vapor polishing is a process when you apply vapors of a solvent to a 3D printed object to increase surface quality or smoothness. You basically polish out visible layering and small imperfections by gently dissolving them in solvent vapors. Here is a list of some solvents that can be used to polish different 3D printing filaments and materials:

  • ABS: Acetone
  • Acrylic: Most Solvents
  • PLA: MEK or ‘MEK Substitute’
  • PVA: Water
  • PVC: Most Solvents

Since Acetone is widely available it is often used to polish ABS parts with this procedure:

Vapor polishing methods were very rough and improvised until the Ultrasonic Vapor Polisher was developed and published on Instructables by a user named “Michael“.

It is made with simple parts like a glass jar, an empty metal paint can, an aquarium air pump and some rescued components from a household ultrasonic humidifier.

Instead of heating to produce dangerous vapors or dipping the object in cold solvent, it uses vibrations to produce a fine solvent mist in a sealed container.

Here is his project description from the Instructables page:

The current vapor polishing methods and their drawbacks include:

  • Hot treat via boiling solvent in a crock pot or similar chamber (Potentially dangerous and very hands-on process)
  • Cold treat via slow release of solvent from paper towels in an enclosed container (Very time consuming, can’t observe parts during this process.)
  • Spray canned solvent aerosol onto part. (Inconsistent surface finish, must be done outside)
  • Dipping parts directly into liquid solvents (Unpredictable/inconsistent finish, Likely over exposure of part)

All I wanted is a machine that lets me quickly drop parts into a transparent container and be able to press ‘go’ and have the machine produce a predictable finish on its own. I do not want to have to put together a really involved setup that may be a fire hazard, fume hazard, or something that produces unpredictable surface finishes. Essentially I want something as convenient as a microwave. I’m also forgetful so I don’t want my parts to be destroyed if I forget that I left them in the machine.
The Ultrasonic Misting 3D Vapor Polisher is the solution to all of these problems.
This key component of this machine comes from ultrasonic humidifier, which uses a piezoelectric transducer (like a speaker) to create a high frequency mechanical oscillation in a liquid. This vibration forms an extremely fine mist of droplets in a fog/mist. The density of the fog is controlled by varying the intensity of the vibrations via a potentiometer.
This fog mist is very dense and won’t move far on its own, so I used an aquarium air pump to blow it from the misting chamber into the glass finishing chamber where it can condense on the 3D printed part. This airflow keeps the air moving inside the finishing chamber, which helps produce a consistent finish on the part. The airflow system is open by necessity but we do not want the exhaust air to become a fume hazard so there is a water bubbler on the exhaust to absorb excess solvent. (Note that this only protects you when using water miscible solvents such as acetone.)

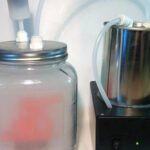
This is the final setup of the Do-It-Yourself apparatus:

ultrasonic setup
DIY Ultrasonic Vapor Polisher. Image source: Instructables

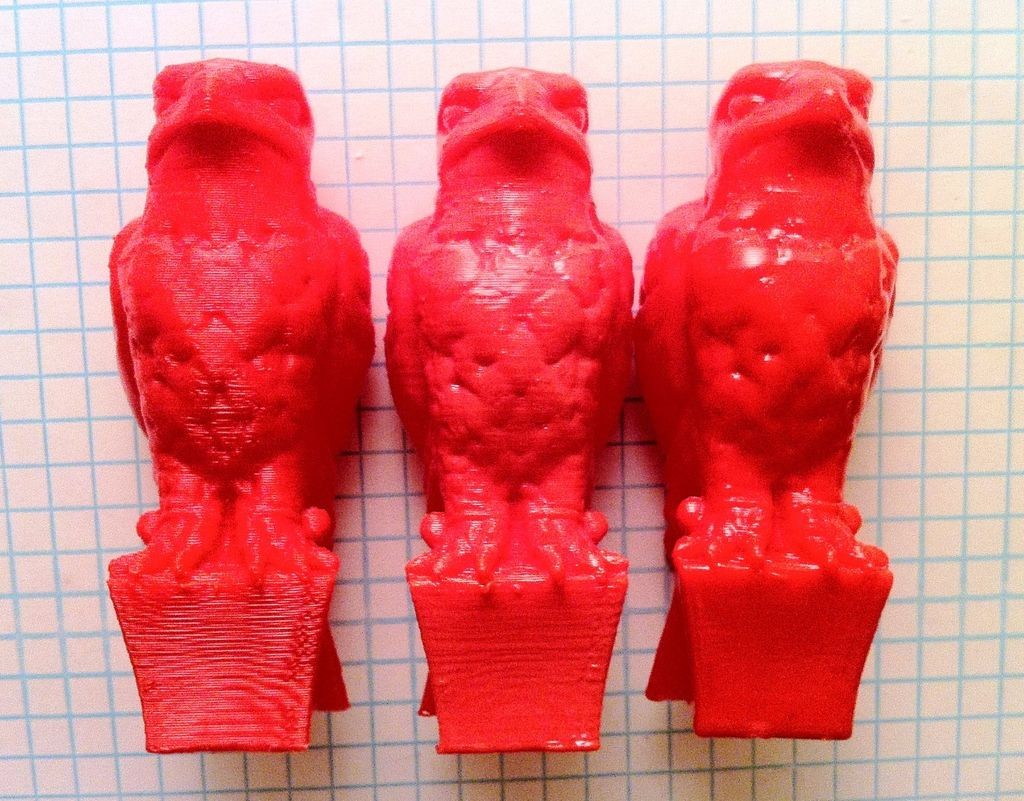
Processed objects look like this:

ultrasonic results
On the far right is a 3D printed objects vapor polished in the ultrasonic mist polisher. You can clearly see it is much smoother and shinier than the non-treated one on the far left. Image source: Instructables

If you want to make this device, a very detailed construction tutorial can be found at Instructables project page:

http://www.instructables.com/id/Ultrasonic-Misting-3D-Printing-Vapor-Polisher/

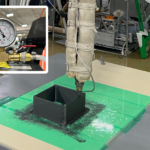
Video demonstration of the Polisher and material testing on his DIY TestrBot are very interesting:

Do keep in mind that the strength of your object will be negatively affected by this chemical polishing technique. Also be very aware that this process can be dangerous and most of the solvents are toxic when inhaled or in contact with skin and / or flammable under some conditions. DO NOT MIX ANY SOLVENTS and clean the apparatus well before switching to a different chemical! STAY SAFE and consult the project instructions! Let us know what are your experiences with vapor polishing in the comments below!

Related Story
Post-Processing FDM 3D Prints
building 3d printer from scratch
Related Story
Building a 3D Printer from Scratch
Share:
WhatsApp Twitter Facebook LinkedIn Buffer Reddit E-mail
About the author | Lav Radis
Entrepreneur and 3d printing enthusiast from Croatia. Blogging about 3d printing and digital manufacturing since 2011.
Join our newsletter

Our newsletter is free & you can unsubscribe any time.

Latest posts

Donkervoort’s New P24 RS Supercar Uses 3D-Printed Intercoolers

Conflux Technology, an Australian company specializing in heat exchangers, has created a 3D-printed intercooler for Donkervoort's upcoming P24 RS supercar. The metal 3D-printed... read more »

Automotive
Donkervoort's New P24 RS Supercar Uses 3D-Printed Intercoolers

3D Printed Concrete Bus Stop Creates Sculptural Shelter in Slovakia

A new 3D-printed concrete bus stop has been installed in Bratislava, Slovakia, as part of urban development in the growing Čerešne district. The... read more »

Construction
3D Printed Concrete Bus Stop Creates Sculptural Shelter in Slovakia

Reducing Porosity Key to Stronger Large-Scale 3D Prints

Oak Ridge National Laboratory (ORNL) researchers have created a vacuum-assisted extrusion technique that reduces internal porosity in large-scale 3D-printed polymer parts by up... read more »

News

Engineer Creates 3D Printed Trekking Pole Attachment to Combat Trail Litter

Aerospace engineer John McShane has developed "CleanTrek," a 3D-printed attachment for hiking poles designed to collect litter on trails. Inspired by a trash-strewn... read more »

Environmental
Engineer Creates 3D Printed Trekking Pole Attachment to Combat Trail Litter

New $9M Illinois Lab to 3D Print Large Vehicle Parts for US Military

The University of Illinois Urbana-Champaign is establishing a new research center focused on developing additive manufacturing methods for large metal parts. The center... read more »

Military
New $9M Illinois Lab to 3D Print Large Vehicle Parts for US Military

University of Florida Students Develop Simple Spool to Address 3D Printing Waste

A team of University of Florida mechanical engineering students has created a device aimed at reducing plastic waste in 3D printing. The device,... read more »

Environmental
University of Florida Students Develop Simple Spool to Address 3D Printing Waste

Cadillac CELESTIQ Features Over 100 3D Printed Parts in Luxury Hand-Built Design

General Motors has expanded its use of additive manufacturing beyond prototyping to include functional parts in production vehicles. The Cadillac CELESTIQ, a hand-built... read more »

Automotive

German SaaS Startup 3D Spark Secures €2 Million in Funding

Hamburg-based 3D Spark has received €2 million in seed funding to expand its manufacturing decision platform. The investment was led by Swedish investor... read more »

News
German SaaS Startup 3D Spark Secures €2 Million in Funding

Vivobarefoot Launches First Fully Customizable Barefoot Sandal

Barefoot footwear brand Vivobarefoot has announced the launch of a new 3D printed barefoot sandal on May 12. The VivoBiome Tabi Gen 01... read more »

Fashion
Vivobarefoot Launches First Fully Customizable Barefoot Sandal

Social

  • Facebook Facebook 3D Printing
  • Linkedin Linkedin 3D Printing
Join our newsletter

Our newsletter is free & you can unsubscribe any time.

Featured Industries

  • Automotive
  • Aerospace
  • Construction
  • Dental
  • Environmental
  • Electronics
  • Fashion
  • Medical
  • Military
  • QIDI Tech X-Max 3

    • - Print size: 325 x 325 x 315 mm
    • - fully enclosed
    More details »
    $799.00 QIDI Store
    Buy Now
  • QIDI Plus4

    • - Print size: 305 x 305 x 280 mm
    • - print temperature of 370°C
    More details »
    $799.00 QIDI Store
    Buy Now
  • Snapmaker Artisan Premium 3-in-1

    • - Print size: 400 x 400 x 400 mm
    • - comes with enclosure
    More details »
    $2,999.00 Snapmaker
    Buy Now
  • QIDI Tech Q1 Pro

    • - Print size: 245 x 245 x 245 mm
    • - 600mm/s max speed
    More details »
    $449.00 QIDI Store
    Buy Now

Company Information

  • What is 3D Printing?
  • Contact us
  • Join our mailing list
  • Advertise with us
  • Media Kit
  • Nederland 3D Printing

Blog

  • Latest News
  • Use Cases
  • Reviews
  • 3D Printers
  • 3D Printing Metal

Featured Reviews

  • Anycubic Photon Mono M5s
  • Creality Ender 5 S1
  • The Mole 3D Scanner
  • Flashforge Creator 3 Pro

Featured Industries

  • Automotive
  • Aerospace
  • Construction
  • Dental
  • Environmental
  • Electronics
  • Medical
  • Military
  • Fashion
  • Art
2025 — Strikwerda en Dehue
  • Home
  • Join our mailing list
  • Contact us
Blog
  • Latest News
  • Use Cases
  • Reviews
  • 3D Printers
  • 3D Printing Metal
Featured Industries
  • Automotive
  • Aerospace
  • Construction
  • Dental
  • Environmental
  • Electronics
  • Medical
  • Military
  • Fashion
  • Art
Company Information
  • What is 3D Printing?
  • Contact us
  • Join our mailing list
  • Advertise with us
  • Media Kit
  • Nederland 3D Printing