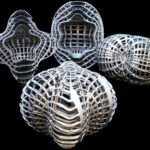
3D printed optics can create scattering as a result of surface roughness. Although, now it appears Stanford University has found a new technique that allows for the production of smoother optical components.
The technique is less about 3D printing materials and more inclined towards post-processing. Stanford researchers Nina Vaidya & Olav Solgaard came up with a UV curable polymer mixture for integration with the surface of the printed part. The mixtures can reduce the surface roughness to a few nanometers as opposed to tens of microns.
“We tried a number of smoothing techniques, including flame polishing, acetone vapor polishing, spraying of polymer coatings, and mechanical polishing,” the researchers explain. “None of these methods create the nanometer scale smooth surfaces required for optical applications.”
So, the researchers settled on making a polymer mixture consisting of methacrylates, acrylates, and urethane. Comparing it to a heat cure, this process minimizes shrinkage of the polymer, which in turn maximizes surface smoothness and conformal coverage.
The Smoothening Process

- Rinse the 3D printed part with water and detergent. Wash with DI (de-ionized) water and blow dry. Leave to completely dry in low temperature oven.
- Place part in vacuum to degas for a few hours.
- Coat a thin layer of gel (UV curable polymer mixture) on the surface of the 3D printed part with a fine brush.
- Place in vacuum chamber to get rid of any air trapped in the printed material, in the gel layer, or in between the printed surface and the gel so that the gel can fill in any pores or depressions to make smooth surfaces.
- If needed for conformal coverage, use gravity or spinning to remove excess gel. Let gel flow under gravity by placing the optics flat on a stand. Spin at around 1400 rpm for 3–5 min while the gel is still un-cured. Brush off excess gel at the edge of the frame/support.
- UV cure the finished gel surface for a couple of minutes, with the exact time depending on the size of the part.
Testing the new Prints

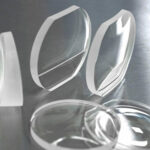
The researchers tested their technique with flat and parabolic mirrors, solar concentrator arrays, and immersion lenses used in microscopy of biological samples. Every single test showed a consistent reduction of the surface roughness to less than three nanometers.
Since 3D printing has become such a diverse field, the researchers also had to test various types of additive manufacturing. The researcher concluded that SLA and wax printers were the most effective for creating optical components. They also asserted that printing them had many benefits. For example, it was low-cost, potentially customizable, lightweight, low on material waste and easy to fabricate. Seeing all these advantages, it’s hard to imagine optics manufacturers won’t be jumping on the process soon.
All featured images courtesy of the researchers, retrieved via Nature. The full study is also available here.