3D Printing
News Videos Newsletter Contact us
Home / How to / How to Get Stronger FDM 3D Prints

How to Get Stronger FDM 3D Prints

There are lots of 3D printing videos on Youtube. Some of the Youtubers take their research very seriously and therefore run rather scientifically-rigorous experiments. They’ve created countless hours of videos dedicated to testing different print settings to determine how to get the strongest parts. Oh, you don’t have countless hours to spend sorting and watching dozens of videos on Youtube? Not to worry my time-pressed friend, we’ve done that for you.

Slice Settings for Strength

Note: All of these settings are based on a 0.4mm nozzle diameter; ideal layer heights and widths are ratios of nozzle diameter so you’ll need to adjust your numbers based on the size of your nozzle.

Basic Settings

In this video from Maker’s Muse, the basics of getting stronger prints are covered. There are several slice settings that can be changed for strength, including infill percentage, surface thickness, layer height, and extrusion width. But one setting that often gets overlooked is infill overlap, which affects how well the perimeters are bonded to the infill; usually, only a small increase is needed. These are all great recommendations but they aren’t tested, so let’s have a look at some experiments.

Disable or Reduce Cooling

Not all materials can be printed with cooling but it’s a very useful feature for those that can, such as PLA. Cooling is great for increasing surface quality, especially for parts with overhangs, but it turns out that it’s detrimental to part strength. Good layer adhesion requires that the printing layer and the previous layer fully melt together and that’s harder to achieve when every layer is being actively cooled. If a part’s geometry allows for zero cooling, then turn the fan off to attain the best level of adhesion between layers. If cooling is necessary, set it to the lowest power possible that still results in the desired surface quality. The video below from CNC Kitchen contains PLA and PETG strength tests for when cooling is decreased.

Increase Extrusion Width

Higher extrusion width increases strength up until 150% – 200% of the nozzle diameter. Adjusting this setting increases the flow rate to achieve the desired width, which results in two things:

  1. More material being deposited per pass.
  2. More downward extrusion pressure to help the printing layer bond with the previous layer.

As the video below from CNC Kitchen indicates, increasing extrusion width makes parts stronger while using less material and taking less time to print. That’s three upgrades with a single parameter adjustment.

Use Rectilinear Infill and Increase the Number of Perimeters

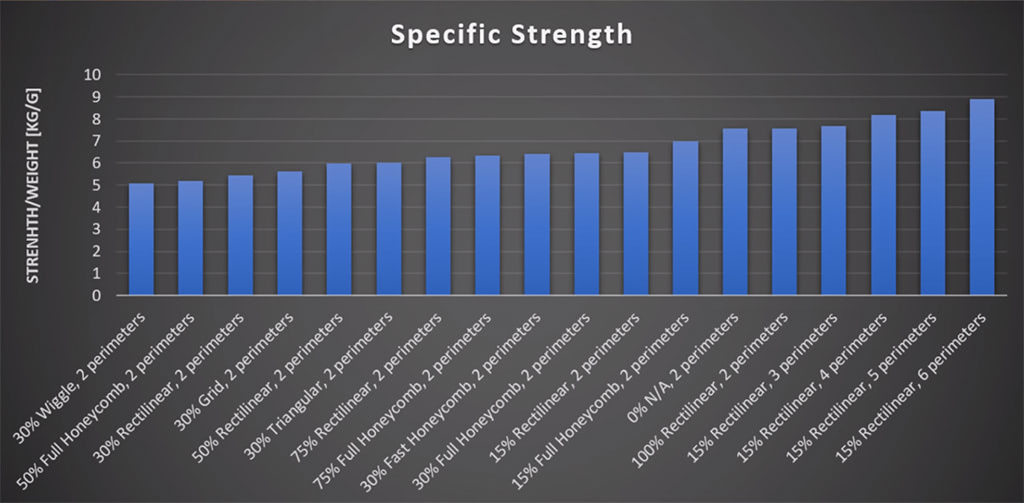
For parts printed with less than 50% infill, the honeycomb pattern is a bit stronger than most other patterns. However, when printing more dense parts with over 50% infill, rectilinear patterns achieve more strength while taking much less time to print than do honeycomb patterns.
how to get stronger prints FDM

I love this chart because it settles a long-standing debate among 3D printing enthusiasts: what has a greater impact on part strength, infill density or number of perimeters?

CNC Kitchen printed and tested dozens of hooks to create this one chart but the answer is clear: perimeters. Increasing the number of perimeters has a greater impact on strength than does increasing infill density. This is because parts will always experience more strain on the outside than on the inside, making thicker walls more useful than higher internal density. Printing with 100% infill will always achieve the highest absolute strength but getting the highest specific strength, which is a strength-to-weight ratio, requires reducing infill and using more perimeters.

Use Thinner Layers

Thinner layers lead to improved layer adhesion and denser parts (likely) because the rounder shape of thicker layers presents more gaps where adjacent layers meet. It’s also possible that the heat from the nozzle being closer to the previous layer helps the layers bond together better. Either way, going as low as 0.1mm (100 microns) will maximize strength, though the strength dropoff associated with going to 0.2mm (200 microns) is minimal so it’s a worthwhile tradeoff to cut print time by 25%. Recall that the first video recommended using thicker layers for more strength, so why the disagreement? Well, the first video didn’t run any tests so that’s important to note, but the disagreement relates to making other slicing changes when increasing layer height, such as also increasing print temperature and the extrusion multiplier to accommodate that thicker stream of plastic that’s being deposited. In short, some believe that CNC Kitchen’s thicker-layer prints were under-extruded and that that’s why they’re weaker. Knowing whether that’s true or not will require more testing.

Recap

To improve the strength of FDM 3D prints: reduce cooling, increase extrusion width, use rectilinear infill, increase the number of perimeters, and use thinner layers. By implementing these tips and tricks, you’ll be on your way to significantly stronger 3D prints. Just remember to say a silent ‘thank you’ to the Youtubers who have poured heir blood, sweat, and tears into these experiments for our benefit.

Featured image courtesy of CNC Kitchen.
Designing for Additive Manufacturing DFAM
Related Story
Designing For Additive Manufacturing (DFAM)
filament guide
Related Story
Choosing a Good Filament
Related Story
Best 3D Printers 2026: Buyer’s Guide
Related Story
Large Scale 3D Printers Big Enough to Print Furniture
Related Story
Post-Processing FDM 3D Prints
Share:
WhatsApp Twitter Facebook LinkedIn Buffer Reddit E-mail
About the author | Cameron Naramore
Cameron is a 3D printer and CNC operator. He's fond of cooking, traveling, and science fiction.
Join our newsletter

Our newsletter is free & you can unsubscribe any time.

Latest posts

Revopoint Trackit SR: Marker-Free, Wireless 3D Scanning Built for Industrial Metrology

An intelligent optical tracking, high-accuracy, marker-free wireless laser 3D scanner for metrology, reverse engineering, and quality inspection, with no reflective markers and no... read more »

News

Best Resin for Miniatures 2026: Sharp Detail That Survives Play

Miniatures are the hardest test you can set a resin. A 28 mm figure carries sub-millimetre detail, spear shafts thinner than a toothpick,... read more »

Resin

3D-Printed Piezoelectric Tooth Implant Restores Chewing Sensation in 90% of Trial Patients

Scientists in China have developed a 3D-printed tooth implant that restores the sense of chewing — a capability that conventional dental implants don't... read more »

Dental
3D-Printed Piezoelectric Tooth Implant Restores Chewing Sensation in 90% of Trial Patients

Nikon SLM Solutions and Bosch 3D Print Complete V8 Engine Block as a Single Piece

Nikon SLM Solutions and Bosch Industry Consulting have produced a complete V8 engine block as a single printed part, using the NXG XII... read more »

Automotive
Nikon SLM Solutions and Bosch 3D Print Complete V8 Engine Block as a Single Piece

Addidex Connect 2026: Two Days Inside Robotic Large-Format 3D Printing

Good coffee, a few robot arms, and two days of unusually open talks: inside the symposium bringing robotic large-format 3D printing together. By... read more »

News

Rotterdam Studio Covers Dutch Transformer Station in 322 Custom 3D Printed Ceramic Tiles

A transformer station in Beverwijk, Netherlands now has an 8-by-5-meter ceramic artwork on its facade, made up of 322 individually designed tiles that... read more »

Construction
Rotterdam Studio Covers Dutch Transformer Station in 322 Custom 3D Printed Ceramic Tiles

Maker’s Pet launches Oomwoo, an open-source robot vacuum built with a 3D printer and Raspberry Pi

Maker's Pet has launched Oomwoo, an open-source robot vacuum that users build themselves from a 3D-printed chassis, a Raspberry Pi, and an inexpensive... read more »

Electronics
Maker's Pet launches Oomwoo, an open-source robot vacuum built with a 3D printer and Raspberry Pi

From Prompt to Printable Mecha in 5 Minutes: Inside Hi3D’s End-to-End AI 3D Printing Workflow

This article is sponsored content. Type a sentence, wait five minutes, and walk away with a printable 3MF project file. That is the... read more »

News
Hi3D print plan screen showing automatic part placement, surface-first orientation, a print-time estimate, and one-click export to Bambu Studio, OrcaSlicer, Creality Print, and Elegoo Slicer

IU Health Opens FDA-Cleared 3D Print Studio, Cutting Model Turnaround to 24 Hours

IU Health has launched one of the country's first hospital-based, FDA-cleared 3D printing programs, allowing physicians to produce patient-specific anatomical models in-house rather... read more »

Medical
IU Health Opens FDA-Cleared 3D Print Studio, Cutting Model Turnaround to 24 Hours

Three Organizations Sign Agreement to Build Materials Research Hub in Singapore

Three organizations have agreed to establish a shared advanced materials development facility in Singapore, signing a Memorandum of Understanding on June 24, 2026.... read more »

Materials
Three Organizations Sign Agreement to Build Materials Research Hub in Singapore

Social

  • Facebook Facebook 3D Printing
  • Linkedin Linkedin 3D Printing
Join our newsletter

Our newsletter is free & you can unsubscribe any time.

Featured Industries

  • Automotive
  • Aerospace
  • Construction
  • Dental
  • Environmental
  • Electronics
  • Fashion
  • Medical
  • Military
  • Flashforge Guider 3 Ultra

    • - Print size: 330 x 330 x 600 mm
    • - dual extruder system
    More details »
    $2,999.00 Flashforge
    Buy Now
  • Qidi Max 4

    • - Print size: 390 x 390 x 340 mm
    • - active cooling air control
    More details »
    $1,219.00 Qidi
    Buy Now
  • Creality K2 Plus

    • - Print size: 350 x 350 x 350 mm
    • - multi-color printing
    More details »
    $1,199.00 Creality
    Buy Now
  • Anycubic Kobra S1 Combo

    • - Print size: 250 x 250 x 250 mm
    • - budget multicolor printing
    More details »
    $429.00 Anycubic
    Buy Now
  • Anycubic Photon Mono M7

    • - Print size: 223 x 126 x 230 mm
    • - 10.1 inch 14K screen
    More details »
    $279.00 Anycubic
    Buy Now
  • Creality Hi Combo

    • - Print size: 260 x 260 x 300 mm
    • - up to 16-color printing
    More details »
    $399.00 Creality
    Buy Now
  • Qidi Q2

    • - Print size: 270 x 270 x 256 mm
    • - enclosed heated chamber up to 65°C
    More details »
    $580.00 Qidi
    Buy Now
  • Flashforge AD5X

    • - Print size: 220 x 220 x 220 mm
    • - dual extrusion system
    More details »
    $399.00 Flashforge
    Buy Now
  • Flashforge Adventurer 5M

    • - Print size: 220 x 220 x 220 mm
    • - 600mm/s travel speed
    More details »
    $299.00 Flashforge
    Buy Now
  • Snapmaker U1

    • - Print size: 270 x 270 x 270 mm
    • - multi-color printing with SnapSwap
    More details »
    $849.00 Snapmaker
    Buy Now

Company Information

  • What is 3D Printing?
  • Contact us
  • Join our mailing list
  • Advertise with us
  • Media Kit
  • Nederland 3D Printing

Blog

  • Latest News
  • Use Cases
  • Reviews
  • 3D Printers
  • 3D Printing Metal

Featured Reviews

  • Anycubic Photon Mono M5s
  • Creality Ender 5 S1
  • The Mole 3D Scanner
  • Flashforge Creator 3 Pro

Featured Industries

  • Automotive
  • Aerospace
  • Construction
  • Dental
  • Environmental
  • Electronics
  • Medical
  • Military
  • Fashion
  • Art
2026 — Strikwerda en Dehue
  • Home
  • Join our mailing list
  • Contact us
Blog
  • Latest News
  • Use Cases
  • Reviews
  • 3D Printers
  • 3D Printing Metal
Featured Industries
  • Automotive
  • Aerospace
  • Construction
  • Dental
  • Environmental
  • Electronics
  • Medical
  • Military
  • Fashion
  • Art
Company Information
  • What is 3D Printing?
  • Contact us
  • Join our mailing list
  • Advertise with us
  • Media Kit
  • Nederland 3D Printing