Ever since BASF announced their Ultrafuse 316L a couple months ago, we’ve been itching to get our hands on this filament that promises fully-metal objects using most desktop 3D printers. That’s quite a claim and so we snagged some to try it out.
Accessible Metal Printing
For those that don’t know, BASF Ultrafuse 316L is a bound metal (stainless steel) filament that requires catalytic debinding and sintering post processing to become fully metal. It’s designed to make metal 3D printing accessible to almost everyone. Printed parts are initially in a ‘green’ state and the debinding step removes most of the polymer binder that makes the filament printable, taking the part to its most fragile ‘brown’ state. The final sintering step removes the remaining binder and fuses the metal particles into a fully-dense metal part. BASF is creating a network of post processing firms to handle these steps.
The first thing I notice about this filament is its weight. The product is, much like its price tag, hefty. A spool of it comes in at three kilos and costs $465. It’s a bit surprising that BASF isn’t offering a smaller, more affordable spool but I won’t pretend to understand their production decisions.
Getting Started With Ultrafuse 316L
The product is professionally packaged and looks a lot like a giant Moon Pie in its vacuum-sealed foil packaging. It’s also extremely well spooled with no overlapping or knots in the filament. It arrived a day before the Dimafix bed adhesive that’s recommended to keep 316L parts down but I was too excited to wait for it. I am reviewing this stuff so why not try printing it on painter’s tape, right? Exactly, I knew you’d agree.
First, the nozzle on my LulzBot had to be swapped to a hardened steel E3D v6 Extra nozzle because the 316L filament is 80% steel powder and therefore very abrasive. While it is possible to print this material on a standard brass nozzle, it will quickly wear down the brass and affect the nozzle diameter, which will eventually lead to poor print quality and failed prints. It’s also recommended to use a dedicated nozzle for 316L to ensure that no other materials make their way into your metal prints; foreign materials can cause objects to explode in the debinding and sintering process. If you don’t use a dedicated nozzle, be sure to run a good amount of cleaner filament through the nozzle to completely purge all of the previous material before printing with 316L.
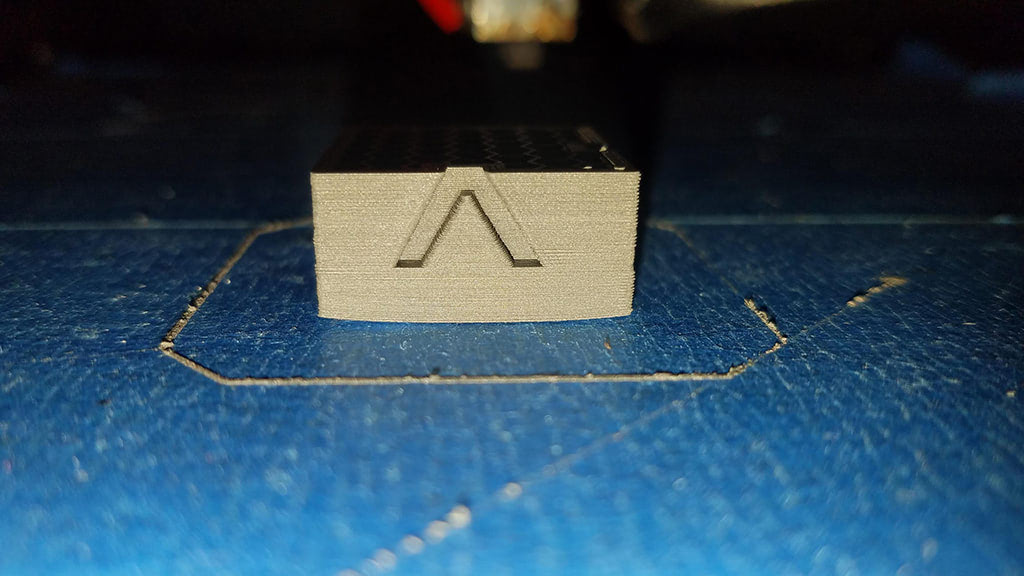
Loading the filament went just like any other filament; it’s a tad softer than ABS but not as soft as TPU so it should work with bowden extruders just fine. It extrudes smoothly at 240°C on my E3D hotend. I was pleasantly surprised that the calibration cube stuck well on the painter’s tape but my surprise was short lived as the corners starting peeling up about halfway through the print. I canceled the print because I was only testing bed adhesion and print settings. So painter’s tape doesn’t work, lesson learned. The image below shows that the infill isn’t the recommended 100% (voids can cause parts to fail in post processing) but I was still shocked at the weight of the small object. This picture does a good job of showing off the level of detail that can be achieved with the material.
The Dimafix arrived the next day so I applied it to my glass bed and printed the calibration again with 100% infill. Prints with this material take a long time because of the solid infill, the thin layers that are recommended to increase part density, and the slow print speeds that are necessary to achieve smooth walls. Objects also have to be scaled up 19% in the X and Y axes and 21% on the Z axis due to anisotropic shrinkage that occurs during the post processing steps. This 20mm cube took almost four hours to print; if I was printing it in (mostly hollow) plastic, it would take about 20 minutes. But that’s a small price to pay to get metal prints. A tiny calibration cube weighed an astonishing 60 grams in its ‘green’ state.
From Green Parts to Metal Parts
Packaging everything up for shipment to the post processing company was kind of stressful because the ‘green’ parts are rather brittle; they feel like a heavy clay and are very bendy. The processors ask that a form be included with every shipment that lists all the parts as well as their weights and dimensions. They also ask that each part be individually wrapped. I found the task to be less tedious if I pretended to be a museum curator cataloging priceless artifacts for safe keeping.
The hardest part of the whole process was coping with the uncertainty of whether the parts would survive both legs of their postal journey. That and the waiting, which really wasn’t that long; I shipped the parts out on October 31 and received them back on November 25, but keep in mind that I’m in Sacramento and they’re in New Jersey. Thankfully, the processors inform customers when they receive their parts and email a report of the parts before and after processing.
Opening the package certainly had a ‘Christmas morning’ vibe as my curiosity and excitement were both in high gear. The metal parts are just what I wished for. They are solid, hard, and shiny. They even make that unmistakable ‘clink’ of metal when tapped together. Every part came out well without any noticeable warping. But what about shrinkage? How accurate are the scaling recommendations?
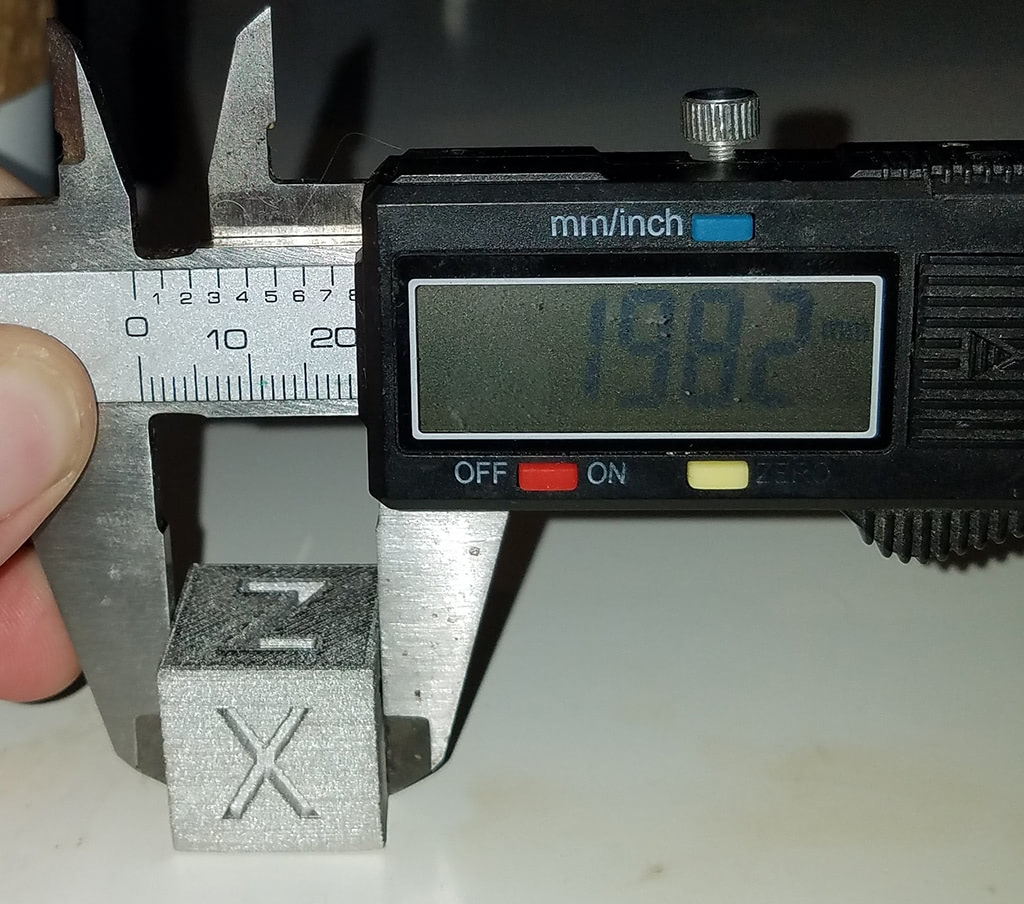
Look at that shine! Sorry, let’s get to the important numbers. Here are the dimensions of the 20mm test cube after processing: X – 19.82mm, Y – 19.91mm, Z – 19.46mm. That’s a variance of 0.5% to 2.7%, which is pretty darn good considering a shrinkage factor of about 20%. It follows that the Z axis has the largest variance as the layers can squish down with gravity during the sintering step. BASF had already adjusted their scaling recommendations once before I worked with the material so it’s possible they’ll make another small change after more parts have been processed.
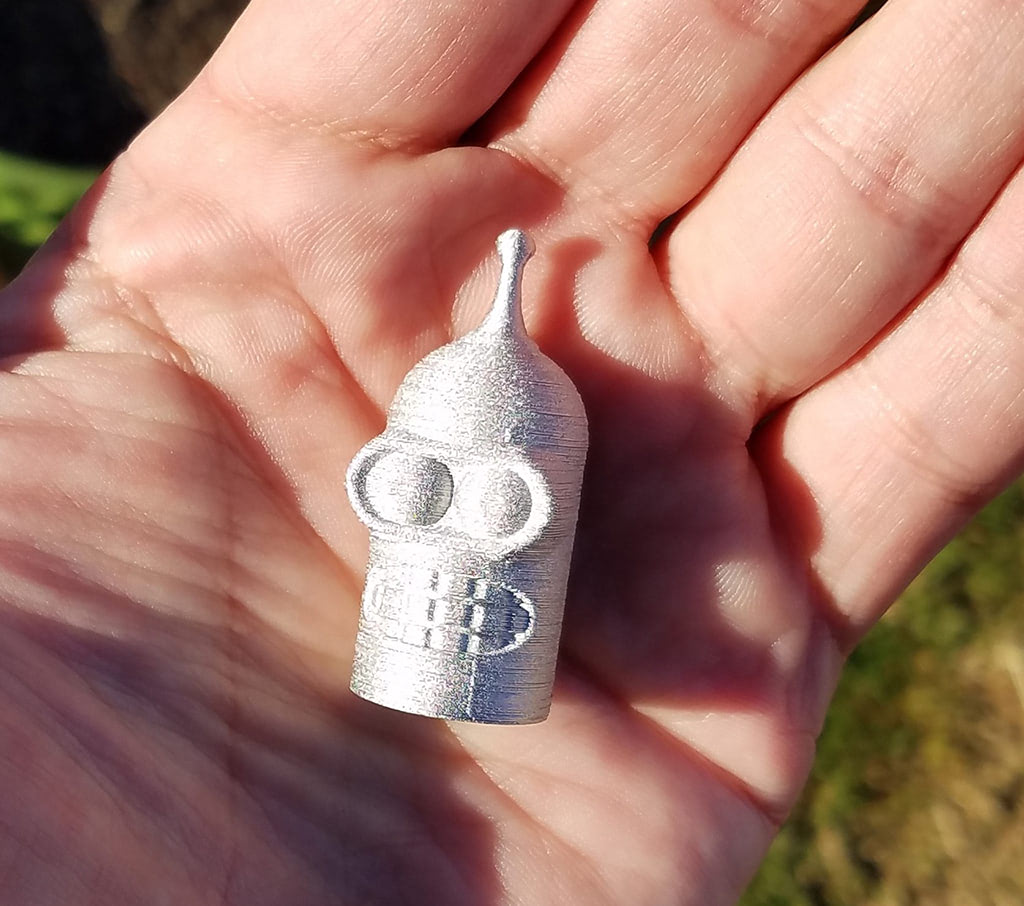
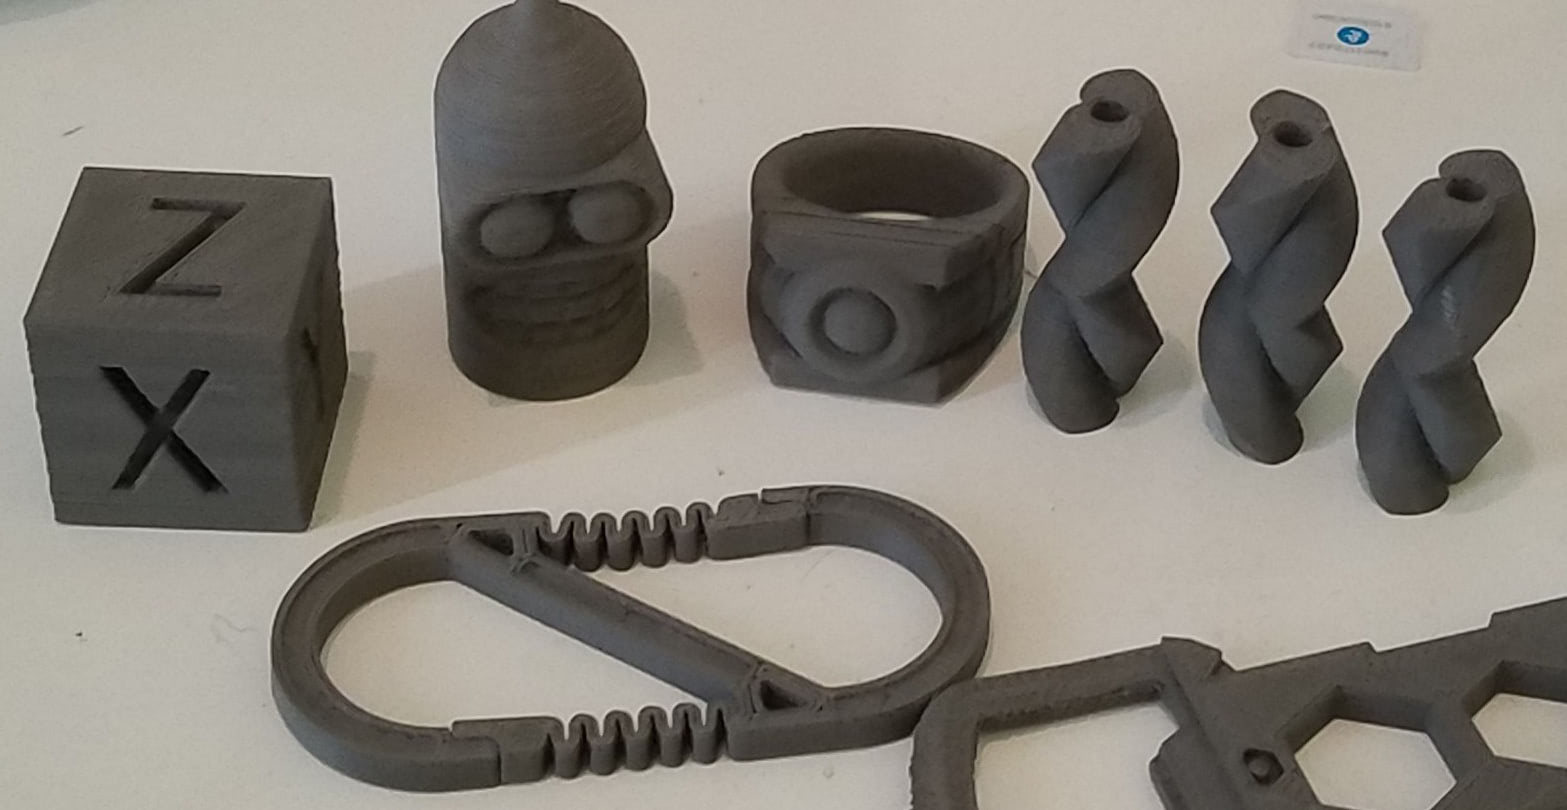
Detail in the prints seems completely unchanged, which is good to know. Here’s a Bender head I’ll now be using as a paper weight; I took it outside to highlight its luster and it’s so reflective that it oversaturates the photo.
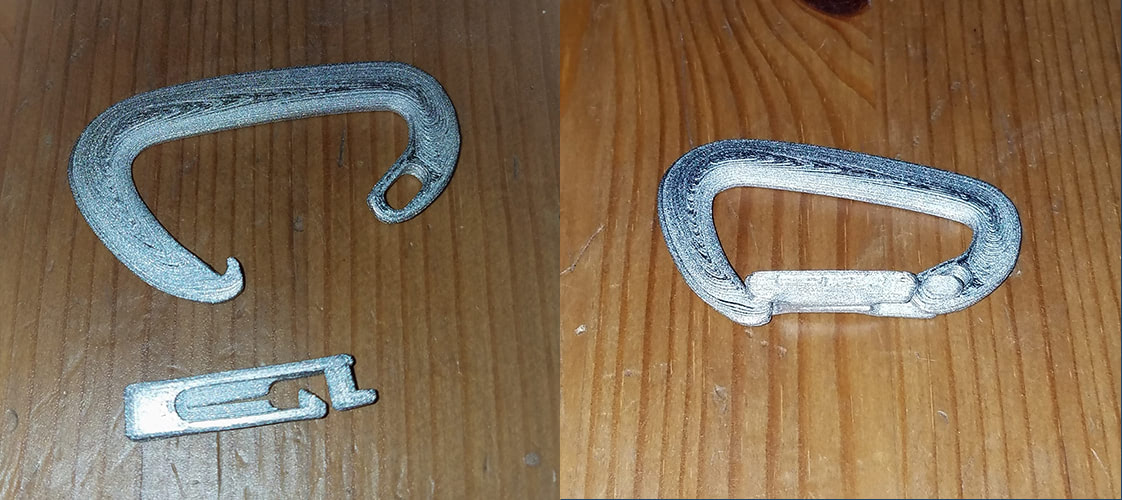
It’s important to note that the thin antenna survived the return shipping trip even though it wasn’t individually wrapped. That’s a testament to the strength of this material. And about that hardness: wow! One of the parts I wanted to test is a carabiner that’s printed as two pieces that snap together. But this material is simply too hard for models that are designed to snap together as plastic. It took using two sets of pliers and some serious grunting to bend the metal enough to assemble the carabiner. Bending parts with pliers is unthinkable if they’re printed in plastic so this really changes things. Here’s the before and after:
The material layering on contours creates a pleasant wood grain effect not typically seen in metal. To test its strength, I compared its load limit to a solid PLA version of the same model; the plastic one broke at 105 pounds (which is pretty impressive) and the metal one didn’t even bend with my brother’s entire weight (125 pounds) hanging from it. That’s super scientific, I know. I’s the best I could do with a simple hanging scale and one sibling.
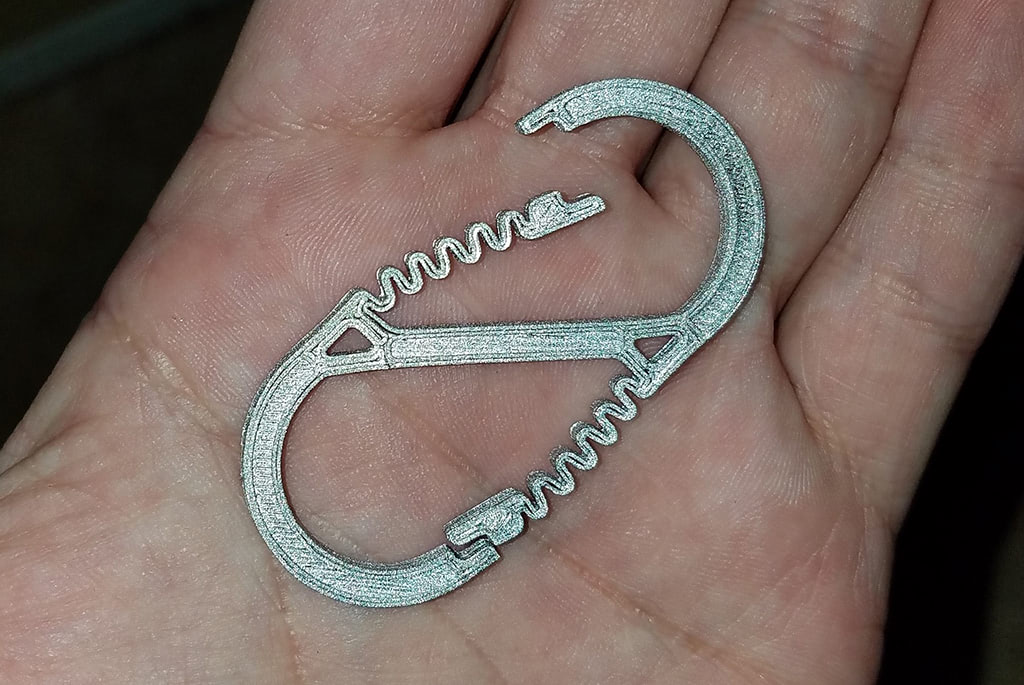
I also printed a single-piece carabiner that uses a wiggle pattern as a spring mechanism. The spring doesn’t function in this material as it stays in whatever position it’s pressed; it seems that the metal will eventually break if repeatedly bent back and forth. So I wouldn’t recommend this material for parts intended to regularly bend.
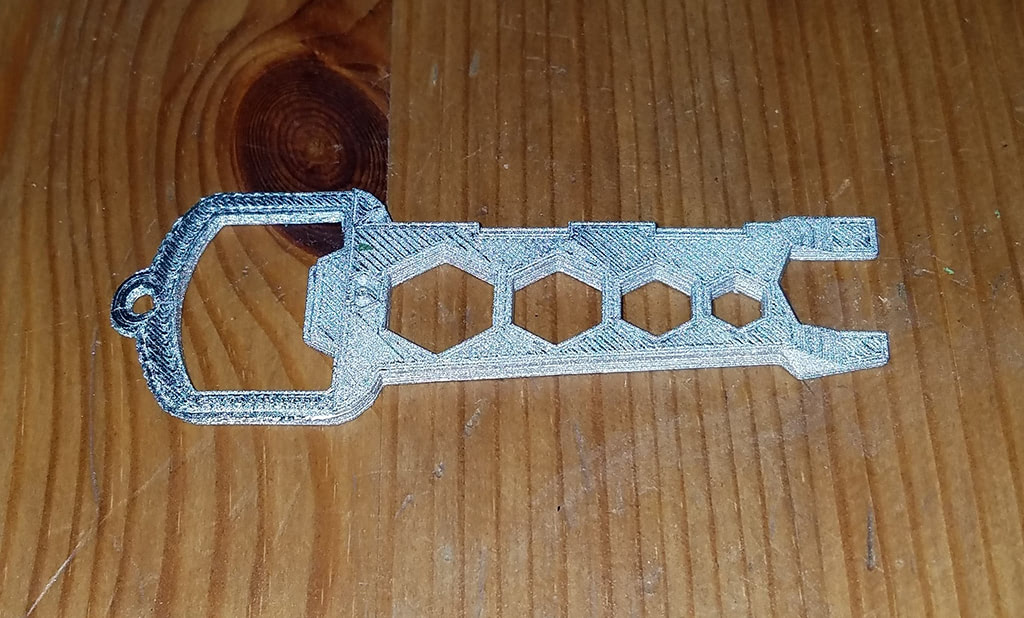
The other functional part tested was this multitool that includes a bottle opener, which did successfully open a bottle, albeit with some bending at the thinnest spot, which is only 1.5mm thick. If the bottle opener was just a bit thicker, it probably would not have bent. The hex sockets work fine.
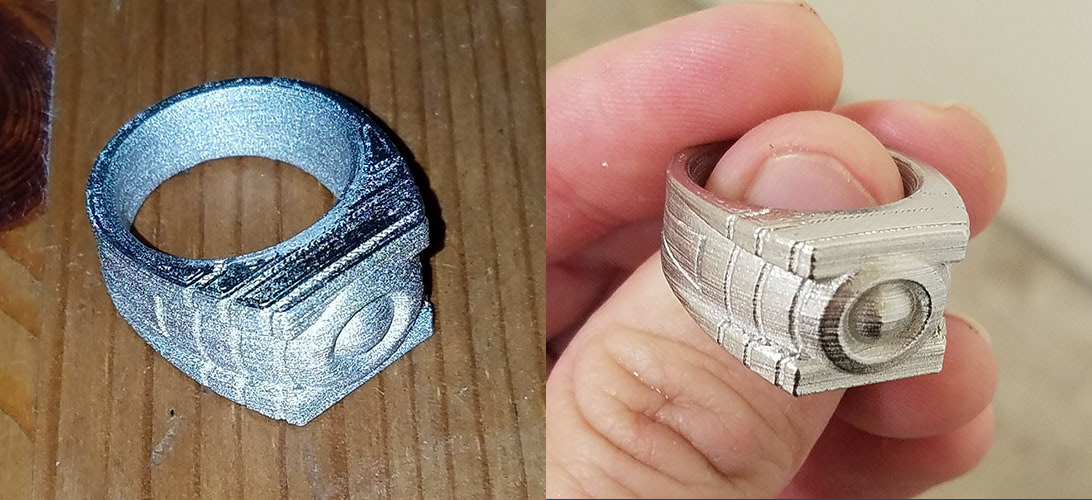
The strength and functional tests were very informative and encouraging but the aesthetic tests were just as delightful. To see how these parts polish up, I ran the Lantern ring in a rock tumbler with steel screws for a couple of hours. The results are absolutely brilliant. This thing really shines. Parts of it are even mirror-like. Here’s a before and after:
Tumbling with screws is only a basic form of polishing, though it’s obviously effective. Tumbling for a longer period or using polishing wheels and compounds would likely yield even better results. This will surely become popular among jewelers who already use 3D printers in their business.
Most of the pieces that I printed have geometries that would be difficult and costly to CNC machine or cast with molds. Machinists are increasingly using 3D printing so they’ll probably add this to their repertoire as well.
My Verdict
BASF Ultrafuse 316L is a very exciting material with loads of potential. It prints relatively easily on most 3D printers and the results are impressive – hard, detailed, and shiny, just as stainless steel should be. The tensile strength isn’t quite that of forged steel but it’s very good nonetheless. It is, by far, the strongest material I’ve run through a 3D printer. And the ‘wow factor’ is high with this one; everyone who sees the parts has the same reaction: “You printed this!?”
With this material, metal 3D printing is finally accessible to pretty much everyone. Small businesses, designers, and artists will all benefit from this filament, whether they’re making custom gears, robots, or jewelry.


