3D Printing

Buyer guides

  • Best 3D printers
  • For beginners
  • Multicolor
  • Resin printers
  • Budget (under $400)
  • For kids and schools
  • For miniatures
  • Large format
All printer guides

Brands and compare

  • Bambu Lab lineup compared
  • Compare printers
  • Full color 3D printers
  • Large scale and industrial

Reviews

  • Elegoo Mars 5 Ultra
  • FLSun T1 Pro
  • QIDI Tech Q1 Pro
All reviews
Best 3D Printers 2026: Buyer’s Guide

Start with the top picks

Best 3D Printers 2026: Buyer’s Guide

Twenty printers tested and ranked, from $169 to the H2D.

See the picks

Filament

  • Best PETG filament
  • Best PLA filament
  • Best TPU filament
  • Best ABS and ASA filament
  • Engineering filaments
  • Composite filaments
  • Flexible filaments
  • Bio filaments
All filament guides

Resin

  • For miniatures
  • Tough and ABS-like
  • Castable resin
  • Water-washable
  • Flexible resin
All resin guides

Accessories

  • Filament dryers
  • Printer enclosures
  • Wash and cure stations
Best Filament Dryers (2026 Guide)

Most-clicked accessory

Best Filament Dryers (2026 Guide)

Wet filament causes most failed prints; the fix costs less than a spool.

Compare dryers

Buyer guides

  • Small objects
  • Medium objects
  • Large objects
  • Professional scanners
  • Scan with your phone
All scanner guides

Software and service

  • 3D scanner software
  • Scanning service vs buying

Reviews

  • Revopoint MetroY Pro
  • Revopoint Inspire 2
  • Revopoint Trackit
All scanner reviews
3D Scanners 2026: The Complete Buying Guide

Find the right scanner

3D Scanners 2026: The Complete Buying Guide

Nineteen scanners from $400 to $40,000, sorted by object size.

Open the guide

Design and AI

  • AI 3D model generators
  • 3D modeling and CAD software

Print prep and control

  • Slicers
  • STL repair tools
  • Printer host and remote control

Reviews

All software reviews
Best AI 3D Model Generators for 3D Printing (2026)

Fastest-growing guide

Best AI 3D Model Generators for 3D Printing (2026)

Type a prompt, get a printable model: the tools we tested, free tiers first.

Try the tools

Start here

  • What is 3D printing?
  • How much does it cost?
  • FDM vs resin
  • Best printers for beginners

How it works

  • What is a 3D printer?
  • How does 3D printing work?
  • Types of 3D printing
  • Metal 3D printing

How-tos and glossary

  • 3D printing glossary
  • Food-safe 3D printing
  • Setting up a school program
  • Free 3D printable models
What is 3D Printing?

Start here

What is 3D Printing?

The one-page explainer, then how much it costs and which technology to buy.

Start reading
Black FridayNEW

Latest

  • Tripo H3.1 Review: From Image to 3D Print
  • University of South Florida Students Test 3D Printed Oyster Bricks on Tampa Bay Seawalls
  • Bambu Lab Launches the H3C, a Nine-Tool Changer Priced From $2,499
  • PathOn Robotics Releases Files for Its Three-Finger 3D Printed Robot Hand
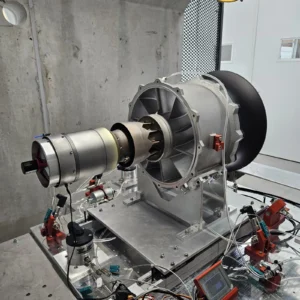
  • Army Research Lab Flies Drone Powered by 3D Printed Heavy-Fuel Engine
All news

Use cases

  • Prague Firefighters 3D Print Their Own Gear on a Prusa CORE One L
  • OECHSLER Scales Carbon Lattice Production to 40 Printers Running Around the Clock
  • Reverse Engineering Without CAD Data: How the MetroY Ultra Turns Physical Parts into Digital Designs
  • Michigan State Engineers 3D Printed Helmet Inserts to Help Quarterbacks Tackle Crowd Noise
  • 3D Printed Quiet Pickleball Unveiled
All use cases

Industry

  • Automotive
  • Aerospace
  • Medical
  • Dental
  • Construction
  • Rapid prototyping
  • Electronics
  • Food
  • Fashion
  • Bioprinting
Tripo H3.1 Review: From Image to 3D Print

Latest

Tripo H3.1 Review: From Image to 3D Print

Tripo is an AI 3D modeling platform that turns a picture or a text prompt into a 3D…

Read more
Contact
  • Home
  • Products
  • Videos
  • Newsletter
  • Contact us

Buyer guides

  • Best 3D printers
  • For beginners
  • Multicolor
  • Resin printers
  • Budget (under $400)
  • For kids and schools
  • For miniatures
  • Large format
All printer guides

Brands and compare

  • Bambu Lab lineup compared
  • Compare printers
  • Full color 3D printers
  • Large scale and industrial

Reviews

  • Elegoo Mars 5 Ultra
  • FLSun T1 Pro
  • QIDI Tech Q1 Pro
All reviews

Filament

  • Best PETG filament
  • Best PLA filament
  • Best TPU filament
  • Best ABS and ASA filament
  • Engineering filaments
  • Composite filaments
  • Flexible filaments
  • Bio filaments
All filament guides

Resin

  • For miniatures
  • Tough and ABS-like
  • Castable resin
  • Water-washable
  • Flexible resin
All resin guides

Accessories

  • Filament dryers
  • Printer enclosures
  • Wash and cure stations

Buyer guides

  • Small objects
  • Medium objects
  • Large objects
  • Professional scanners
  • Scan with your phone
All scanner guides

Software and service

  • 3D scanner software
  • Scanning service vs buying

Reviews

  • Revopoint MetroY Pro
  • Revopoint Inspire 2
  • Revopoint Trackit
All scanner reviews

Design and AI

  • AI 3D model generators
  • 3D modeling and CAD software

Print prep and control

  • Slicers
  • STL repair tools
  • Printer host and remote control

Reviews

All software reviews

Start here

  • What is 3D printing?
  • How much does it cost?
  • FDM vs resin
  • Best printers for beginners

How it works

  • What is a 3D printer?
  • How does 3D printing work?
  • Types of 3D printing
  • Metal 3D printing

How-tos and glossary

  • 3D printing glossary
  • Food-safe 3D printing
  • Setting up a school program
  • Free 3D printable models
Black FridayNEW

Latest

  • Tripo H3.1 Review: From Image to 3D Print
  • University of South Florida Students Test 3D Printed Oyster Bricks on Tampa Bay Seawalls
  • Bambu Lab Launches the H3C, a Nine-Tool Changer Priced From $2,499
  • PathOn Robotics Releases Files for Its Three-Finger 3D Printed Robot Hand
  • Army Research Lab Flies Drone Powered by 3D Printed Heavy-Fuel Engine
All news

Use cases

  • Prague Firefighters 3D Print Their Own Gear on a Prusa CORE One L
  • OECHSLER Scales Carbon Lattice Production to 40 Printers Running Around the Clock
  • Reverse Engineering Without CAD Data: How the MetroY Ultra Turns Physical Parts into Digital Designs
  • Michigan State Engineers 3D Printed Helmet Inserts to Help Quarterbacks Tackle Crowd Noise
  • 3D Printed Quiet Pickleball Unveiled
All use cases

Industry

  • Automotive
  • Aerospace
  • Medical
  • Dental
  • Construction
  • Rapid prototyping
  • Electronics
  • Food
  • Fashion
  • Bioprinting
Contact
Blog
  • Latest News
  • Use Cases
  • Reviews
  • 3D Printers
  • 3D Printing Metal
Featured Industries
  • Automotive
  • Aerospace
  • Construction
  • Dental
  • Environmental
  • Electronics
  • Medical
  • Military
  • Fashion
  • Art
Company Information
  • What is 3D Printing?
  • Advertise with us
  • Media Kit
  • Nederland 3D Printing
Home / Reviews / Tripo H3.1 Review: From Image to 3D Print

Tripo H3.1 Review: From Image to 3D Print

November 4, 2026

Hands-On Review

Tripo is an AI 3D modeling platform that turns a picture or a text prompt into a 3D model. Tripo says more than 6.5 million people use it and that Tripo Studio, its browser workspace, launched in June 2025. Its HD Model mode now runs H3.1, which in my tests generated meshes of up to two million polygons. I took one picture from idea to a four-color print on a Bambu Lab P2S.

Short verdict. Tripo gets you from an idea to a detailed, textured model in minutes, and every step sits in one workspace. The “Export Multi-Color Printable File” button gets you most of the way to a colored print, and my model printed well.

Reader offer: 60% off Tripo Pro with code 3DPRINTINGHow it works

Disclosure

Tripo provided a Pro account and paid 3DPrinting.com a fixed fee for this independent hands-on review. The fee does not depend on the verdict or the rating, Tripo had no say in the content and did not see the piece before publication. 3DPrinting.com earns a commission on Pro subscriptions taken through the link and reader code at the end of this piece, and Tripo also books advertising placements on this site. Neither had any bearing on the testing or the score. The 3D printer and filaments are my own.

Scorecard

  • Ease of useOne picture to a textured model in minutes, with every step in the same workspace.
  • Mesh quality for printingH3.1 gave a clean model of almost two million faces, and the Nano Banana Pro lighthouse printed well.
  • Control over the resultClear generation settings and Remove Lighting. But no color reduction and no orientation setting.
  • Value for money50 credits for the H3.1 model, and exports are free. Pro costs $20 a month.

Overall4 / 5

Jump to menu

On this page

  • The Test Object, a Four-Color Lighthouse
  • How I Tested Tripo
  • Step 1: The Source Image
  • Step 2: Generating the 3D Model
  • Step 3: Export Multi-Color Printable File
  • Step 4: Other Exports and Slicing
  • Step 5: The Print
  • Agentic Canvas (Beta)

More

  • Tripo Pricing and Credits
  • Who It’s For
  • Wishlist
  • Verdict
  • Reader Offer

The Test Object, a Four-Color Lighthouse

I needed a test object that a slicer judges quickly. I chose a small lighthouse on a rocky base. It has a railing, small arched windows, a door, stone steps and an overhanging gallery and roof.

My AMS (Automatic Material System) holds orange, pink, white and grey. Those are the only four colors I own, so the design uses them. I print on a Bambu Lab P2S and slice in Bambu Studio on my Mac.

How I Tested Tripo

I followed one workflow from picture to print: make an image, generate the 3D model, export it with Tripo’s own print setting, open it in Bambu Studio and print it. I used Tripo as it comes, with its own settings and export buttons, and then Bambu Studio, the app you would use too.

Tripo Studio’s HD Model mode runs H3.1, which Tripo points to for detailed meshes. It has an Ultra Mesh Quality switch, 2K, 4K or 8K textures, PBR (physically based rendering), a Remove Lighting switch and triangle or quad topology.

Step 1: The Source Image

Tripo’s Image Generation module sits in the same app, so you can start from an idea instead of a finished picture. My prompt asked for a stylized lighthouse figurine on a rocky base, in a three-quarter view with flat colors and exactly four colors. It also asked for railing bars, arched windows, a door, stone steps and an overhanging balcony.

I tried five image models, one image each. Every model shows a price, but all five images were free on my account. I chose Nano Banana Pro, because its lighthouse has simple, chunky shapes: thick stripes, a plain bar railing, a door and arched windows on rocks with steps.
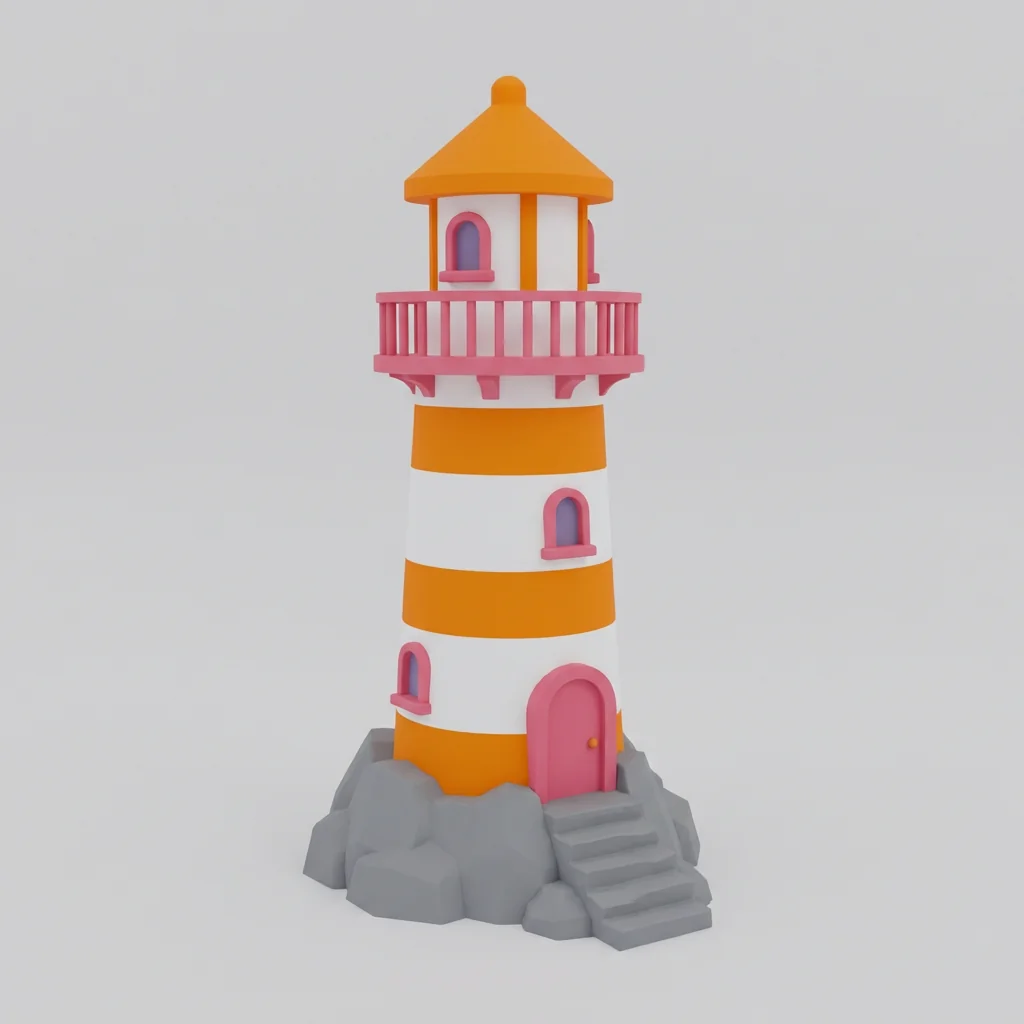
Lighthouse reference image generated by Nano Banana Pro on a light grey background
Figure 1: The Nano Banana Pro picture I used (Image: Tripo Image Generation)

Step 2: Generating the 3D Model

I generated the Nano Banana Pro picture in HD Model mode on H3.1, with Ultra Mesh Quality on, a 4K texture, PBR off, triangles and 2,000,000 polygons. These are the credits the Generate button showed for the options I tried.

Model Ultra Texture Credits
H3.1 On None, 2,000,000 polygons (default) 30
H3.1 On 2K 40
H3.1 On 2K with PBR 45
H3.1 On 4K 50
H3.1 Off 4K 35
H3.0 (Fast and Balanced) No switch Yes 35

I did not test the members-only 8K texture. The model I generated took about four minutes and made 1,954,446 faces. It has the stripes, the pink railing, door and windows, and the grey rocks of the picture.
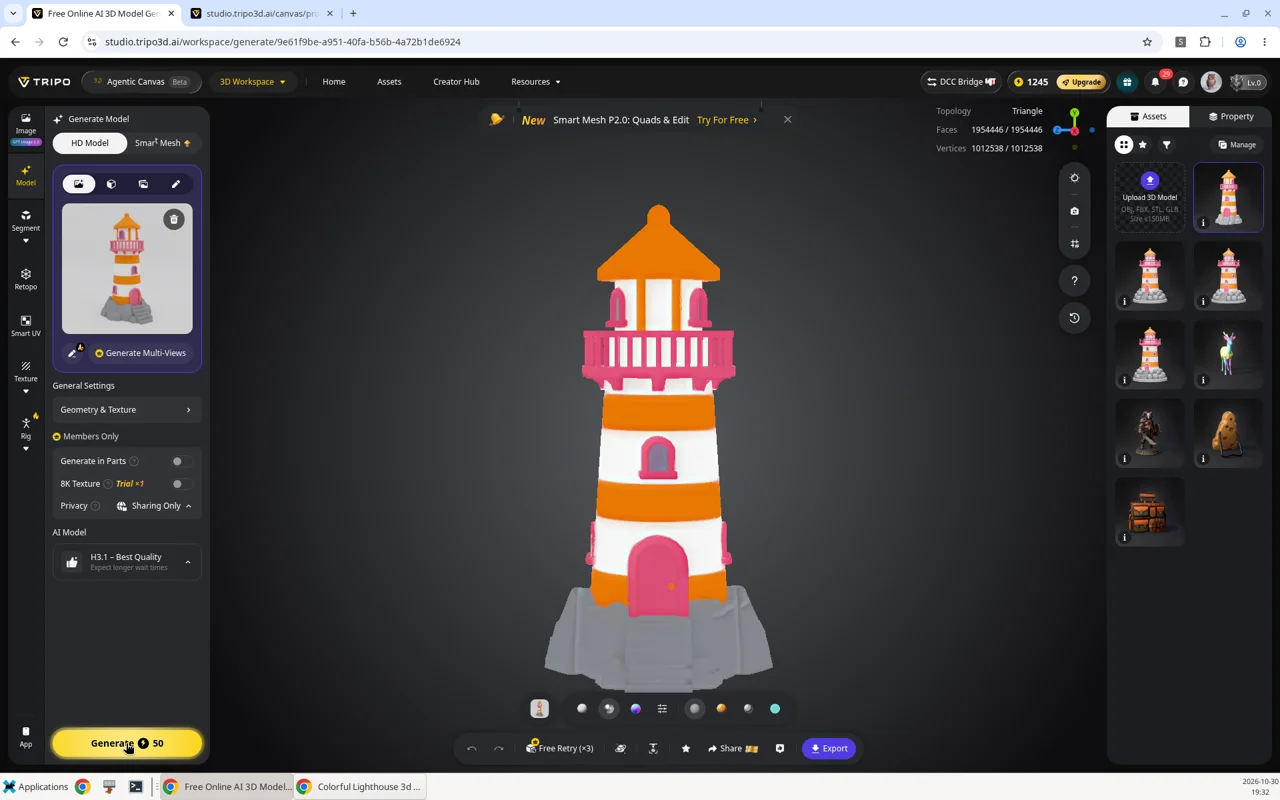
The finished H3.1 lighthouse model from the Nano Banana Pro picture in Tripo Studio with the face count shown
Figure 2: The Nano Banana Pro model in Tripo Studio, 50 credits (Screenshot: Tripo Studio)

View the Nano Banana Pro lighthouse on Tripo.

Remove Lighting

Remove Lighting is a new switch in the Geometry & Texture panel. Its tooltip says it reduces the impact of environmental lighting to create more consistent textures. It only works when you generate or retexture a model, and it costs no extra credits. H3.1 with a 4K texture costs 50 credits with the switch on or off.
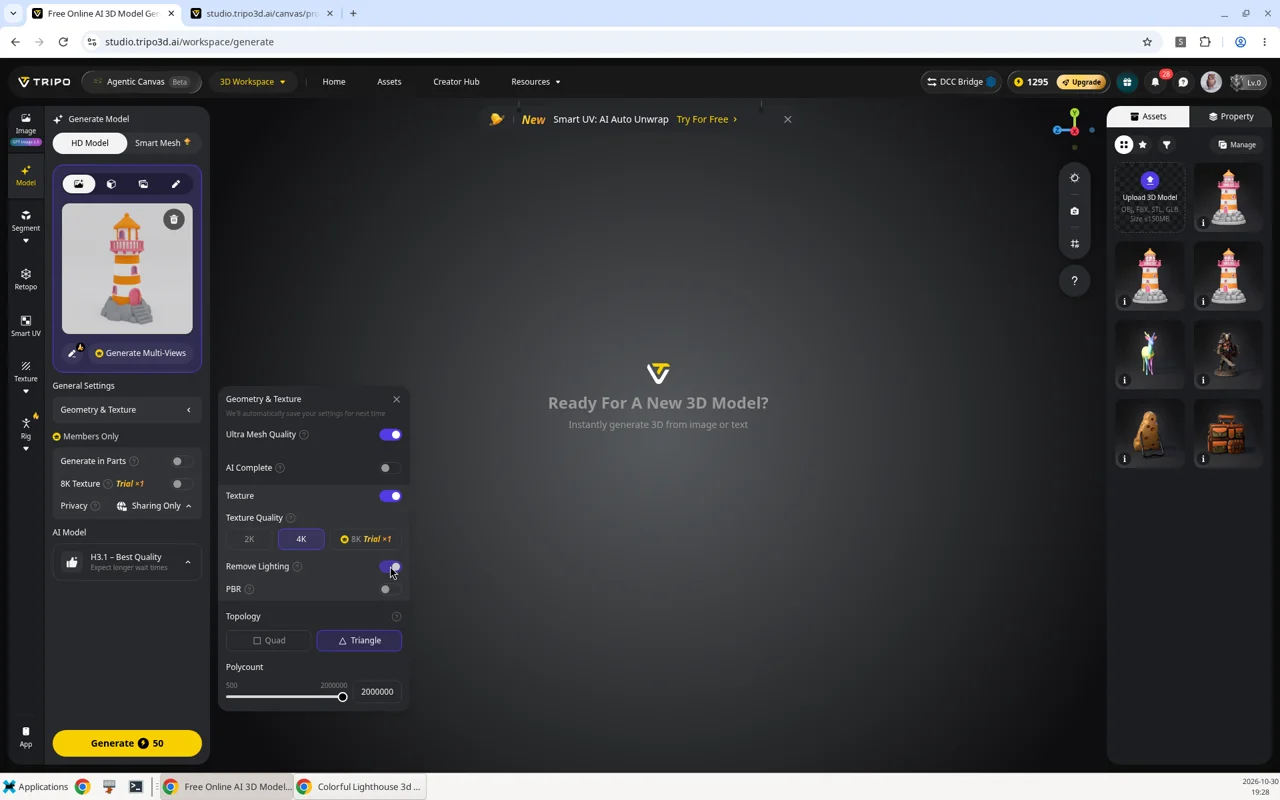
Tripo Studio Geometry and Texture panel with the Remove Lighting switch turned on
Figure 3: The Remove Lighting switch (Screenshot: Tripo Studio)

The lighthouse I printed has Remove Lighting on. To see what the switch does, I generated the same picture again with it off and kept every other setting the same. The times are approximate, because the queue varies.

Remove Lighting Credits Time Faces
On (the one I printed) 50 about 4 min 1,954,446
Off 50 about 2 min 1,937,713

The face counts are almost the same, so the switch does not change the mesh. It changes the texture. In the Tripo viewer, the model with the switch on has flat, saturated colors: bright pink, clean orange and white stripes and plain grey rocks. With the switch off, the same picture gives a model with soft shading and duller colors.
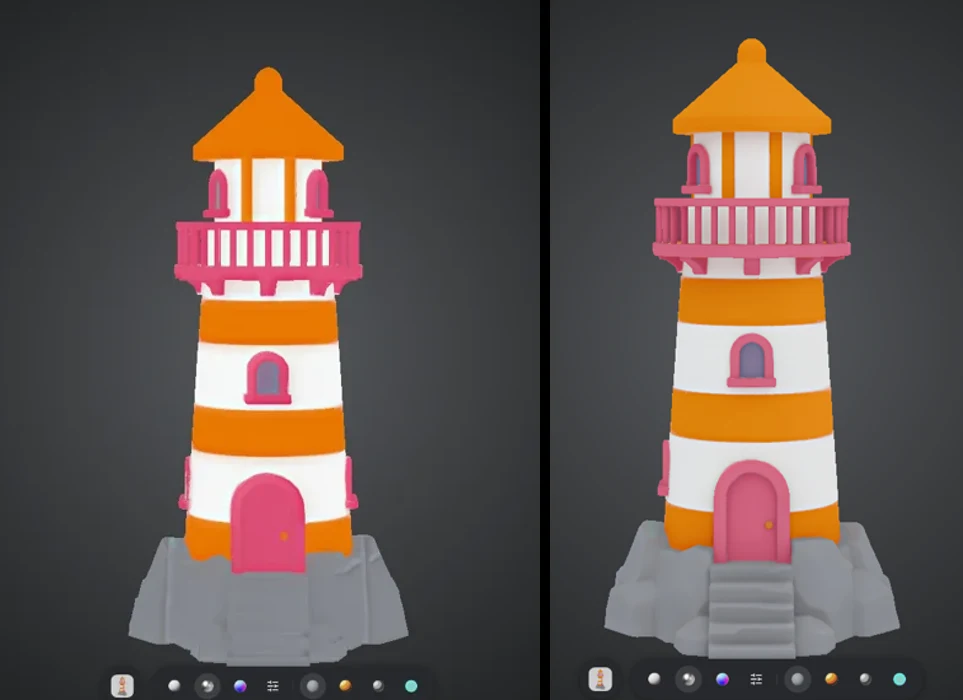
Two H3.1 lighthouse models from the Nano Banana Pro picture side by side, Remove Lighting on on the left and off on the right
Figure 4: Left: Remove Lighting on. Right: Remove Lighting off (Screenshot: Tripo Studio)

Step 3: Export Multi-Color Printable File

This is the feature that matters for an AMS owner, so I tested it as it comes, with no edits to the file. Open the model, choose 3D Print and then Export Multi-Color Printable File. The menu also has Send to items for seven slicers and Print & Delivery through JuJuBit.
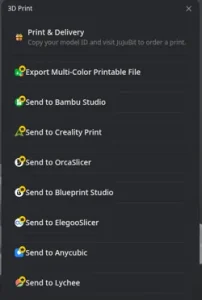
Tripo Studio 3D Print menu with Print and Delivery, Export Multi-Color Printable File and Send to slicer items
Figure 5: The 3D Print menu (Screenshot: Tripo Studio)

The 161 MB Wait

The export works in one click, but the button gives no feedback. After the click, at first nothing seems to happen: there is no progress bar, spinner or message, and the button feels unresponsive. Most likely that is because the file is so large. It is a 161 MB OBJ, and it takes a while before the download starts. A progress indicator or a size warning would help.

Opening It in Bambu Studio

The download is an OBJ file with the texture colors stored on the mesh. I opened it in the default Bambu Studio. My exports first showed two notices: the mesh has non-manifold geometry or open boundaries, and the object is too small and may be in meters or inches, with an offer to scale it to millimeters. After that, Bambu Studio opens an Import Model dialog. It groups the colors into clusters (Color Count 4, 8 or 16, plus a Smooth Level) and asks you to map each cluster to a filament.

You would expect four clusters, because the model in Tripo has four colors. With Remove Lighting off, the model gave only three: a dull rose (#A95665), a brownish orange (#C47230) and a pinkish cream (#CDBAB1). The grey rocks came out cream, the underside of the base came out dark rose, and there was no grey at all to map to a filament. The likely cause is the baked lighting. Tripo paints the shaded side of the model into the texture, and the export carries it along, so the colors drift and merge.
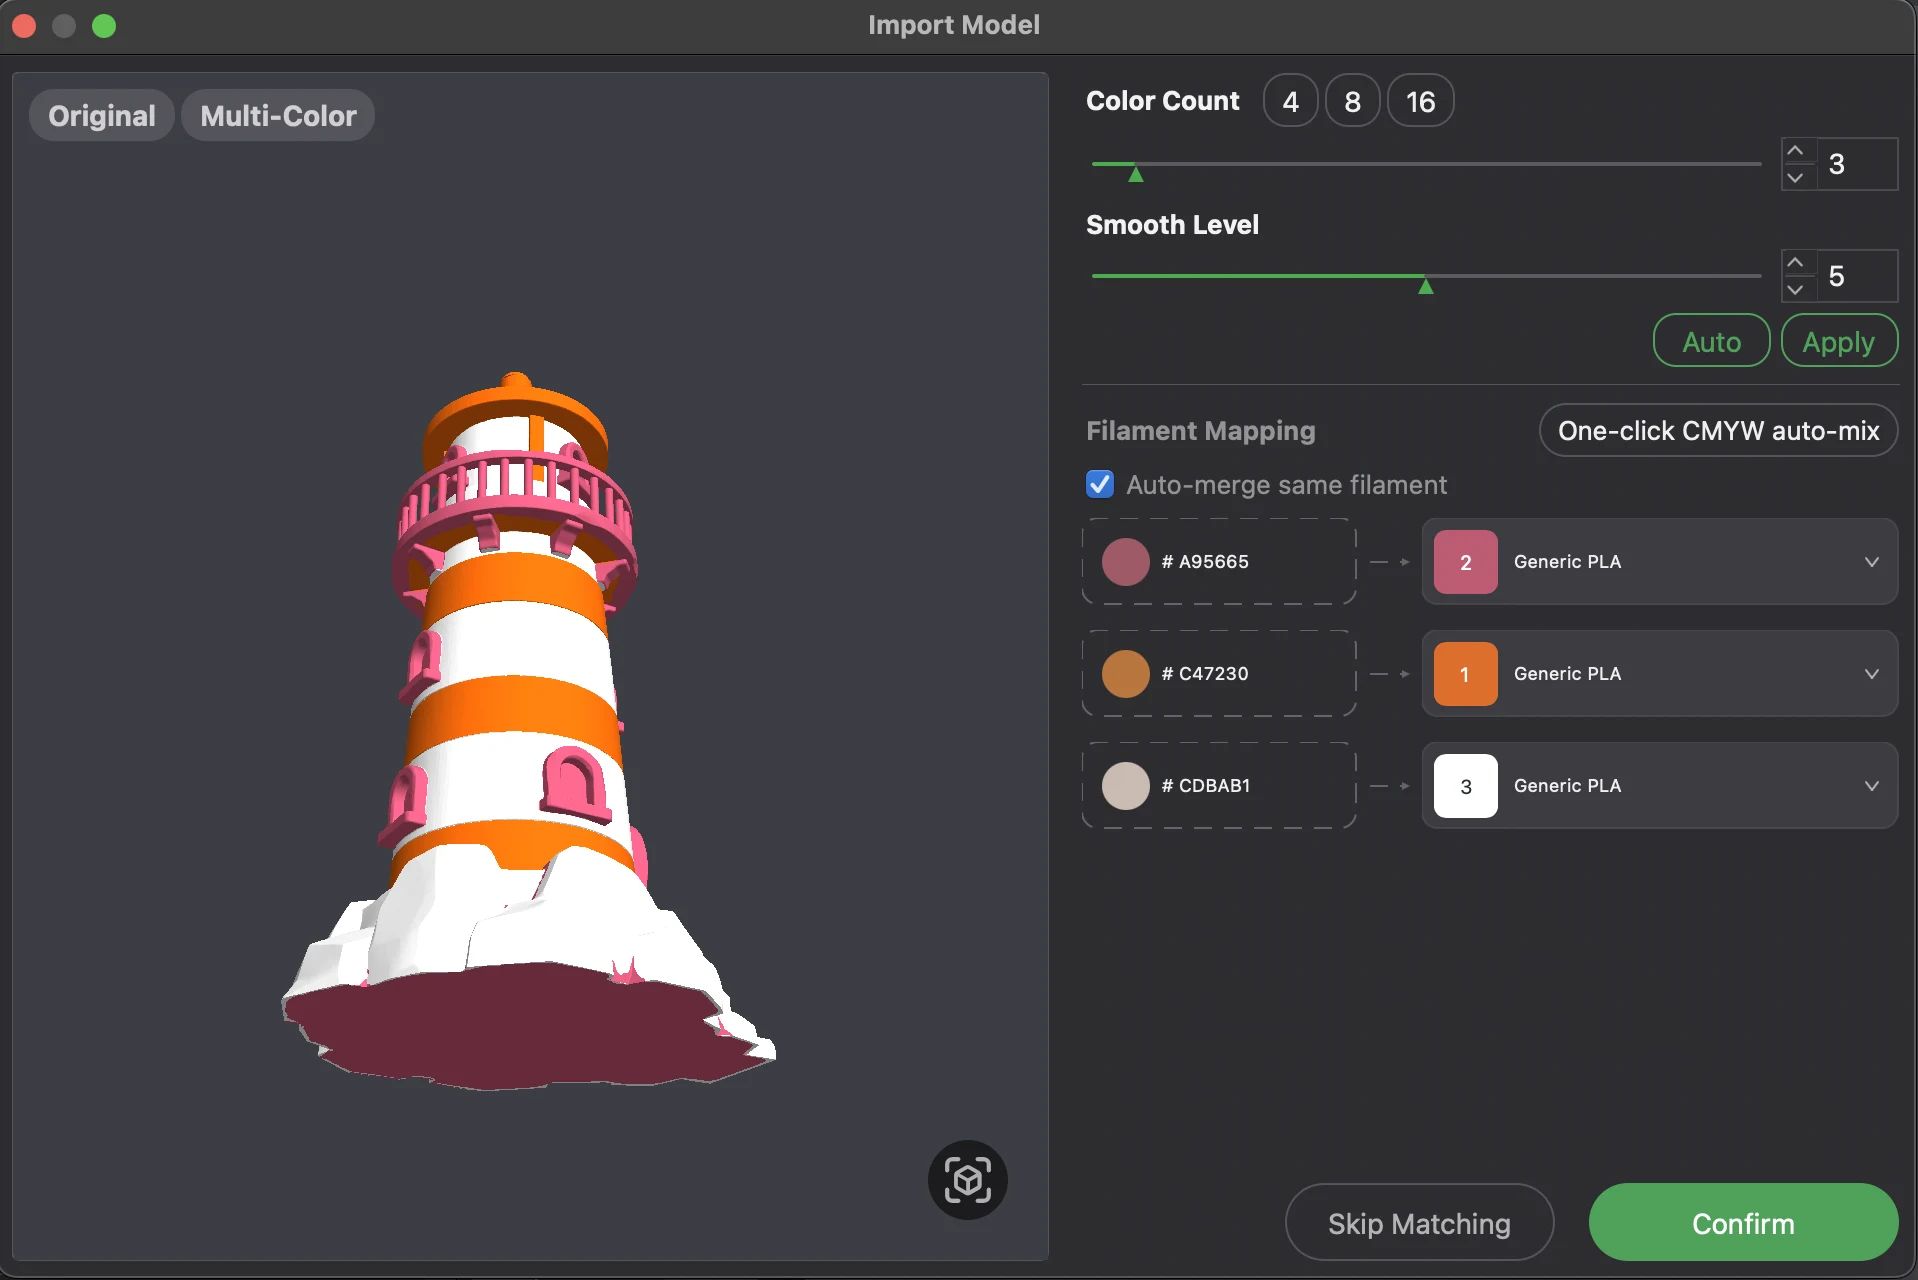
Bambu Studio Import Model dialog showing only three color clusters for the Nano Banana Pro model with Remove Lighting off
Figure 6: Remove Lighting off: three colors (Screenshot: Bambu Studio)

With Remove Lighting on, the model I printed gave five clusters: pink (#CD5973), grey-mauve (#897D84), orange (#DE8537) and white (#EBD6D0), plus a green (#647A56) that is not part of the model. That is not perfectly clean, but all the colors of the lighthouse are there, including the grey for the rocks. I mapped the green to grey and continued.
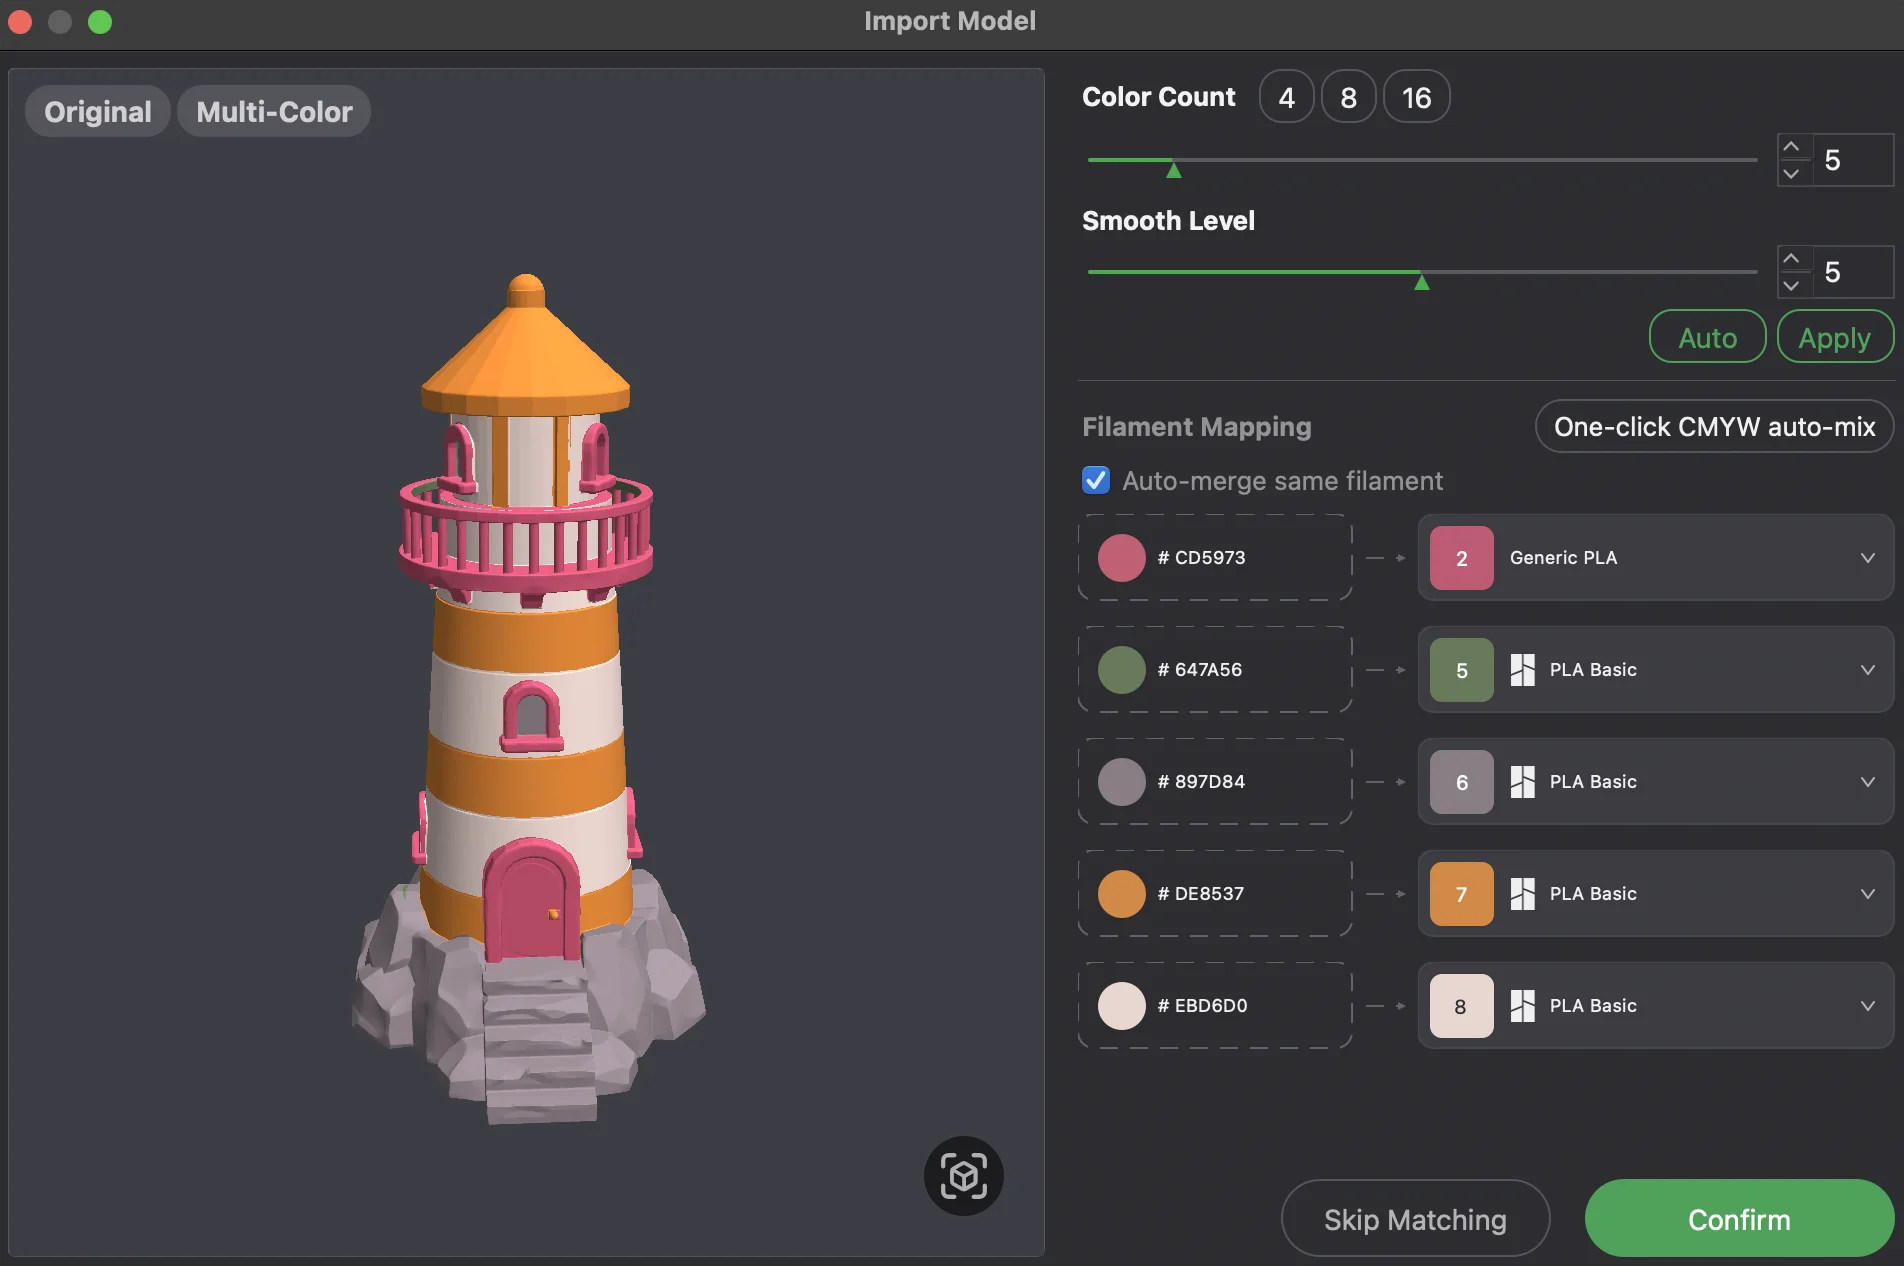
Bambu Studio Import Model dialog showing five color clusters for the Nano Banana Pro model with Remove Lighting on
Figure 7: Remove Lighting on, the model I printed (Screenshot: Bambu Studio)

I also tried Color Count 4, because I own four filaments. That merged orange and white into one peach cluster (#ECB48D), so the lighthouse lost its stripes. Check the preview before you confirm.
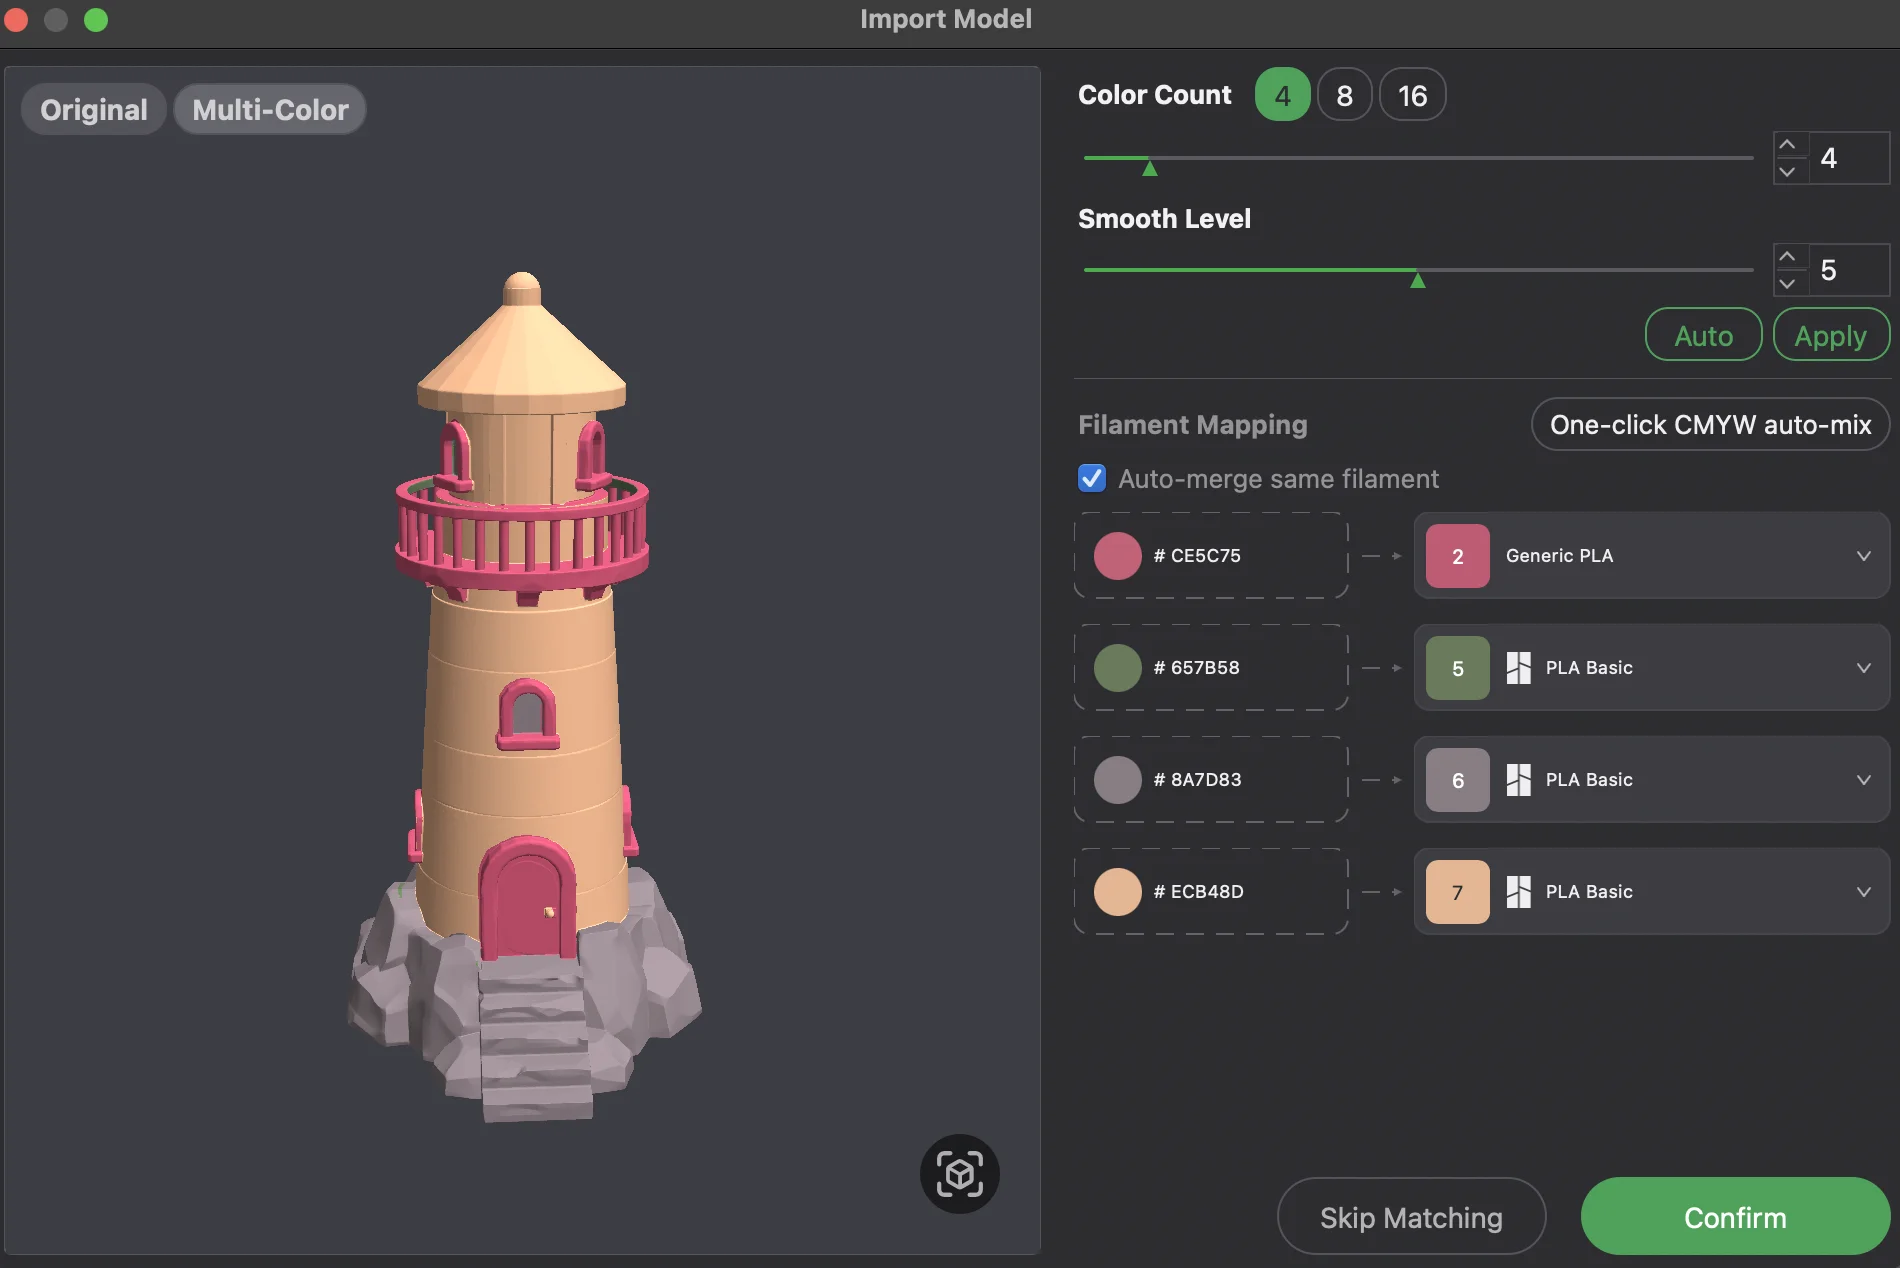
Bambu Studio Import Model dialog with Color Count 4 merging orange and white into a peach cluster
Figure 8: Color Count 4 merges orange and white (Screenshot: Bambu Studio)

This was one run per setting, so treat it as an indication and not as a rule. But in my tests Remove Lighting gave the cleaner colors.

The Orientation Is Wrong

After I confirmed the mapping, the lighthouse did not stand upright on the build plate. You would not expect that from a 3D printing export, and Tripo has no orientation setting in this export, so you have to fix it in the slicer.
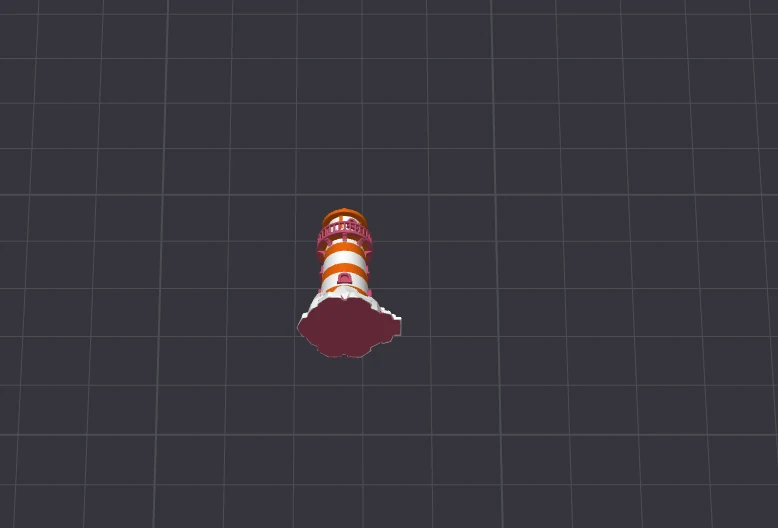
Bambu Studio build plate view with the Tripo H3.1 Nano Banana Pro lighthouse lying tilted instead of standing upright after import
Figure 9: The lighthouse does not stand upright after import. Shown is the Nano Banana Pro model with Remove Lighting off; the model I printed came in the same way (Screenshot: Bambu Studio)

Advice for Tripo and Its Users

Switch Remove Lighting on.
Turn it on before you generate a model you want to print in color. In my tests the colors came out cleaner, and it costs no extra credits.
Check the preview.
Look at the clusters in the Import Model dialog before you confirm. Color Count 4 merged orange and white on my export.
Expect a big file.
The export is 161 MB and the button gives no feedback, so wait after the click.
Check the orientation.
Look at the build plate before you slice.

Step 4: Other Exports and Slicing

Exports are free. Besides the multi-color OBJ from the 3D Print menu, the Export button in Tripo Studio offers USD, FBX, OBJ, STL, GLB and 3MF, with a choice of texture resolution. I downloaded the plain formats of the Nano Banana Pro model I printed, with the default options and a 4K texture. The model has 1,954,446 faces and 1,012,538 vertices, so the files are large.
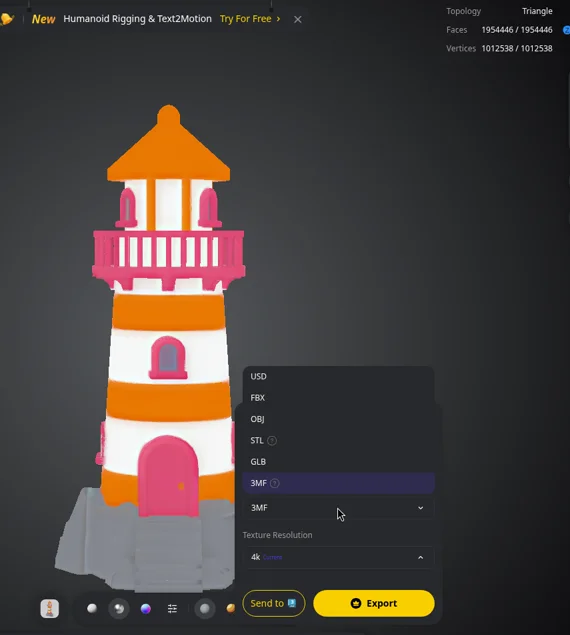
Tripo Studio export menu for the Nano Banana Pro lighthouse with USD, FBX, OBJ, STL, GLB and 3MF and a 4K texture
Figure 10: The Export menu with the plain formats (Screenshot: Tripo Studio)
Format Download size
STL about 98 MB
GLB about 58 MB
OBJ about 30 MB zipped, the OBJ inside is about 145 MB
3MF about 31 MB

The OBJ export had Export Vertex Colors on by default.

STL Repair

Tripo also has a free STL Repair tool that runs in the browser. It is not in the Tools menu or the 3D Print menu of Tripo Studio, so you have to find it on the Tripo website. I loaded the plain STL. The check found 1,954,446 triangles in one shell, with no open edges, no non-manifold edges and no degenerate or duplicate faces. The only issue was 11 edges with inconsistent normals, where neighboring triangles point in opposite directions.
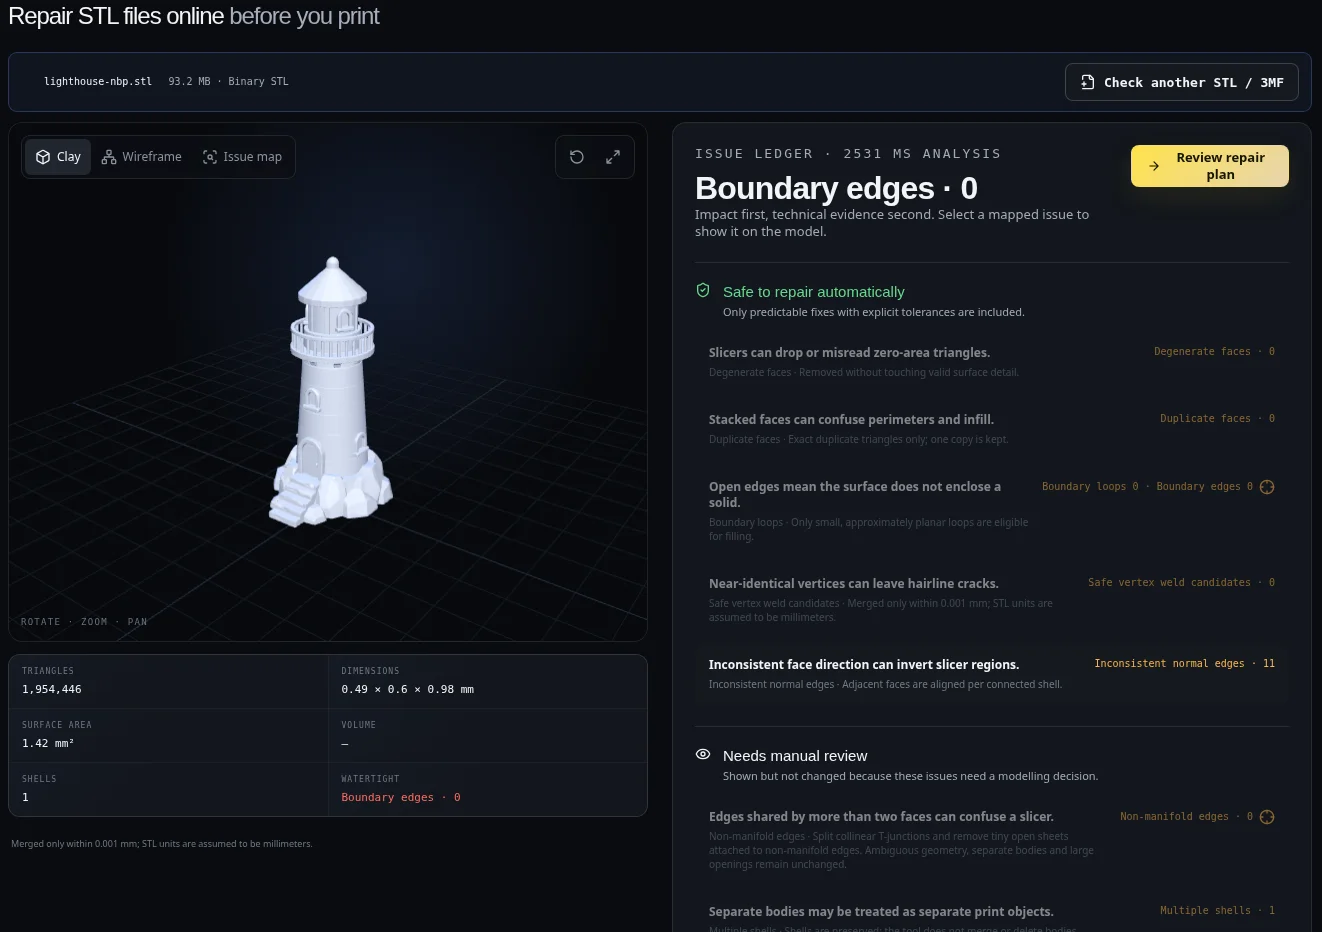
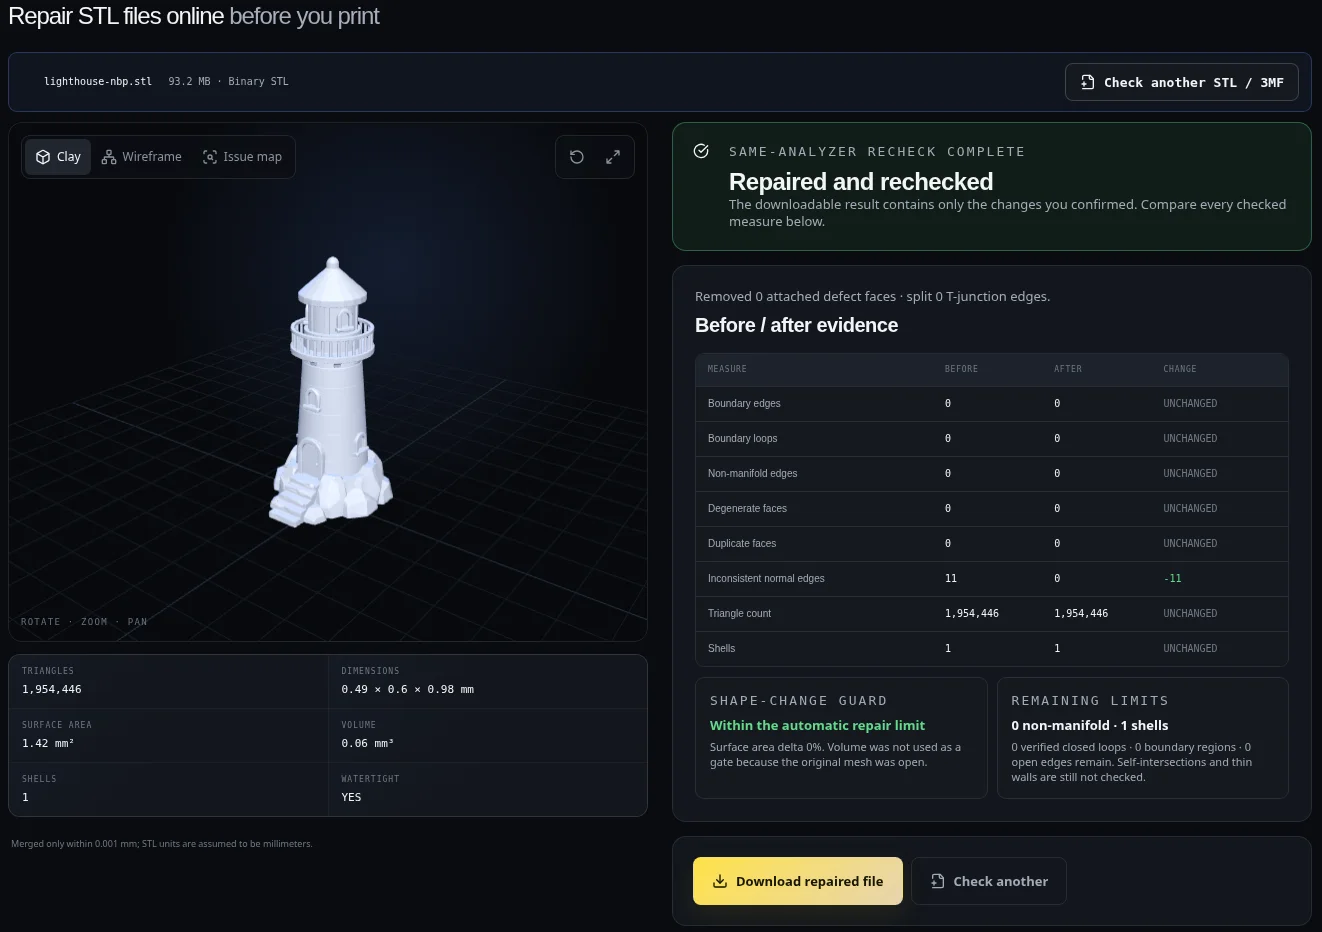
Tripo STL Repair check of the Nano Banana Pro lighthouse STL showing 0 boundary edges and 11 inconsistent normal edges
Figure 11: The check before repair (Screenshot: Tripo STL Repair)
Tripo STL Repair result for the Nano Banana Pro lighthouse STL, repaired and rechecked with 0 inconsistent normal edges and an unchanged triangle count
Figure 12: Repaired and rechecked (Screenshot: Tripo STL Repair)

After Repair and recheck, the tool reported 0 inconsistent normal edges, and everything else stayed the same. The fix does not change the shape: the triangle count stayed at 1,954,446, and the tool marked the file as watertight and within its automatic repair limit. So there was nothing to fix except the normals, and the STL was otherwise clean.

One thing to watch: the tool shows the lighthouse as 0.49 x 0.6 x 0.98 mm. The STL has no real-world scale, which matches the notice I got in Bambu Studio with the multi-color export: the object is too small, with an offer to scale it to millimeters. You set the size yourself in the slicer.

Step 5: The Print
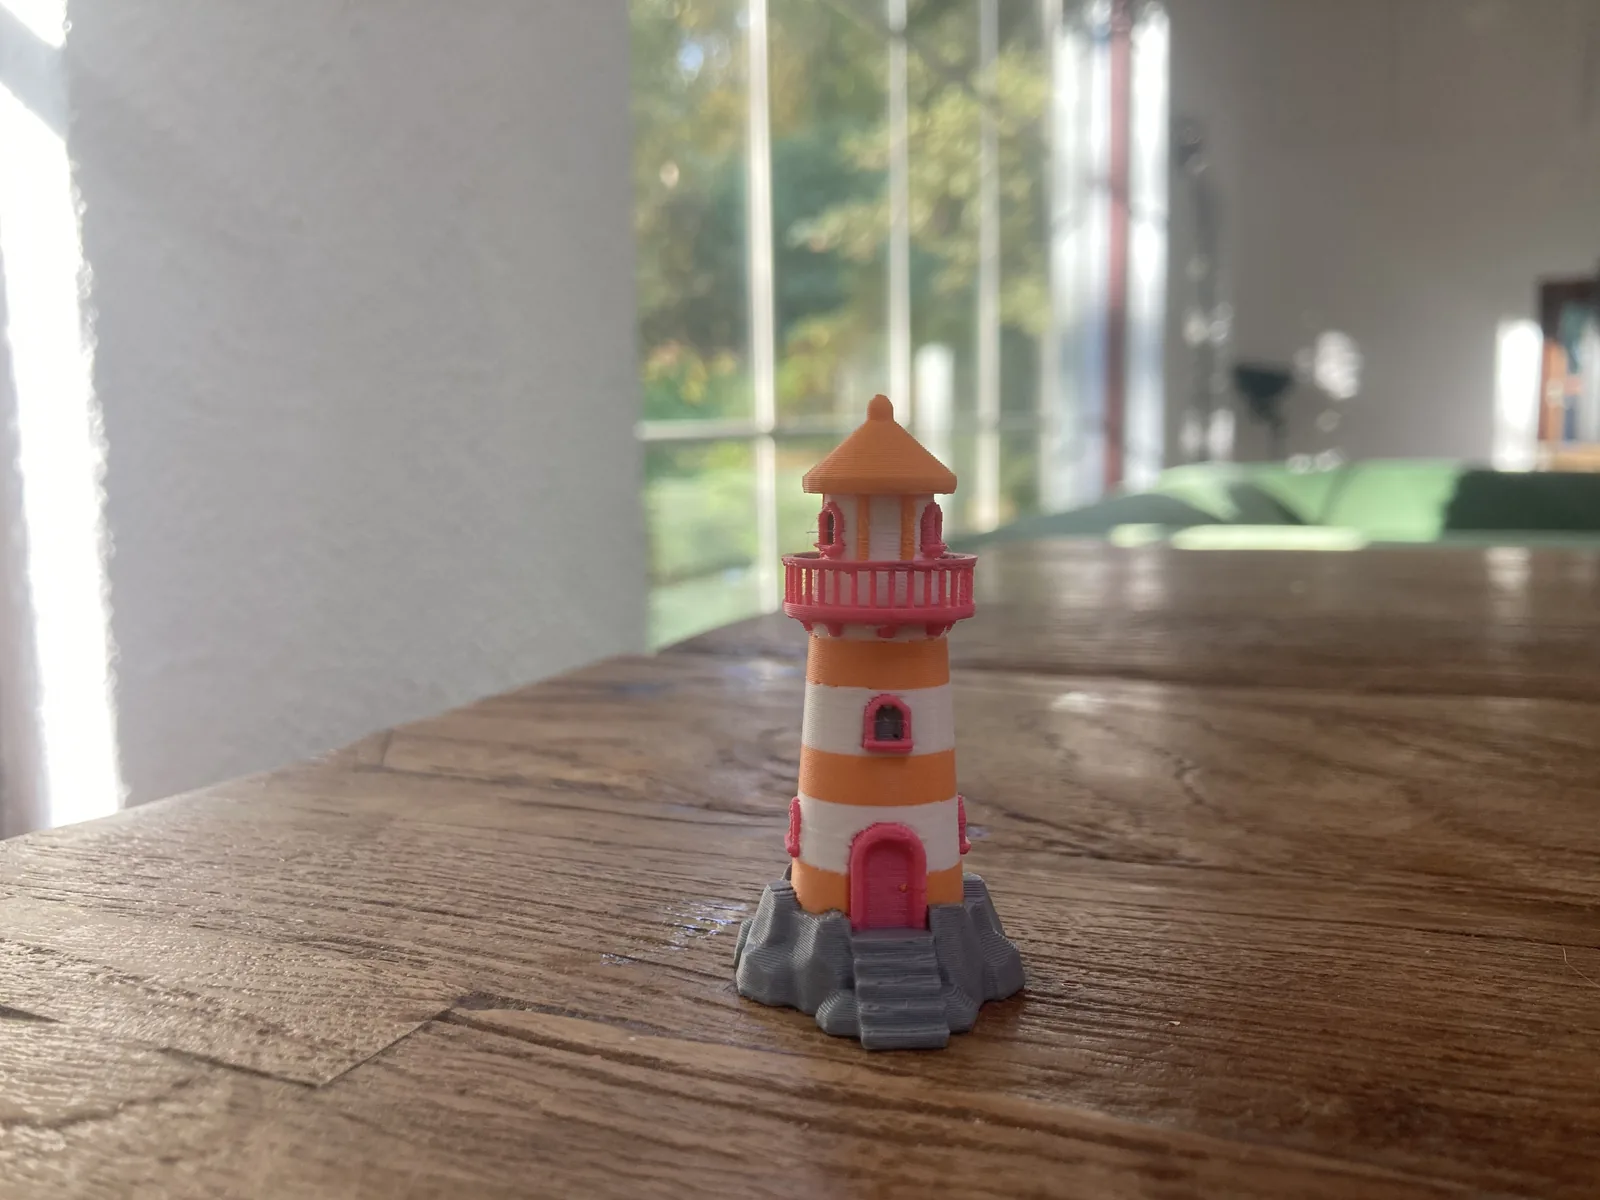
Finished multi-color 3D print of the Tripo H3.1 lighthouse in orange, white, pink and grey filament on a wooden table
Figure 13: The finished lighthouse, printed in four colors on my Bambu Lab P2S (Photo: 3DPrinting.com)

I sliced the lighthouse in Bambu Studio on my Mac for the Bambu Lab P2S with a 0.4 mm nozzle and the AMS, using the 0.20 mm Standard profile with Generic PLA in all four slots. Supports are on (tree, automatic), infill is 15% grid with two wall loops, and the prime tower and an automatic 5 mm brim are on. I printed on the Textured PEI plate.

Bambu Studio estimated 8 hours and 44 minutes: 7 minutes of preparation and 8 hours 37 minutes of printing, with 250 filament changes. The total comes to 129.16 g of filament. The lighthouse itself uses 8.42 g and the supports 2.81 g. Purging uses 92.42 g and the prime tower 25.51 g, so about 91% of the filament never ends up in the lighthouse. That is the price of four colors on an AMS, and it is worth knowing before you start.

Agentic Canvas (Beta)

Tripo Studio also has Agentic Canvas, a chat agent that works on a node canvas. You describe the project and it makes the image, the views and the HD model. The models it makes look nice. I used it on the Pro account at the end of October; since 2 November Tripo lists it as early access for the Max and Team plans, so check your plan before you count on it.

For 3D printing it is still a beta. It has no Export Multi-Color Printable File setting, so you do not get that print-ready color export. I also asked it to recolor models with the four colors I have in my AMS, and the reprompts did not give me a nice new model. The credits add up too: one run each cost about 122 credits for an owl, 140 for a rocket, 225 for a curled dragon and about 306 for a first dragon. One exported dragon 3MF even came up in Bambu Studio on my Mac with the message “The 3mf file has invalid config, load geometry data only”.

Tripo Pricing and Credits

The Pro plan costs $20 a month, or $240 billed yearly, and gives 3,000 credits a month, 10 tasks at once and private models with commercial use. That is about 60 H3.1 models at 50 credits, or about 85 H3.0 models at 35. The Free plan has 200 credits a month, one task at once, public models and non-commercial use. These are the prices on Tripo’s pricing page on 30 October 2026, in US dollars. 3DPrinting.com readers get 60% off the monthly Pro plan with the code at the end of this review.

Exports were free in my tests. Extra credits cost $10 for 1,000, $100 for 12,000 and $500 for 62,000. Monthly credits do not roll over.

Who It’s For

Tripo suits someone who wants a detailed, textured model from one picture in minutes, and who wants to try several image models in the same workspace first. If you own an AMS and want a colored print, turn on Remove Lighting before you generate and expect to check and map the colors in Bambu Studio.

Who It’s Not For

It is less suited to anyone who wants a finished four-color file with one click. Tripo does not reduce the colors to your filaments, and the export does not open in the right orientation.

Wishlist

  • A color reduction option in the export, where I pick my filaments and Tripo merges the rest.
  • An export that opens upright on the build plate.
  • Progress feedback and a size warning on the multi-color export, because the 161 MB file makes the button feel unresponsive.
  • Remove Lighting as the default for models meant for printing, or a clear hint in the 3D Print menu.
  • The multi-color print export inside Agentic Canvas.

Verdict

Tripo H3.1 is quick and easy. It made a detailed lighthouse in two to four minutes for 50 credits, and you can make the image, the model and the printable file in the same workspace.

The multi-color export is the part to watch. It works, but the default file carries baked shadows that Bambu Studio turns into muddy or merged colors. Turning on Remove Lighting gave cleaner colors in my tests. You still map the colors yourself, and the model opens in the wrong orientation on the build plate. A progress indicator for the 161 MB file would also help.
Reader offer

60% off Tripo Pro for 3DPrinting.com readers

Tripo gives our readers 60% off the monthly Pro plan. The offer works for new and existing users and is valid through 31 December 2026, while redemptions last.

Code3DPRINTING
Open Tripo
  1. Open Tripo through the button above.
  2. Choose the monthly Pro plan.
  3. Enter 3DPRINTING in the discount code field at checkout. The link does not apply the discount by itself; without the code you pay the full price.

3DPrinting.com earns a commission on Pro subscriptions taken through this link, with or without the code. See the disclosure at the top of this review.

Share:
WhatsApp Twitter Facebook LinkedIn Buffer Reddit E-mail

Peter Strikwerda

Building 3DPrinting.com since 2011. Peter is a web developer at heart who loves testing and creating digital tools.

Join our newsletter

Our newsletter is free & you can unsubscribe any time.

Latest posts

University of South Florida Students Test 3D Printed Oyster Bricks on Tampa Bay Seawalls

Honors College students in Florida print clay hexa-logs that help native oysters settle on Tampa Bay seawalls, and they plan to open-source the... read more »

Environmental
University of South Florida Students Test 3D Printed Oyster Bricks on Tampa Bay Seawalls

Bambu Lab Launches the H3C, a Nine-Tool Changer Priced From $2,499

Bambu Lab has launched the H3C, the first printer in its third generation and a nine-tool tool changer. Nine print tools dock in... read more »

3D Printers
Bambu Lab Launches the H3C, a Nine-Tool Changer Priced From $2,499

PathOn Robotics Releases Files for Its Three-Finger 3D Printed Robot Hand

Robot maker PathOn Robotics has released print files for the three-finger, four-motor 3D printed hand its own robot uses.

Electronics
PathOn Robotics Releases Files for Its Three-Finger 3D Printed Robot Hand

Army Research Lab Flies Drone Powered by 3D Printed Heavy-Fuel Engine

The U.S. Army Research Laboratory (ARL) has flown a midsized drone on what it says is the first 3D printed heavy-fuel engine, an... read more »

Aerospace
Army Research Lab Flies Drone Powered by 3D Printed Heavy-Fuel Engine

UNIST Uses Ultrasound to Tell When 3D Printed Concrete Can Take the Next Layer

A sensor plate on one side of the print lets UNIST engineers track when fresh 3D printed concrete is strong enough to carry... read more »

Construction
UNIST Uses Ultrasound to Tell When 3D Printed Concrete Can Take the Next Layer

Polymaker Announces CymphoniK, a Six-Pellet Color Mixing System for Large-Format 3D Printing

Polymaker has announced CymphoniK, a color mixing system for pellet-fed large-format 3D printing that lets a studio produce custom colors on site from... read more »

Materials
Polymaker Announces CymphoniK, a Six-Pellet Color Mixing System for Large-Format 3D Printing

The New Raw 3D Prints Swinging Public Seats From Rotterdam Harbour Rope

The New Raw has 3D printed Buoy, a series of swinging public seats made from discarded Rotterdam harbour rope recycled in the Netherlands.

Art
The New Raw 3D Prints Swinging Public Seats From Rotterdam Harbour Rope

Prague Firefighters 3D Print Their Own Gear on a Prusa CORE One L

Prague's central fire station prints its own mounts, door wedges and spare parts on a Prusa CORE One L, saving around 90 to... read more »

News
Prague Firefighters 3D Print Their Own Gear on a Prusa CORE One L

Aurora Labs Raises A$6 Million to Scale Up 3D Printed Turbojet Production

Aurora Labs has secured A$6 million, with engineering group Walkinshaw as a strategic investor, to expand production of its 3D printed turbojets.

3D Printing Metal
Aurora Labs Raises A$6 Million to Scale Up 3D Printed Turbojet Production

Social

  • Facebook Facebook 3D Printing
  • Linkedin Linkedin 3D Printing
Join our newsletter

Our newsletter is free & you can unsubscribe any time.

revopoint miraco sidebar

Creality Ender-3 V3 Mega

$569
  • This page keeps the Ender-3 S1 Plus address.
Creality Ender-3 V3 Mega
Buy Now store.creality.com

Prusament ASA

  • Batch-traceable ASA with 42 MPa tensile strength and 93°C HDT backed by published data…
Prusament ASA
Buy Now prusa3d.com

Prusa CORE One L

~$1,799
  • Doubles the print volume of the original CORE One with a 300 × 300 × 330 mm build, AC…
Prusa CORE One L
Buy Now prusa3d.com

3DMakerpro Seal

~$699
  • First sub-$1,000 consumer scanner to hit 0.01mm point accuracy, with blue structured li…
3DMakerpro Seal
Buy Now store.3dmakerpro.com

Creality HALOT-X1

$469
  • This page keeps the HALOT-ONE address and now covers the HALOT-X1, the current Creality…
Creality HALOT-X1
Buy Now store.creality.com

Fiberlogy PCTG

  • Most widely cited PCTG brand in European communities using Eastman Tritan copolyester,…
Fiberlogy PCTG
Buy Now fiberlogy.com

Raise3D Pro3 Plus HS

~$7,000-$7,600
  • A production-grade IDEX machine with a 300 × 300 × 605 mm build volume, Hyper FFF tec…
Raise3D Pro3 Plus HS
Buy Now matterhackers.com

Bambu Lab P2S Combo

~$699-$749
  • Pairs the P2S with the AMS 2 Pro for active filament drying during multicolor prints, s…
Bambu Lab P2S Combo
Buy Now bambulab.com

Site footer

The 3DPrinting.com newsletter

The week’s best reviews, buyer’s guides and deals. One email every Friday, no spam.

By subscribing you agree to our privacy policy. Unsubscribe anytime.

3D PRINTING.COM

Independent reviews, buyer’s guides and news about 3D printers, materials, scanners and software.

Reviews

  • All reviews
  • 3D printers
  • Filament & materials
  • 3D scanners
  • Software
  • Compare products

Buyer's guides

  • Best 3D printers
  • Best resin 3D printers
  • 3D printers for beginners
  • Best PLA filament
  • Best slicers
  • Best pro 3D scanners

Learn & news

  • Latest news
  • Deals
  • What is 3D printing?
  • FDM vs resin
  • Use cases by industry
  • Glossary

Company

  • About us
  • Contact us
  • Advertise with us
  • Media kit
  • Nederland 3D Printing

© 2026 3DPrinting.com · Strikwerda en Dehue

  • Privacy policy
  • Terms of use
  • Affiliate disclosure
  • RSS