
3D Printing

Buyer guides

  • Best 3D printers
  • For beginners
  • Multicolor
  • Resin printers
  • Budget (under $400)
  • For kids and schools
  • For miniatures
  • Large format
All printer guides

Brands and compare

  • Bambu Lab lineup compared
  • Compare printers
  • Full color 3D printers
  • Large scale and industrial

Reviews

  • Elegoo Mars 5 Ultra
  • FLSun T1 Pro
  • QIDI Tech Q1 Pro
All reviews
Best 3D Printers 2026: Buyer’s Guide

Start with the top picks

Best 3D Printers 2026: Buyer’s Guide

Twenty printers tested and ranked, from $169 to the H2D.

See the picks

Filament

  • Best PETG filament
  • Best PLA filament
  • Best TPU filament
  • Best ABS and ASA filament
  • Engineering filaments
  • Composite filaments
  • Flexible filaments
  • Bio filaments
All filament guides

Resin

  • For miniatures
  • Tough and ABS-like
  • Castable resin
  • Water-washable
  • Flexible resin
All resin guides

Accessories

  • Filament dryers
  • Printer enclosures
  • Wash and cure stations
Best Filament Dryers (2026 Guide)

Most-clicked accessory

Best Filament Dryers (2026 Guide)

Wet filament causes most failed prints; the fix costs less than a spool.

Compare dryers

Buyer guides

  • Small objects
  • Medium objects
  • Large objects
  • Professional scanners
  • Scan with your phone
All scanner guides

Software and service

  • 3D scanner software
  • Scanning service vs buying

Reviews

  • Revopoint MetroY Pro
  • Revopoint Inspire 2
  • Revopoint Trackit
All scanner reviews
3D Scanners 2026: The Complete Buying Guide

Find the right scanner

3D Scanners 2026: The Complete Buying Guide

Nineteen scanners from $400 to $40,000, sorted by object size.

Open the guide

Design and AI

  • AI 3D model generators
  • 3D modeling and CAD software

Print prep and control

  • Slicers
  • STL repair tools
  • Printer host and remote control

Reviews

  • Meshy Edit Review: Fixing the Four-Eyed Dragon
  • Tripo H3.1
  • Meshy 7
All software reviews
Best AI 3D Model Generators for 3D Printing (2026)

Fastest-growing guide

Best AI 3D Model Generators for 3D Printing (2026)

Type a prompt, get a printable model: the tools we tested, free tiers first.

Try the tools

Start here

  • What is 3D printing?
  • How much does it cost?
  • FDM vs resin
  • Best printers for beginners

How it works

  • What is a 3D printer?
  • How does 3D printing work?
  • Types of 3D printing
  • Metal 3D printing

How-tos and glossary

  • 3D printing glossary
  • Food-safe 3D printing
  • Setting up a school program
  • Free 3D printable models
What is 3D Printing?

Start here

What is 3D Printing?

The one-page explainer, then how much it costs and which technology to buy.

Start reading
Black FridayNEW

Latest

  • Stanford Uses a 3D-Printed Model to Plan First US Adult Osteobionix Chest Wall Implant
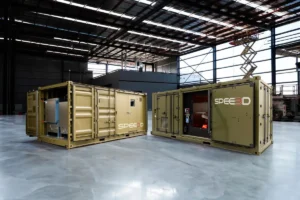
  • SPEE3D Plans 50 Cold Spray Metal Printing Factories Across Asia Pacific, Starting in Darwin
  • SWISSto12 Passes Design Review for 5G Satellite Antennas With 3D-Printed Front Ends
  • Bambu Lab H3C Mixes Layer Heights on the Same Surface
  • UT San Antonio Turns Sargassum Seaweed Into 3D-Printed Runoff Filters
All news

Use cases

  • Prague Firefighters 3D Print Their Own Gear on a Prusa CORE One L
  • OECHSLER Scales Carbon Lattice Production to 40 Printers Running Around the Clock
  • Reverse Engineering Without CAD Data: How the MetroY Ultra Turns Physical Parts into Digital Designs
  • Michigan State Engineers 3D Printed Helmet Inserts to Help Quarterbacks Tackle Crowd Noise
  • 3D Printed Quiet Pickleball Unveiled
All use cases

Industry

  • Automotive
  • Aerospace
  • Medical
  • Dental
  • Construction
  • Rapid prototyping
  • Electronics
  • Food
  • Fashion
  • Bioprinting
Stanford Uses a 3D-Printed Model to Plan First US Adult Osteobionix Chest Wall Implant

Latest

Stanford Uses a 3D-Printed Model to Plan First US Adult Osteobionix Chest Wall Implant

Stanford surgeons used a 3D-printed model to plan a 16-hour operation that ended with the first US adult…

Read more
Contact
  • Home
  • Products
  • Videos
  • Newsletter
  • Contact us

Buyer guides

  • Best 3D printers
  • For beginners
  • Multicolor
  • Resin printers
  • Budget (under $400)
  • For kids and schools
  • For miniatures
  • Large format
All printer guides

Brands and compare

  • Bambu Lab lineup compared
  • Compare printers
  • Full color 3D printers
  • Large scale and industrial

Reviews

  • Elegoo Mars 5 Ultra
  • FLSun T1 Pro
  • QIDI Tech Q1 Pro
All reviews

Filament

  • Best PETG filament
  • Best PLA filament
  • Best TPU filament
  • Best ABS and ASA filament
  • Engineering filaments
  • Composite filaments
  • Flexible filaments
  • Bio filaments
All filament guides

Resin

  • For miniatures
  • Tough and ABS-like
  • Castable resin
  • Water-washable
  • Flexible resin
All resin guides

Accessories

  • Filament dryers
  • Printer enclosures
  • Wash and cure stations

Buyer guides

  • Small objects
  • Medium objects
  • Large objects
  • Professional scanners
  • Scan with your phone
All scanner guides

Software and service

  • 3D scanner software
  • Scanning service vs buying

Reviews

  • Revopoint MetroY Pro
  • Revopoint Inspire 2
  • Revopoint Trackit
All scanner reviews

Design and AI

  • AI 3D model generators
  • 3D modeling and CAD software

Print prep and control

  • Slicers
  • STL repair tools
  • Printer host and remote control

Reviews

  • Meshy Edit Review: Fixing the Four-Eyed Dragon
  • Tripo H3.1
  • Meshy 7
All software reviews

Start here

  • What is 3D printing?
  • How much does it cost?
  • FDM vs resin
  • Best printers for beginners

How it works

  • What is a 3D printer?
  • How does 3D printing work?
  • Types of 3D printing
  • Metal 3D printing

How-tos and glossary

  • 3D printing glossary
  • Food-safe 3D printing
  • Setting up a school program
  • Free 3D printable models
Black FridayNEW

Latest

  • Stanford Uses a 3D-Printed Model to Plan First US Adult Osteobionix Chest Wall Implant
  • SPEE3D Plans 50 Cold Spray Metal Printing Factories Across Asia Pacific, Starting in Darwin
  • SWISSto12 Passes Design Review for 5G Satellite Antennas With 3D-Printed Front Ends
  • Bambu Lab H3C Mixes Layer Heights on the Same Surface
  • UT San Antonio Turns Sargassum Seaweed Into 3D-Printed Runoff Filters
All news

Use cases

  • Prague Firefighters 3D Print Their Own Gear on a Prusa CORE One L
  • OECHSLER Scales Carbon Lattice Production to 40 Printers Running Around the Clock
  • Reverse Engineering Without CAD Data: How the MetroY Ultra Turns Physical Parts into Digital Designs
  • Michigan State Engineers 3D Printed Helmet Inserts to Help Quarterbacks Tackle Crowd Noise
  • 3D Printed Quiet Pickleball Unveiled
All use cases

Industry

  • Automotive
  • Aerospace
  • Medical
  • Dental
  • Construction
  • Rapid prototyping
  • Electronics
  • Food
  • Fashion
  • Bioprinting
Contact
Blog
  • Latest News
  • Use Cases
  • Reviews
  • 3D Printers
  • 3D Printing Metal
Featured Industries
  • Automotive
  • Aerospace
  • Construction
  • Dental
  • Environmental
  • Electronics
  • Medical
  • Military
  • Fashion
  • Art
Company Information
  • What is 3D Printing?
  • Advertise with us
  • Media Kit
  • Nederland 3D Printing
Home / Reviews / Meshy Edit Review: Fixing the Four-Eyed Dragon
creality header

Meshy Edit Review: Fixing the Four-Eyed Dragon

Hands-On Review

In September I reviewed Meshy 7.1 by turning a designer’s drawings into four-color board game pawns. The dragon I liked best never reached the printer: the generator had sculpted a second pair of eyes into its head, and no texture pass can paint away what is in the mesh. Being able to fix one part of a model without regenerating all of it was the biggest item on my wishlist. Three weeks later Meshy shipped Meshy Edit, which promises exactly that. I took the four-eyed dragon back out of my library and asked Edit to give it two eyes. It did. The pawn that was impossible in September now stands on the board, and no modeling program was involved at any point. Eleven attempts failed before the twelfth worked, and the thirteenth, the same approach on a second four-eyed model, worked at the first try. This review should save you the first eleven.

Disclosure

Meshy provided a Pro membership and paid 3DPrinting.com an editorial fee for this independent hands-on review, under the same terms as the first: Meshy had no say in the content, rating or timing and did not see the piece before publication. The reader code and the affiliate link at the end come from a separate promotional agreement with Meshy’s partnership team and had no bearing on the testing or the score. The Snapmaker U1 used for the prints was provided by Snapmaker for the September review, and the filament is Polymaker Panchroma Matte PLA, also provided. The dragon was drawn by game designer Sonja Uittenboogaard and is used with her permission. Method: every geometry result in this piece was produced inside Meshy, and all three dragons were printed from the files as Meshy exported them, with the same slicer settings; the only thing changed in the slicer was which spool each filament number points to, as described below.

Score4.25 / 5Full scorecard

Jump to menu
On this page

  • The case: a dragon with four eyes
  • How Edit works
  • Thirteen attempts, so you need two
  • Retexture, Multicolor, and a pink dragon

More

  • The print
  • The numbers
  • What we would tell Meshy
  • Verdict
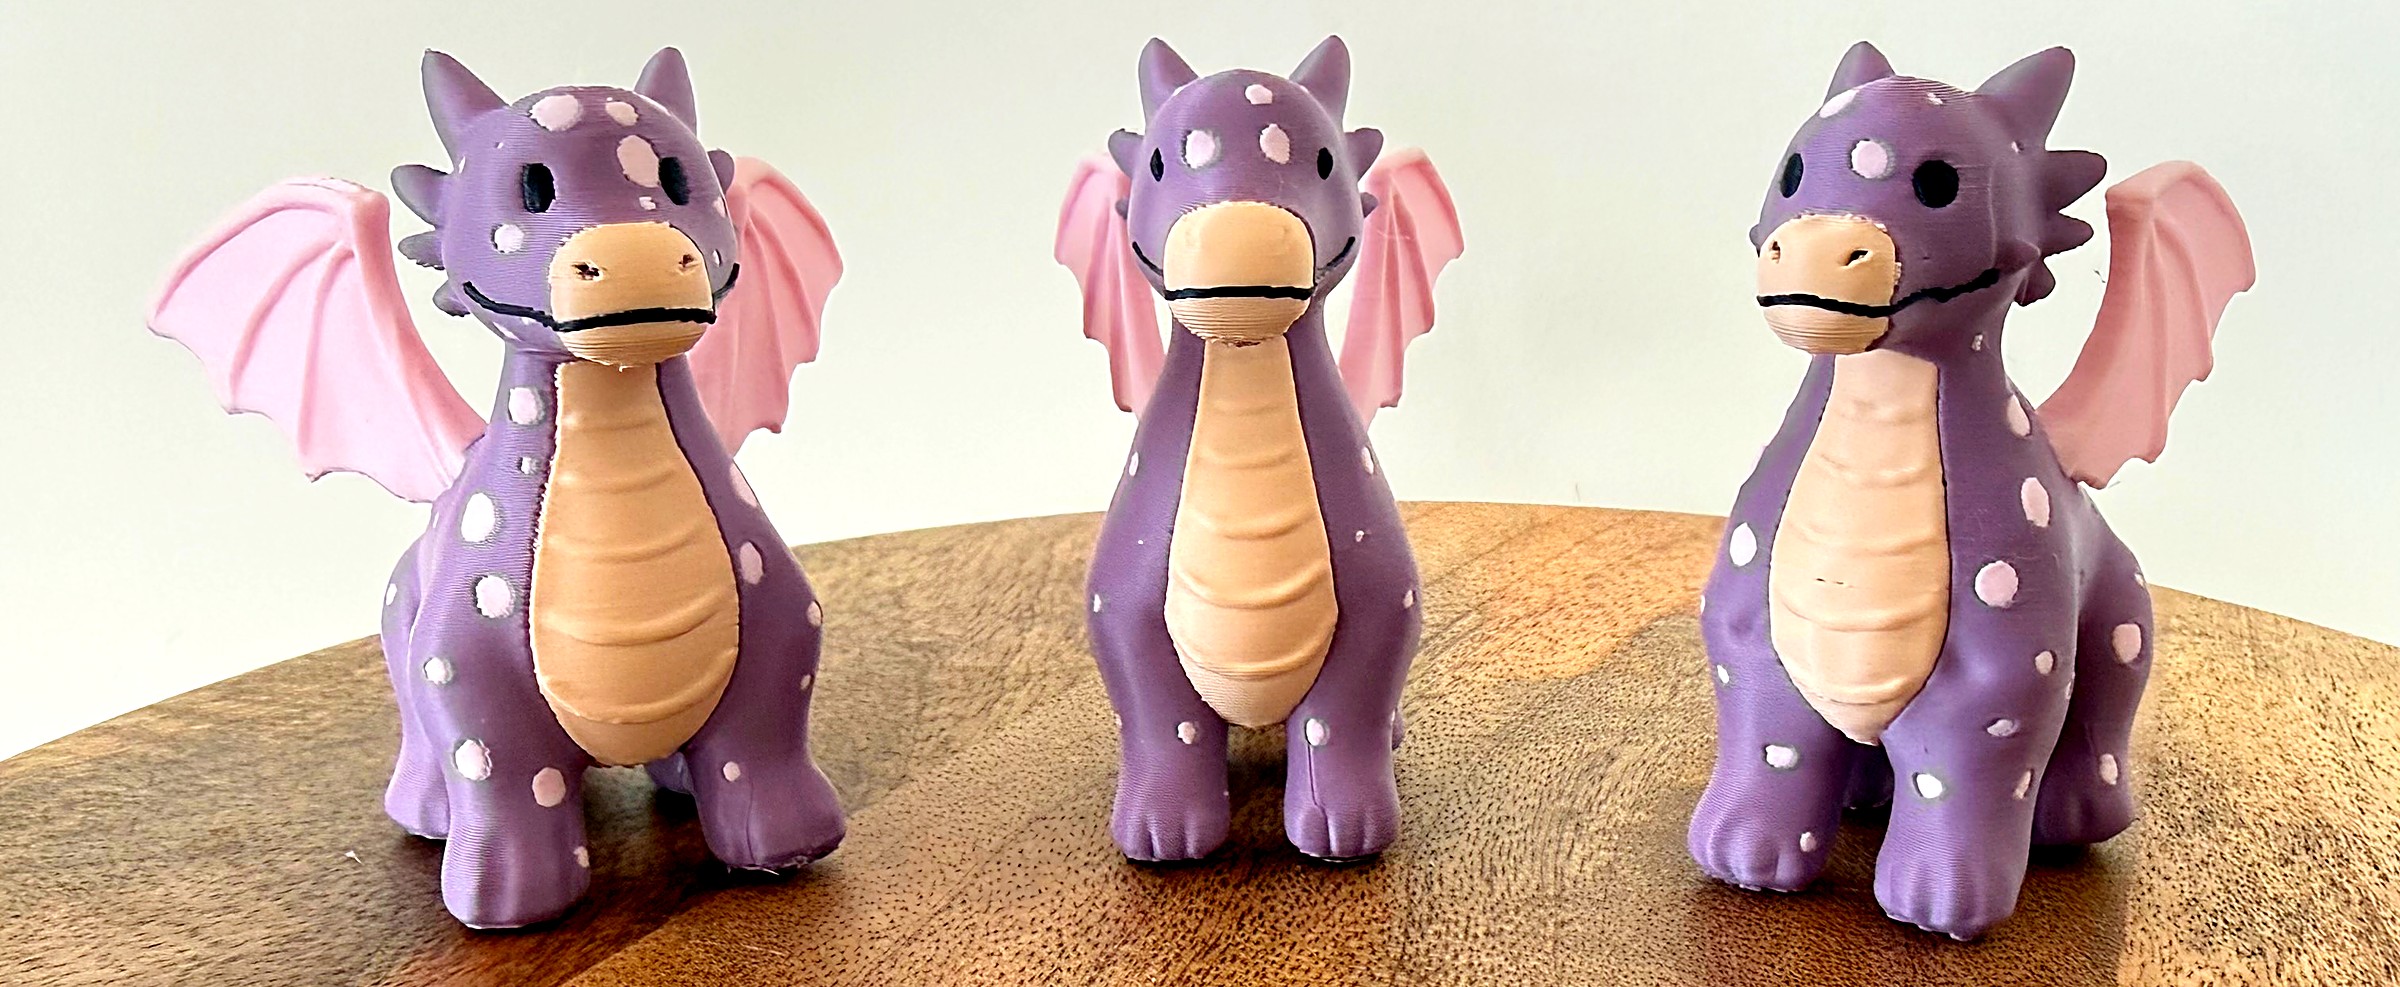
Three dragons, one day, one set of spools: the repaired favorite (left), the September pawn reprinted as the benchmark (center) and the second repaired dragon (right). All 75 mm, Snapmaker U1, Polymaker Panchroma Matte PLA.

The case: a dragon with four eyes

The dragon in question is a generation from 15 September. On screen it was my favorite of eleven runs, the one with its wings out the way Sonja drew them. The viewer’s gray mode showed the problem: four raised ovals in a row across the brow, two on each side, and the texture stage had painted a dark eye into every one of them. In September I could regenerate and hope, which gives a different dragon every time, or open a modeling program for a short smoothing pass, which that review had promised not to do. The pawn I printed instead is a good dragon, and Sonja called it spot on. It is not the one I wanted.

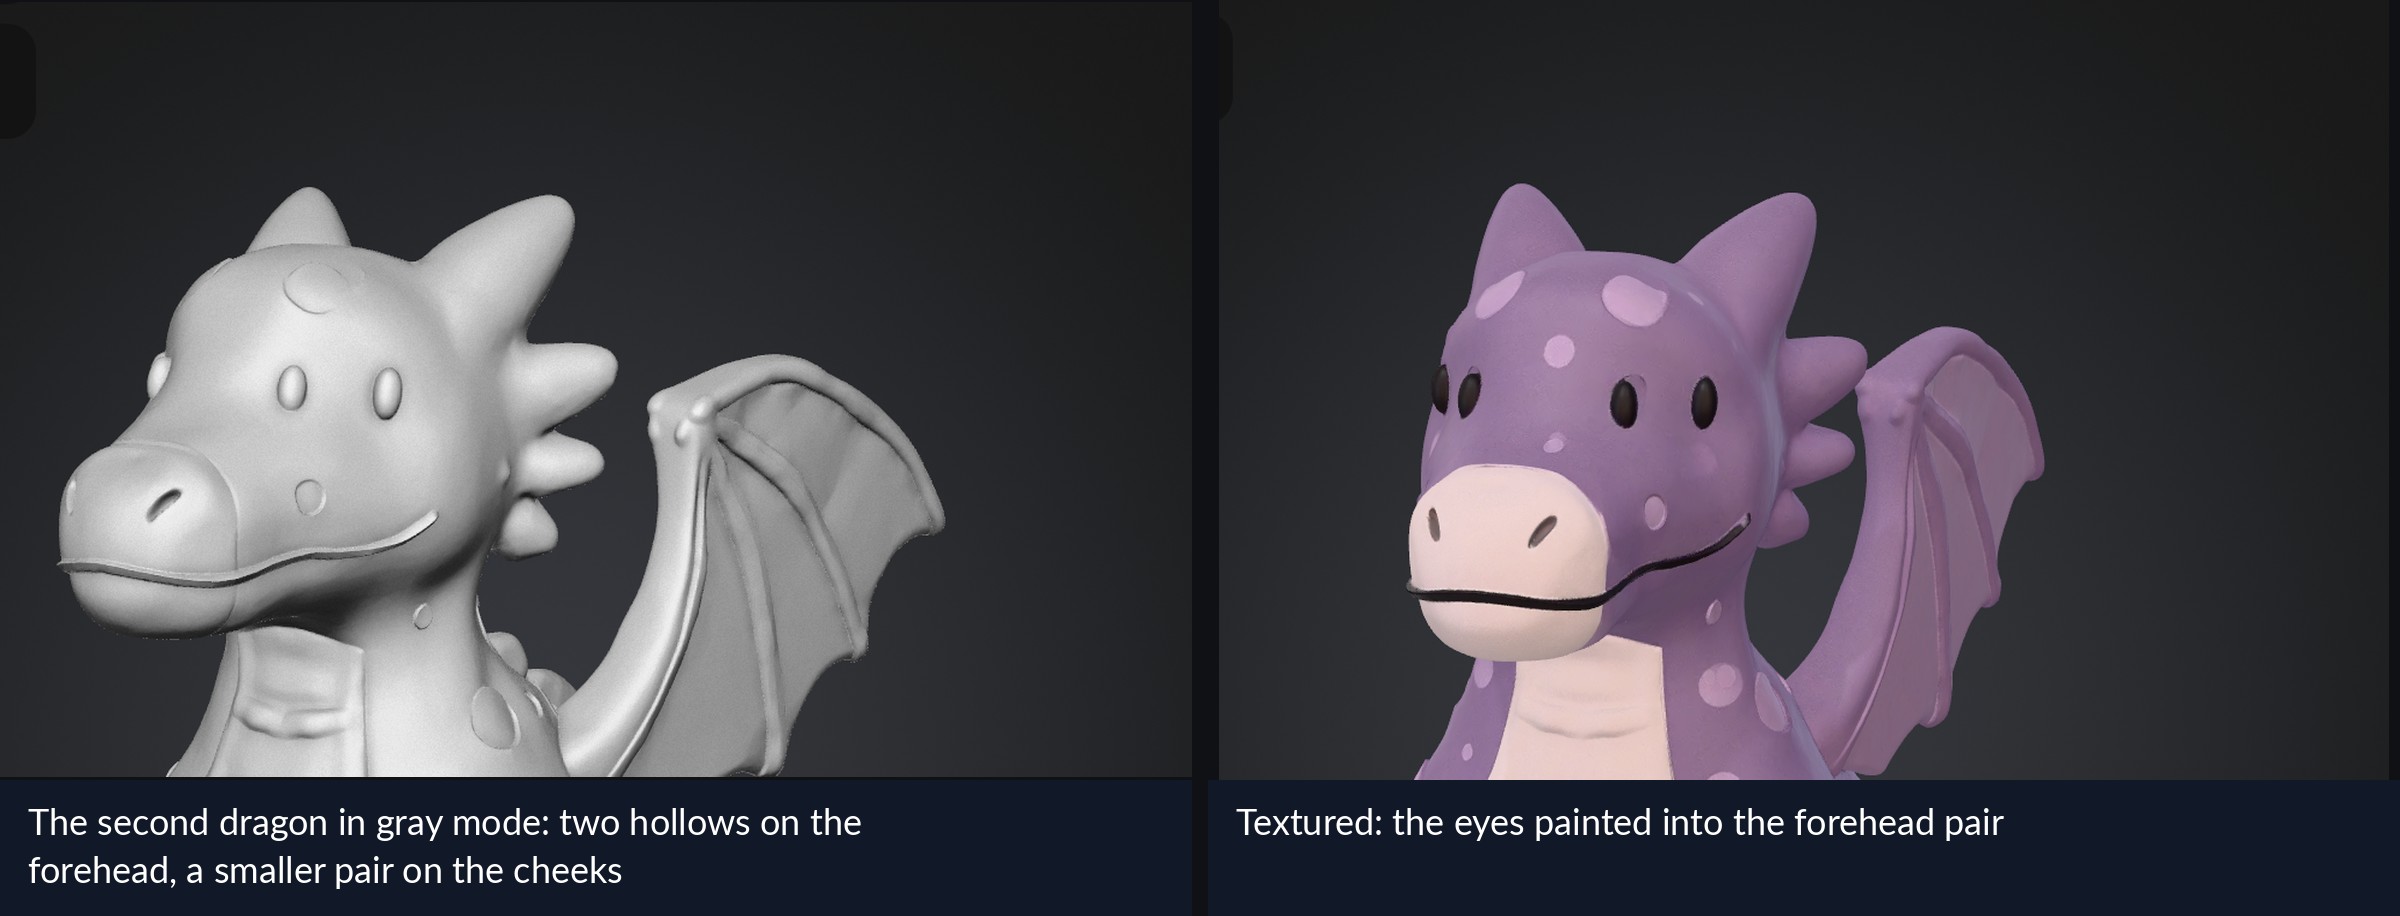
A second dragon from the same session had the same fault in a different arrangement: two hollows high on the forehead and a smaller pair of bumps on the cheeks. I put both through Edit. In this piece they are the favorite and the second dragon.

The test is simple. Take the four-eyed model and use Edit to remove one pair of eyes and nothing else. Run the result through the same Retexture and Multicolor 2.0 steps as in September. Print it at the same 75 mm on the same printer with the same four spools, next to a fresh print of the September pawn. If the repaired dragon has two eyes and is otherwise the dragon I liked, Edit has done something the whole September workflow could not.
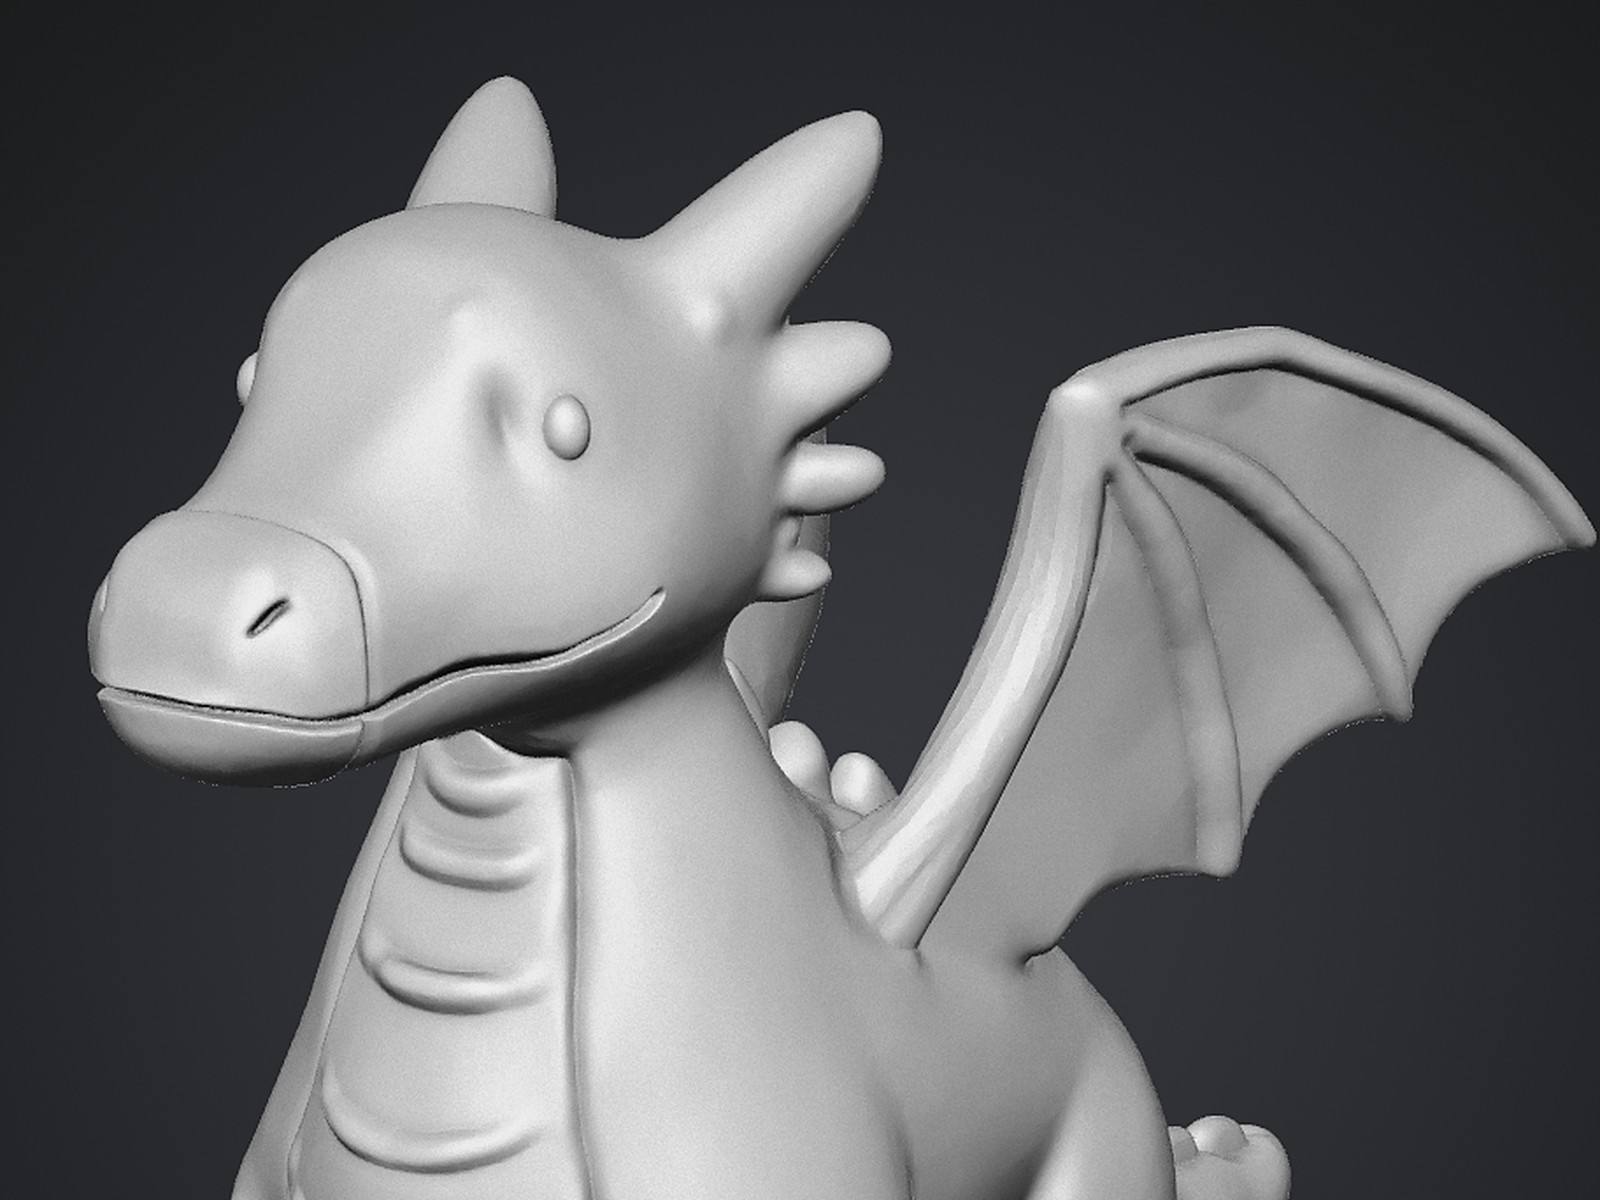
The favorite in the viewer's gray mode, before the repair. The eyes are raised ovals sculpted into the head, two on each side.
The favorite in the viewer’s gray mode, before the repair. The eyes are raised ovals sculpted into the head, two on each side.
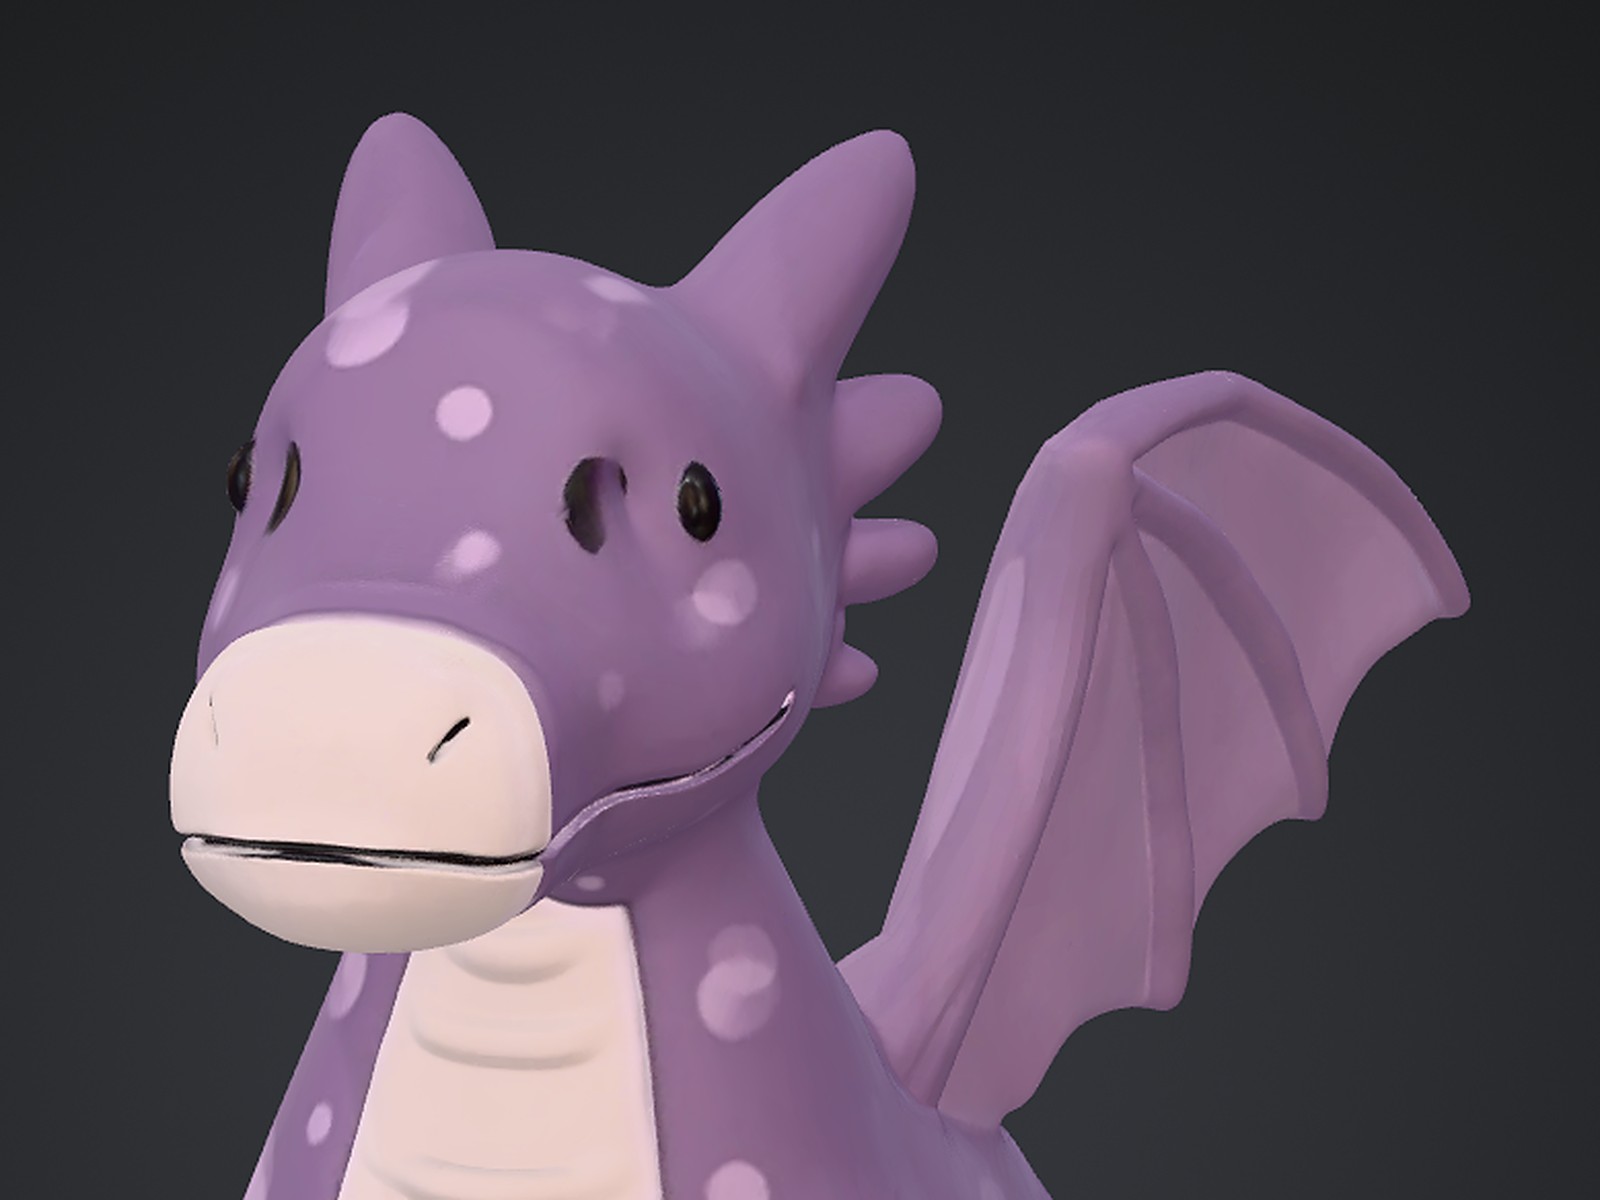
The same model textured: two dark eyes painted on each side of the face.
The second four-eyed dragon: two hollows high on the forehead and a smaller pair on the cheeks, with the eyes painted into the forehead pair.

How Edit works

Edit sits in two places: as a button under the model viewer and as the first card in the Print module’s Post-Processing panel. Press it on a textured model and the viewer switches to the gray mesh without mentioning the texture. At the time of writing the help article still says textured models are unsupported; the press kit says they switch automatically, and the press kit is right.

The toolbar offers a Lasso, a Brush, a Lasso Eraser, an Eraser and Clear All, plus a brush size slider. You hold Alt (Option on a Mac) to rotate while selecting, type a sentence and press the arrow. A notification tells you when the new model is ready, roughly a minute later; I did not time it. Each edit costs 20 credits and produces a new version, so the original stays in the library and a result can be edited again. Edit is open to every registered Meshy account, not only to paid plans. It works on high-poly models from Meshy 6 and 7.1 up to Ultra 2K, which covered everything in my library. Ultra 4K, uploaded files and split parts are not supported yet.
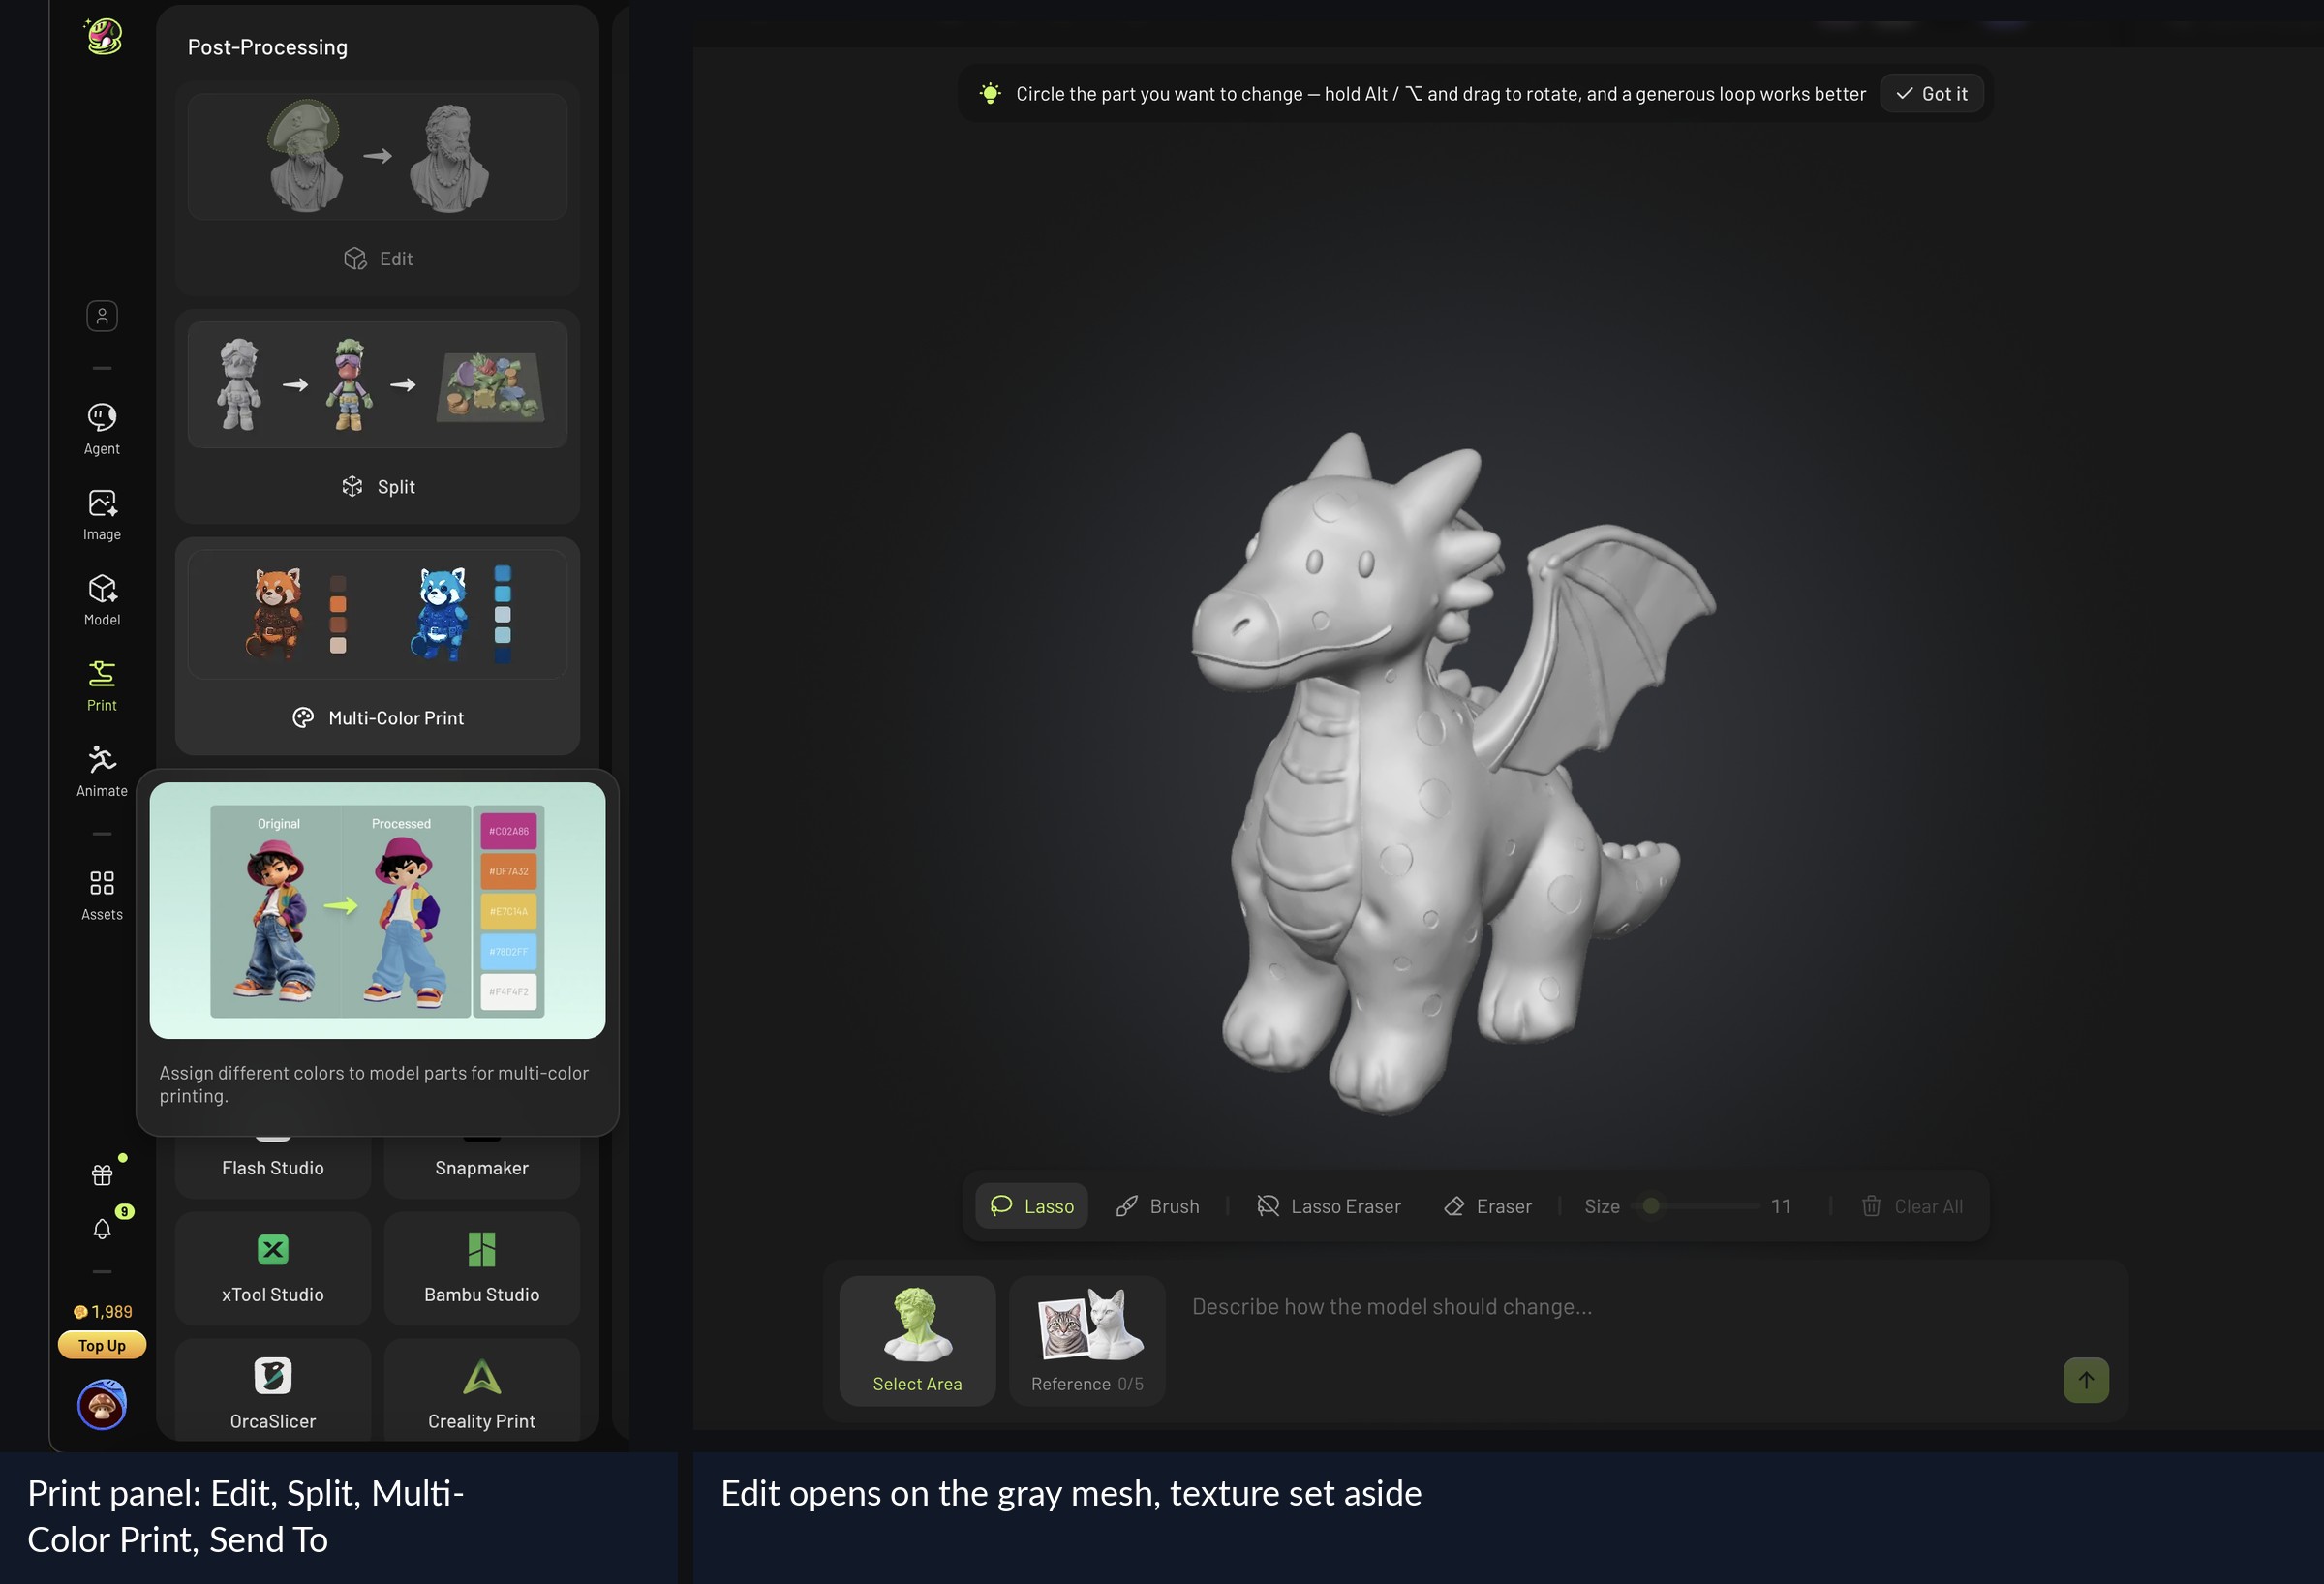
Where Edit lives: the Print panel's Post-Processing cards with Edit first, and the Edit screen opening on the gray mesh of a textured model.
Where Edit lives: the Print panel’s Post-Processing cards with Edit first, and the Edit screen opening on the gray mesh of a textured model.

Two things about the tools matter more than the press kit suggests. The first is that the Lasso cuts straight through the model. A loop drawn around a feature on the front selects everything behind it along the line of sight, out through the back of the head. That is what you want for a hat, the example on the press kit cover. It is not what you want for an eye socket. The Lasso Eraser cuts through in the same way, so it is a tool for trimming a selection; to drop a loop you regret, Cmd-Z (Ctrl-Z on Windows) is quicker.

The second is that the Brush paints only the surface you can see, which makes it the right tool for a surface feature. It has one catch: an area that looks covered from the front can have unpainted patches once you turn the head, so check the selection from several angles.
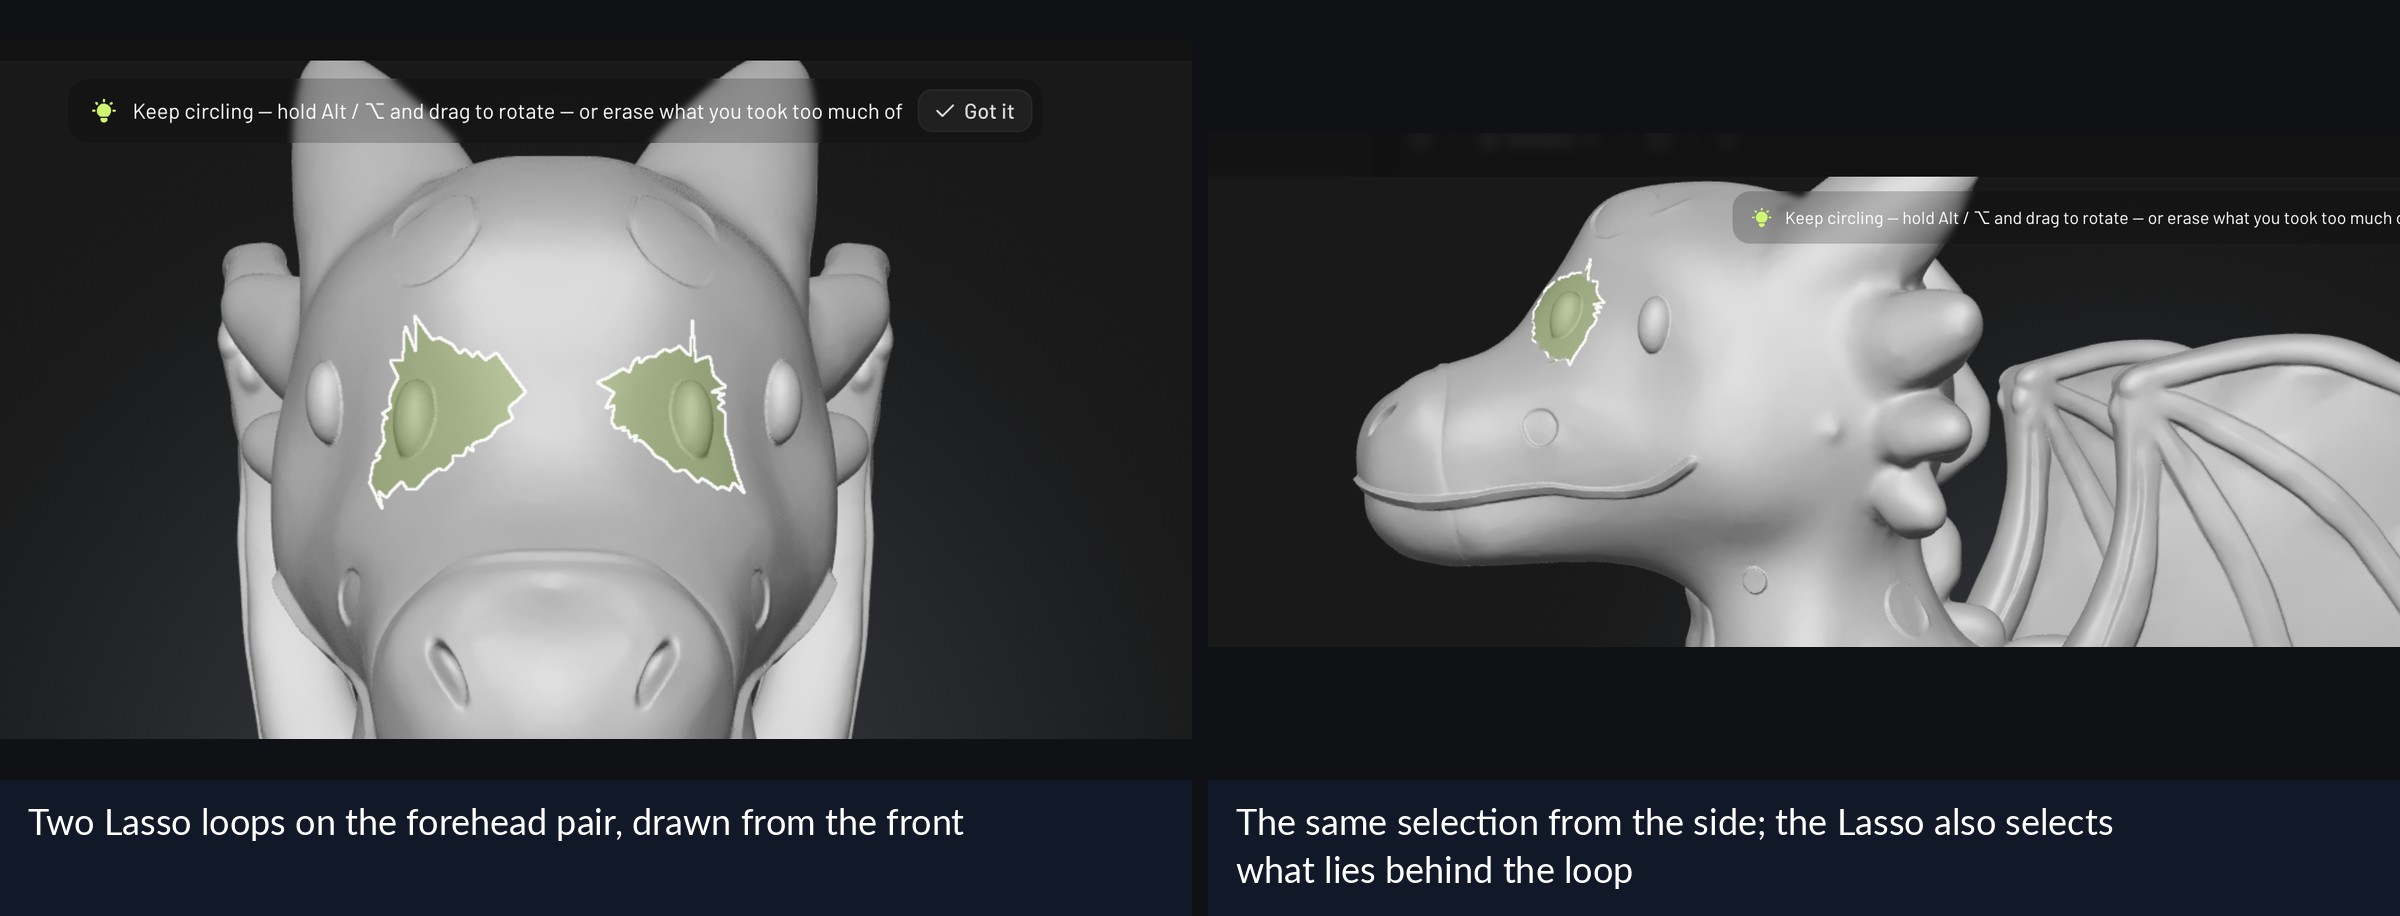
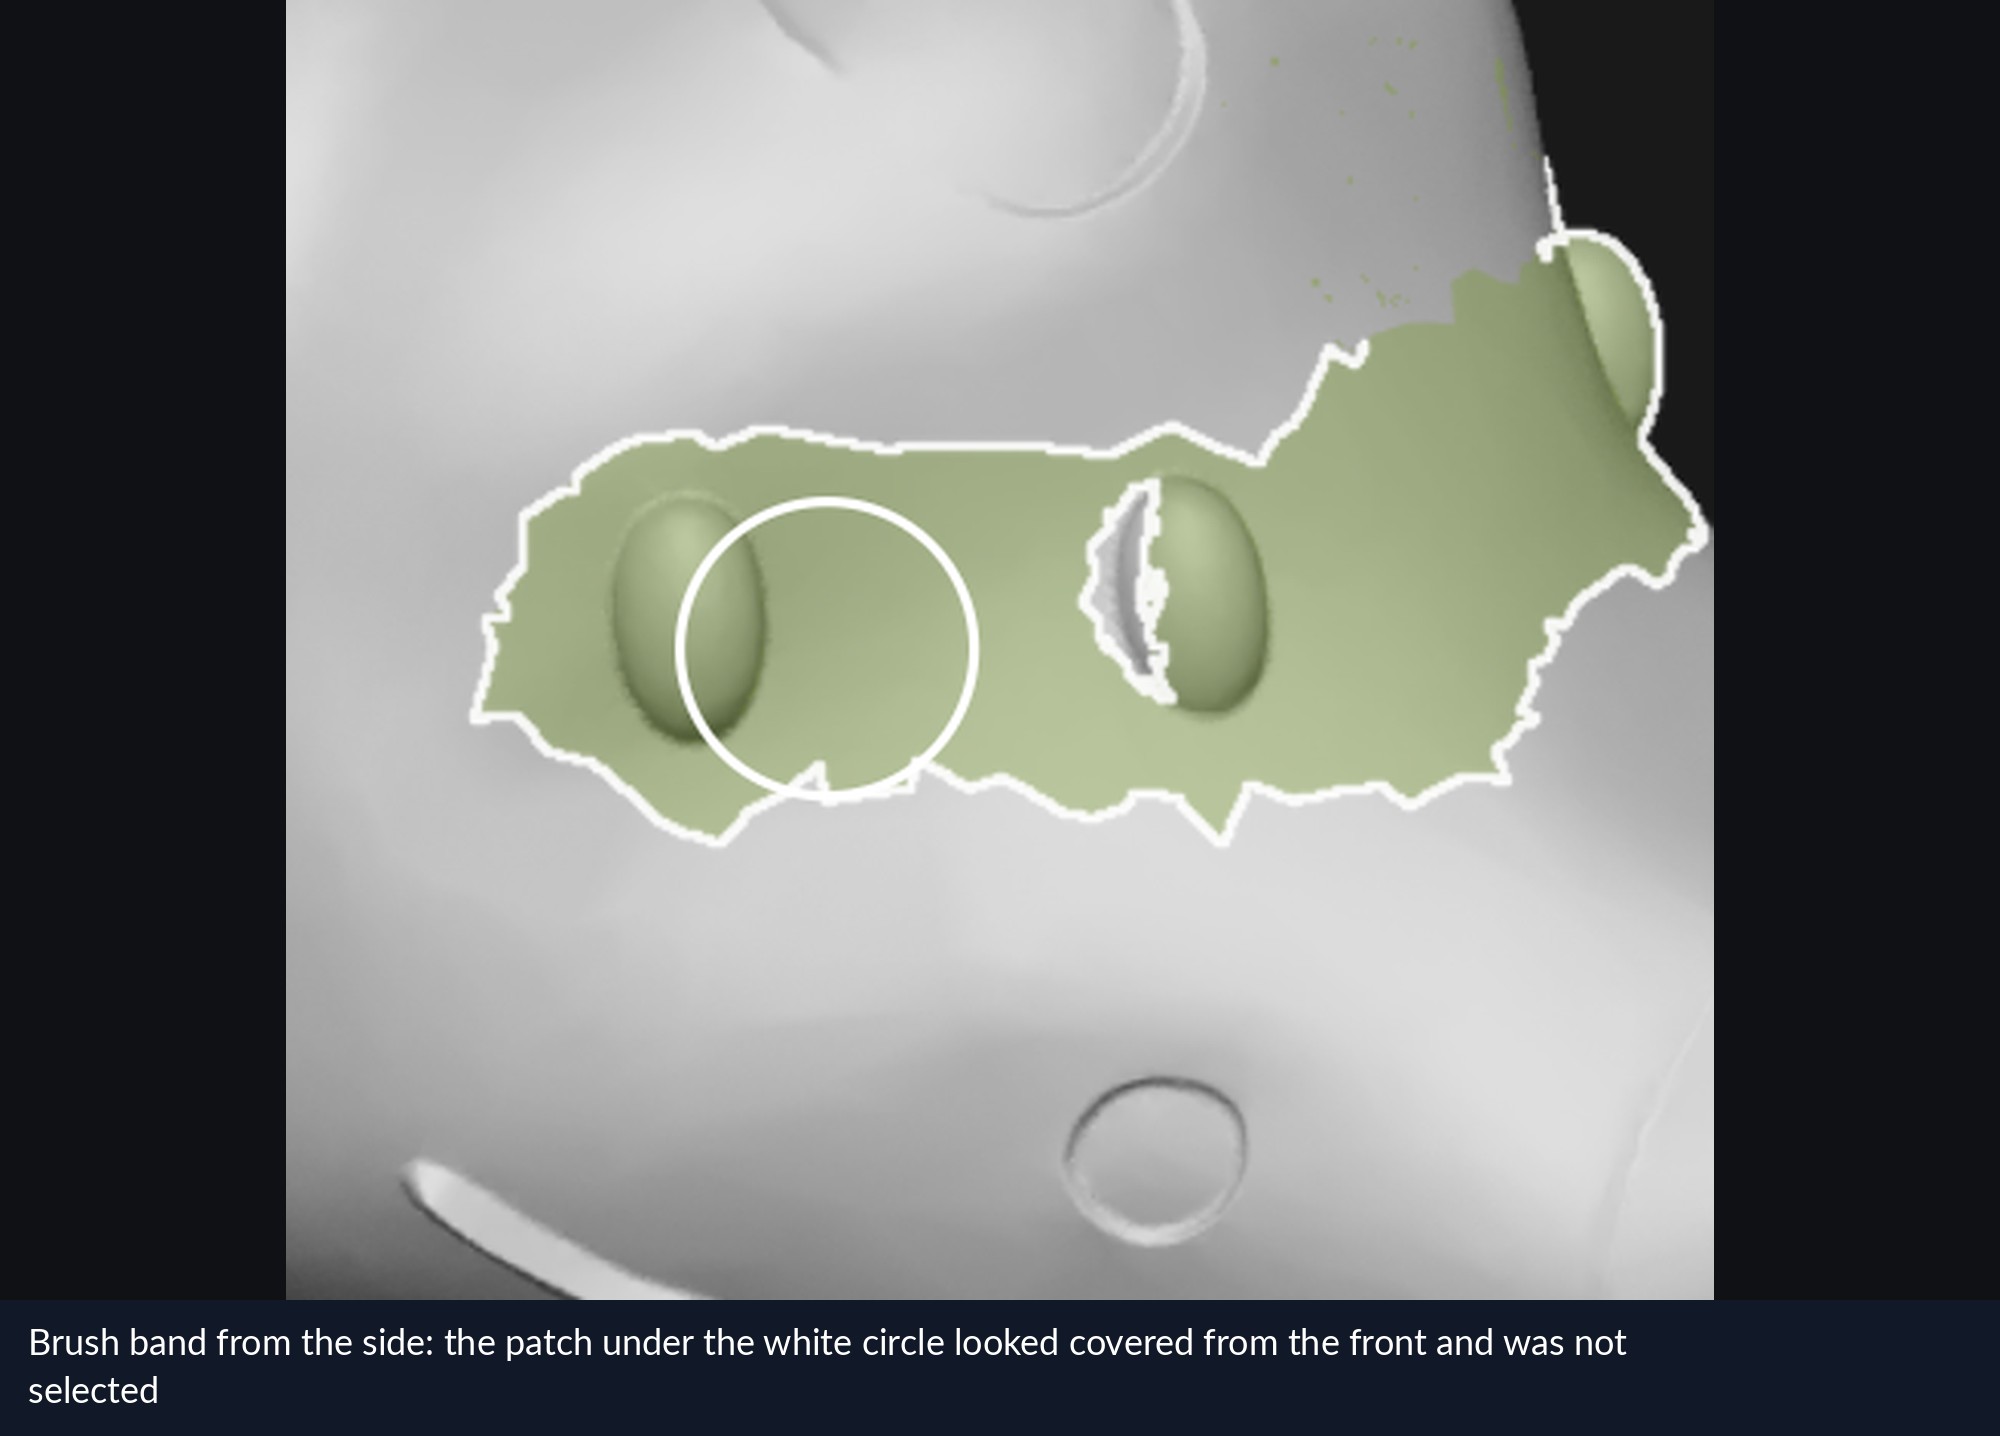
Two Lasso loops on the forehead pair, drawn from the front, and the same selection seen from the side. The Lasso also selects what lies behind the loop.
A Brush band seen from the side: the patch under the white circle looked covered from the front and was not selected.

Thirteen attempts, so you need two

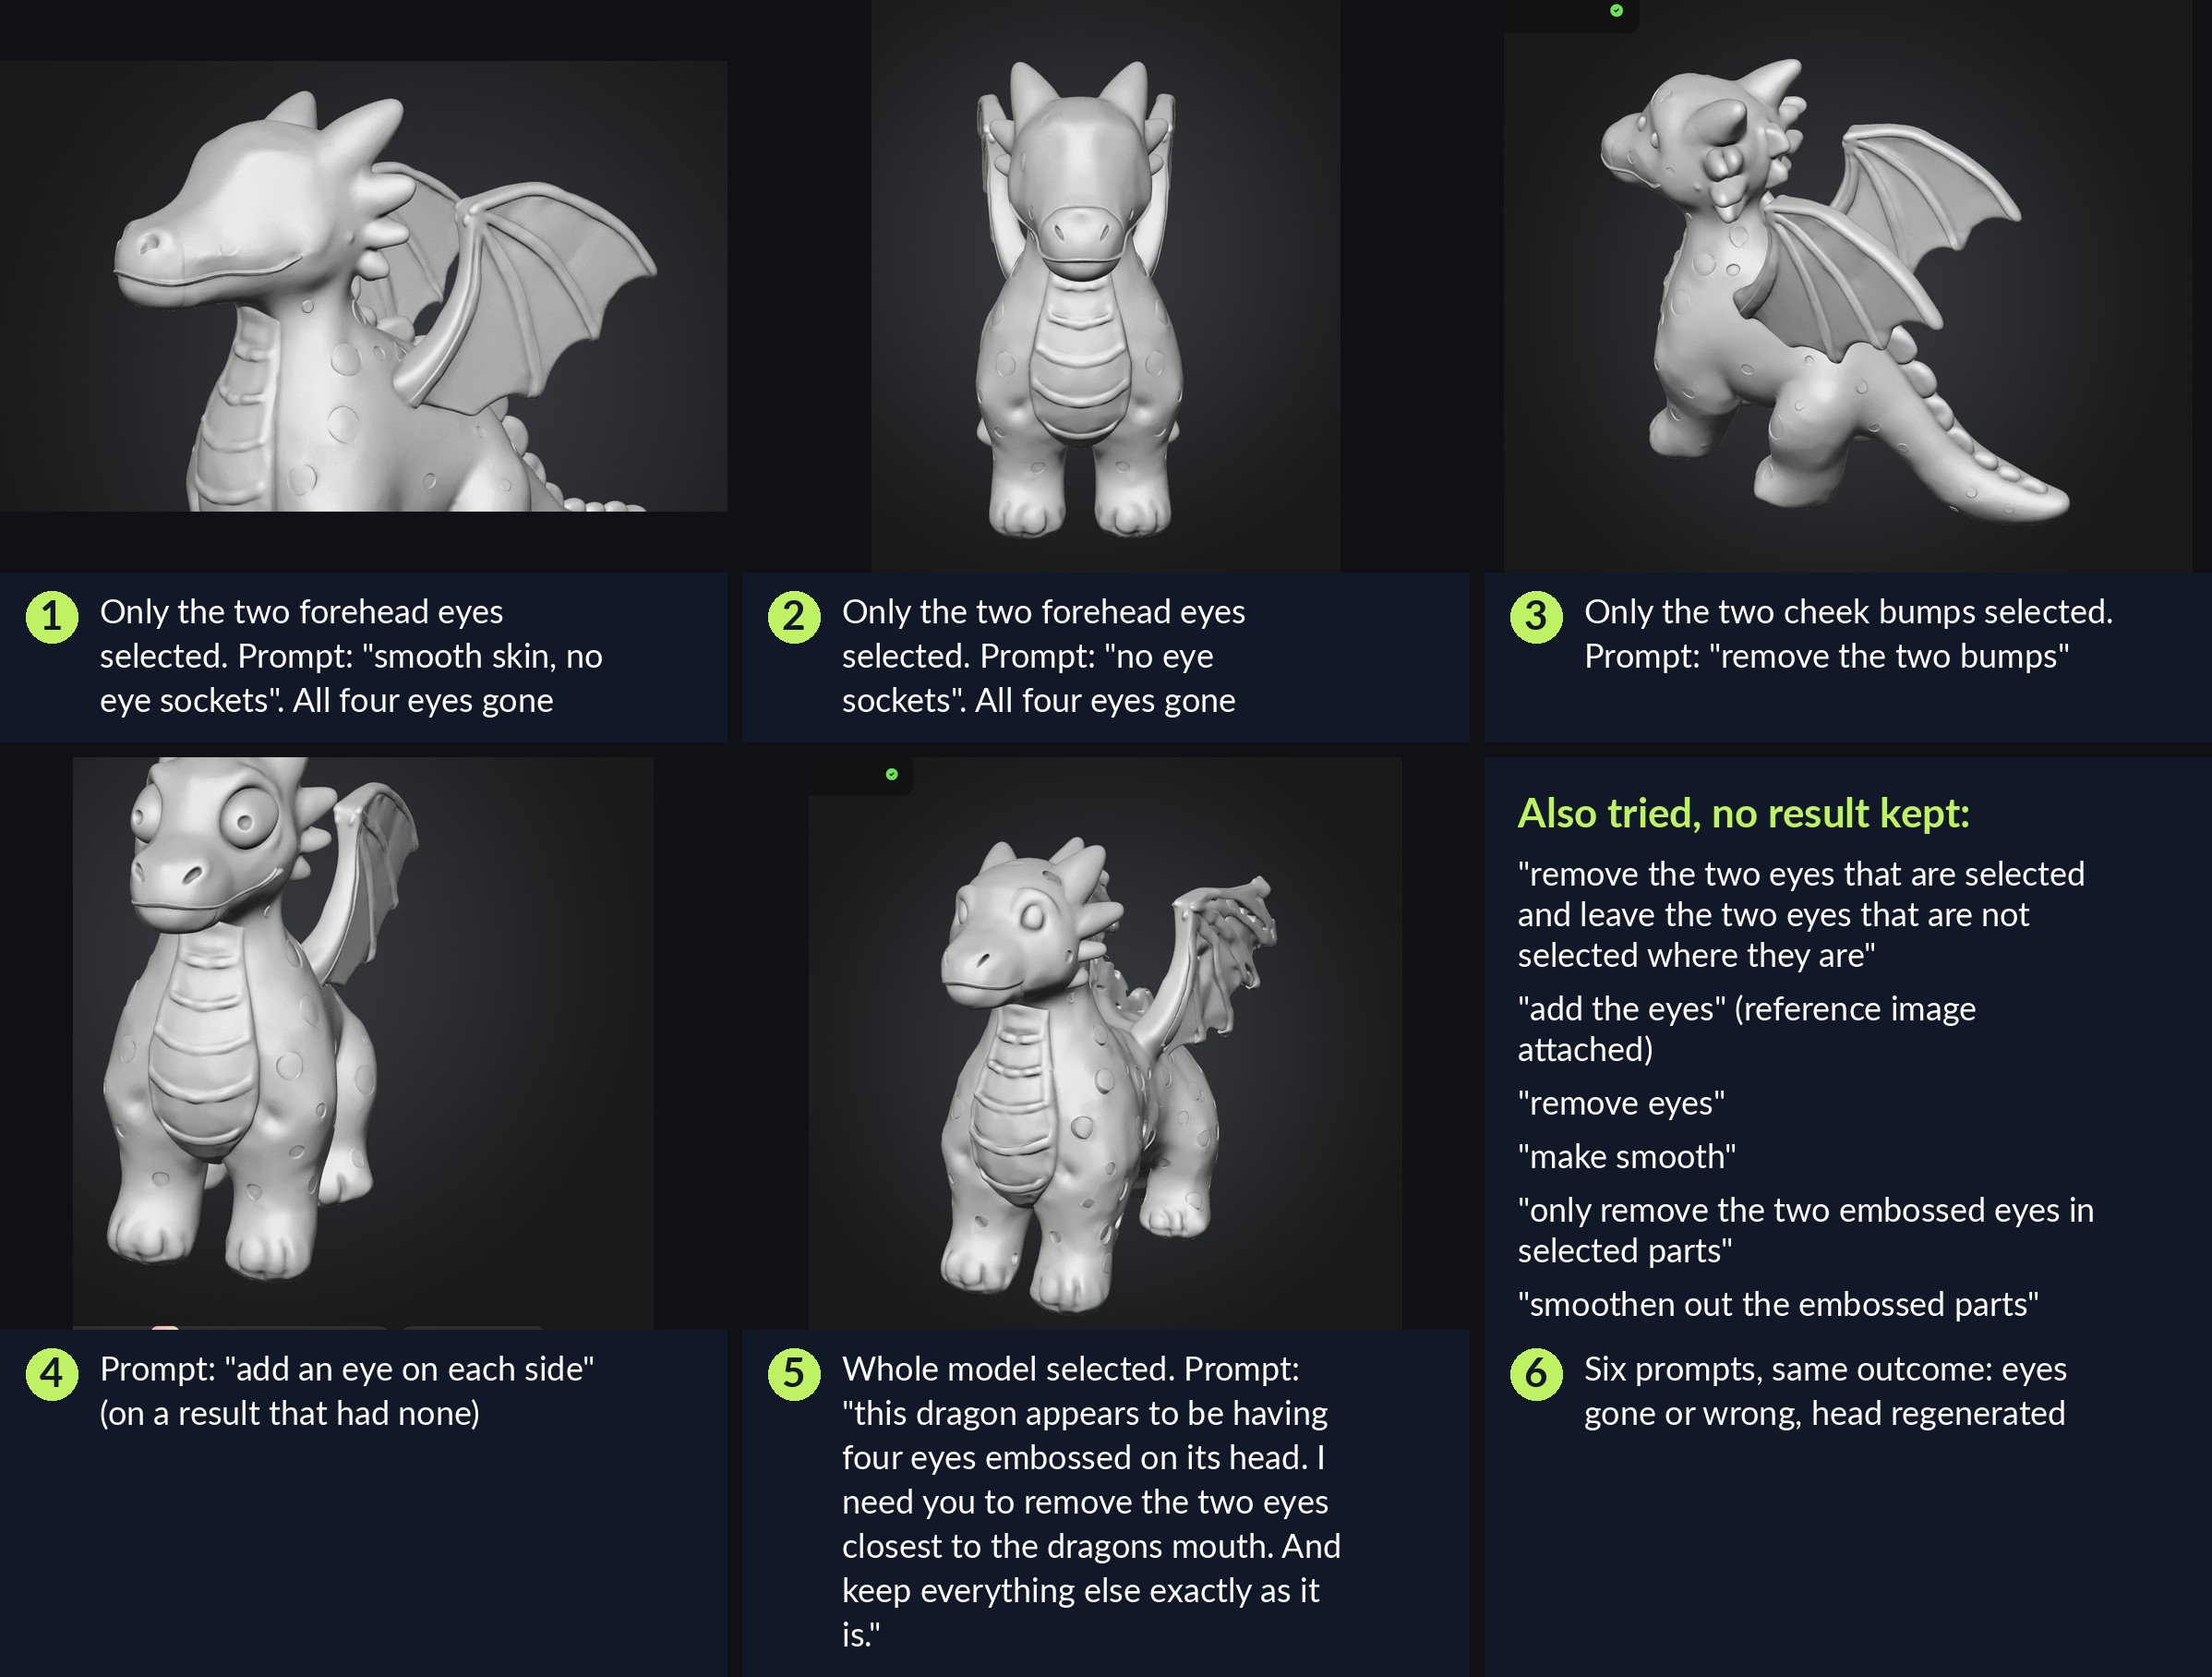
I started on the second dragon, simply because it was the first of the two I found in my library. The obvious first attempt was a Lasso around the two forehead sockets only, with the cheek pair left outside the selection, and the prompt “smooth skin, no eye sockets”. The result came back with every socket and bump on the head gone, the unselected cheek pair included. The spots on the skull went with them, and the head was no longer quite the same shape. The second attempt, “no eye sockets”, gave the same wipe, and the face count dropped from 505,116 to 440,722: the head had been rebuilt, not patched.

So I tried the rest of the vocabulary. “Remove the two bumps” on the cheek pair. A side-view loop with “remove the two eyes that are selected and leave the two eyes that are not selected where they are”. “Add an eye on each side” on a result that had none, which produced two cartoon eyes on the forehead. A whole-model edit with my reference image attached and “add the eyes”. “Remove eyes” on a brushed band. That made seven attempts and no usable dragon. Then I found the favorite itself in my library and carried on there with “make smooth”, “only remove the two embossed eyes in selected parts”, “smoothen out the embossed parts”, and finally a whole-model edit with a paragraph of instructions that ended “keep everything else exactly as it is”.
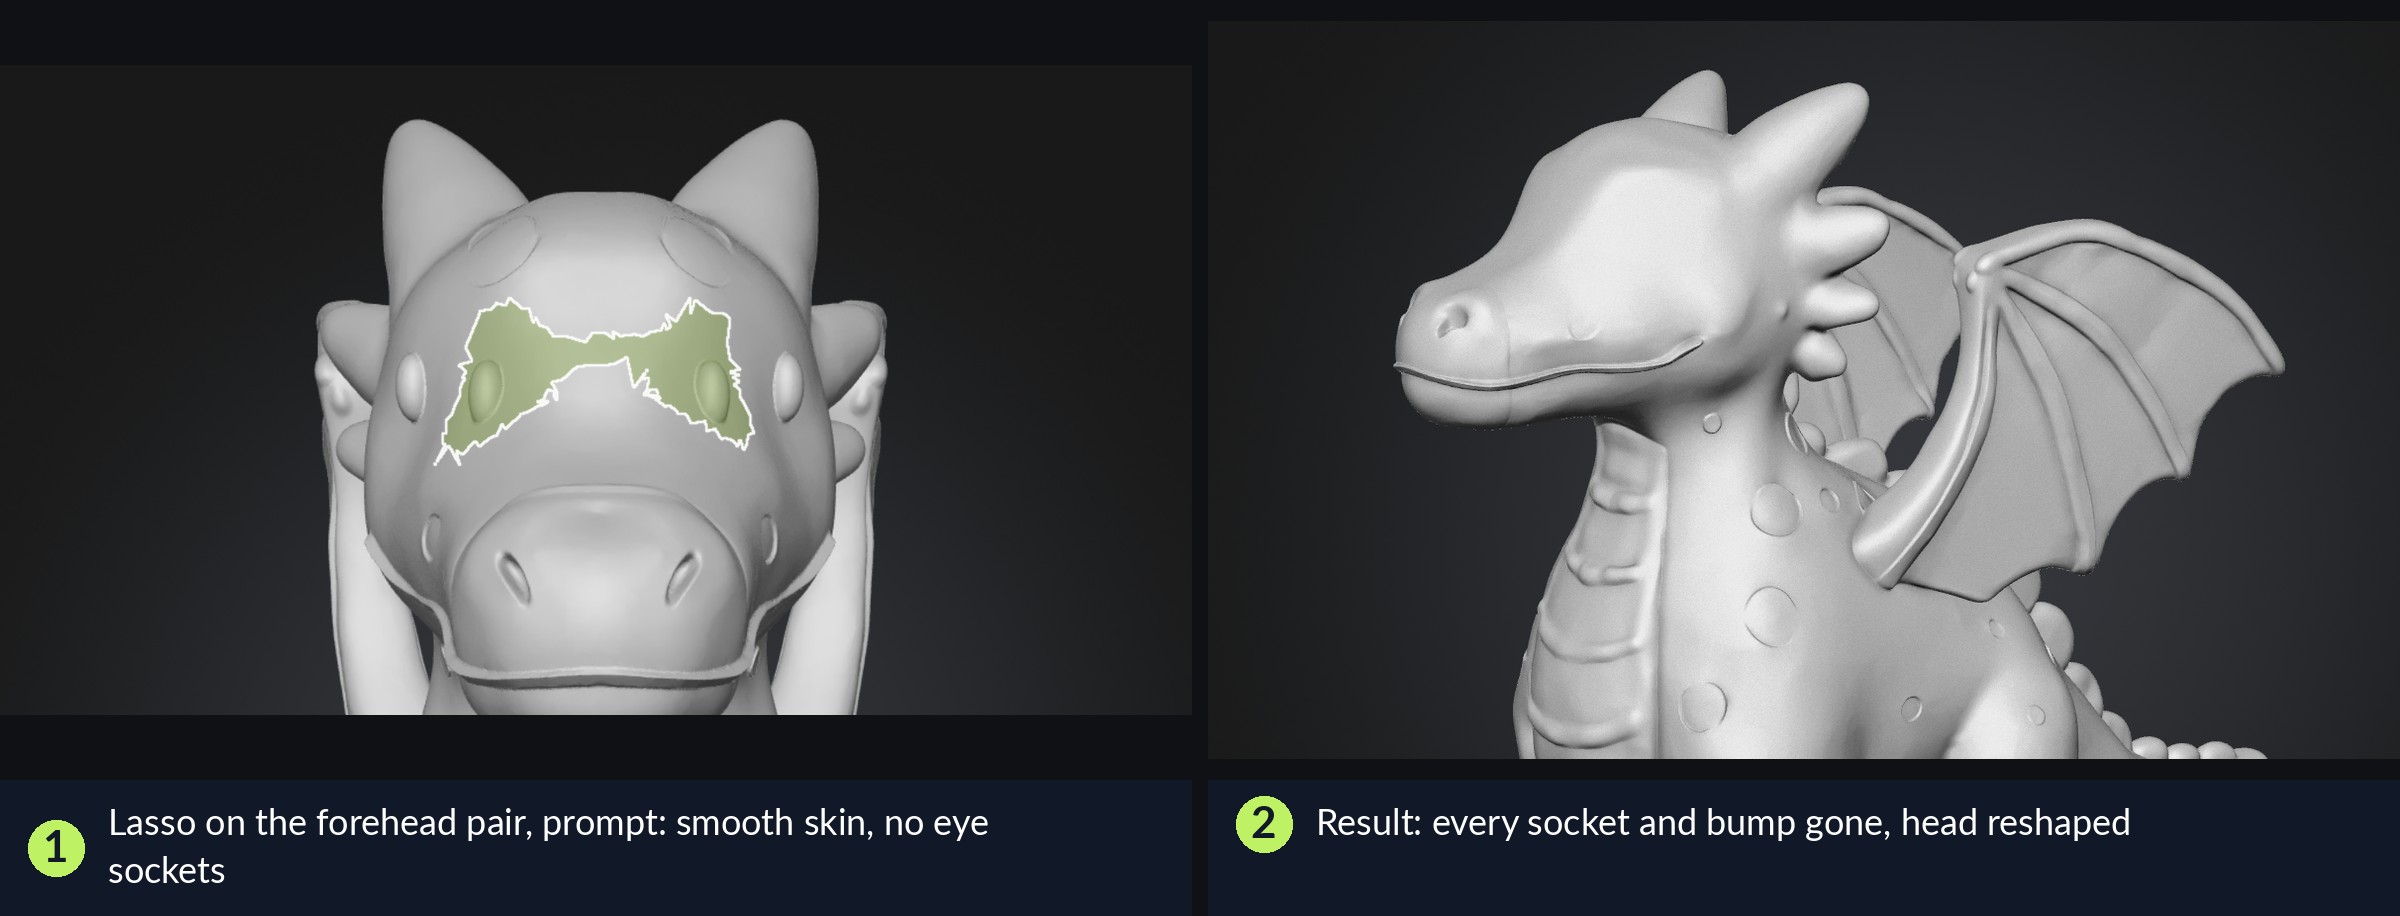
Attempt one: the Lasso selection on the forehead, and the result with every eye and bump smoothed away.

That last one, attempt ten, was the turning point. The face came out right, with two eyes and no cheek bumps. It was the first time Meshy had understood which pair I meant, and it was also the first prompt that told it what it was looking at before telling it what to do.

It also came back with 1,148,196 faces, more than three times the original, and wings that had gone soft and lumpy. With the whole model selected, the whole model was regenerated, despite a sentence asking in plain English to leave everything else alone. So two lessons arrived together. The prompt decides whether Edit understands the edit, and the short, instruction-style prompts Meshy recommends did not get there on this model. The selection decides how much gets rebuilt, whatever the prompt says about it. In most of my attempts the model changed well outside the green area, and a Lasso loop selects more than it shows.
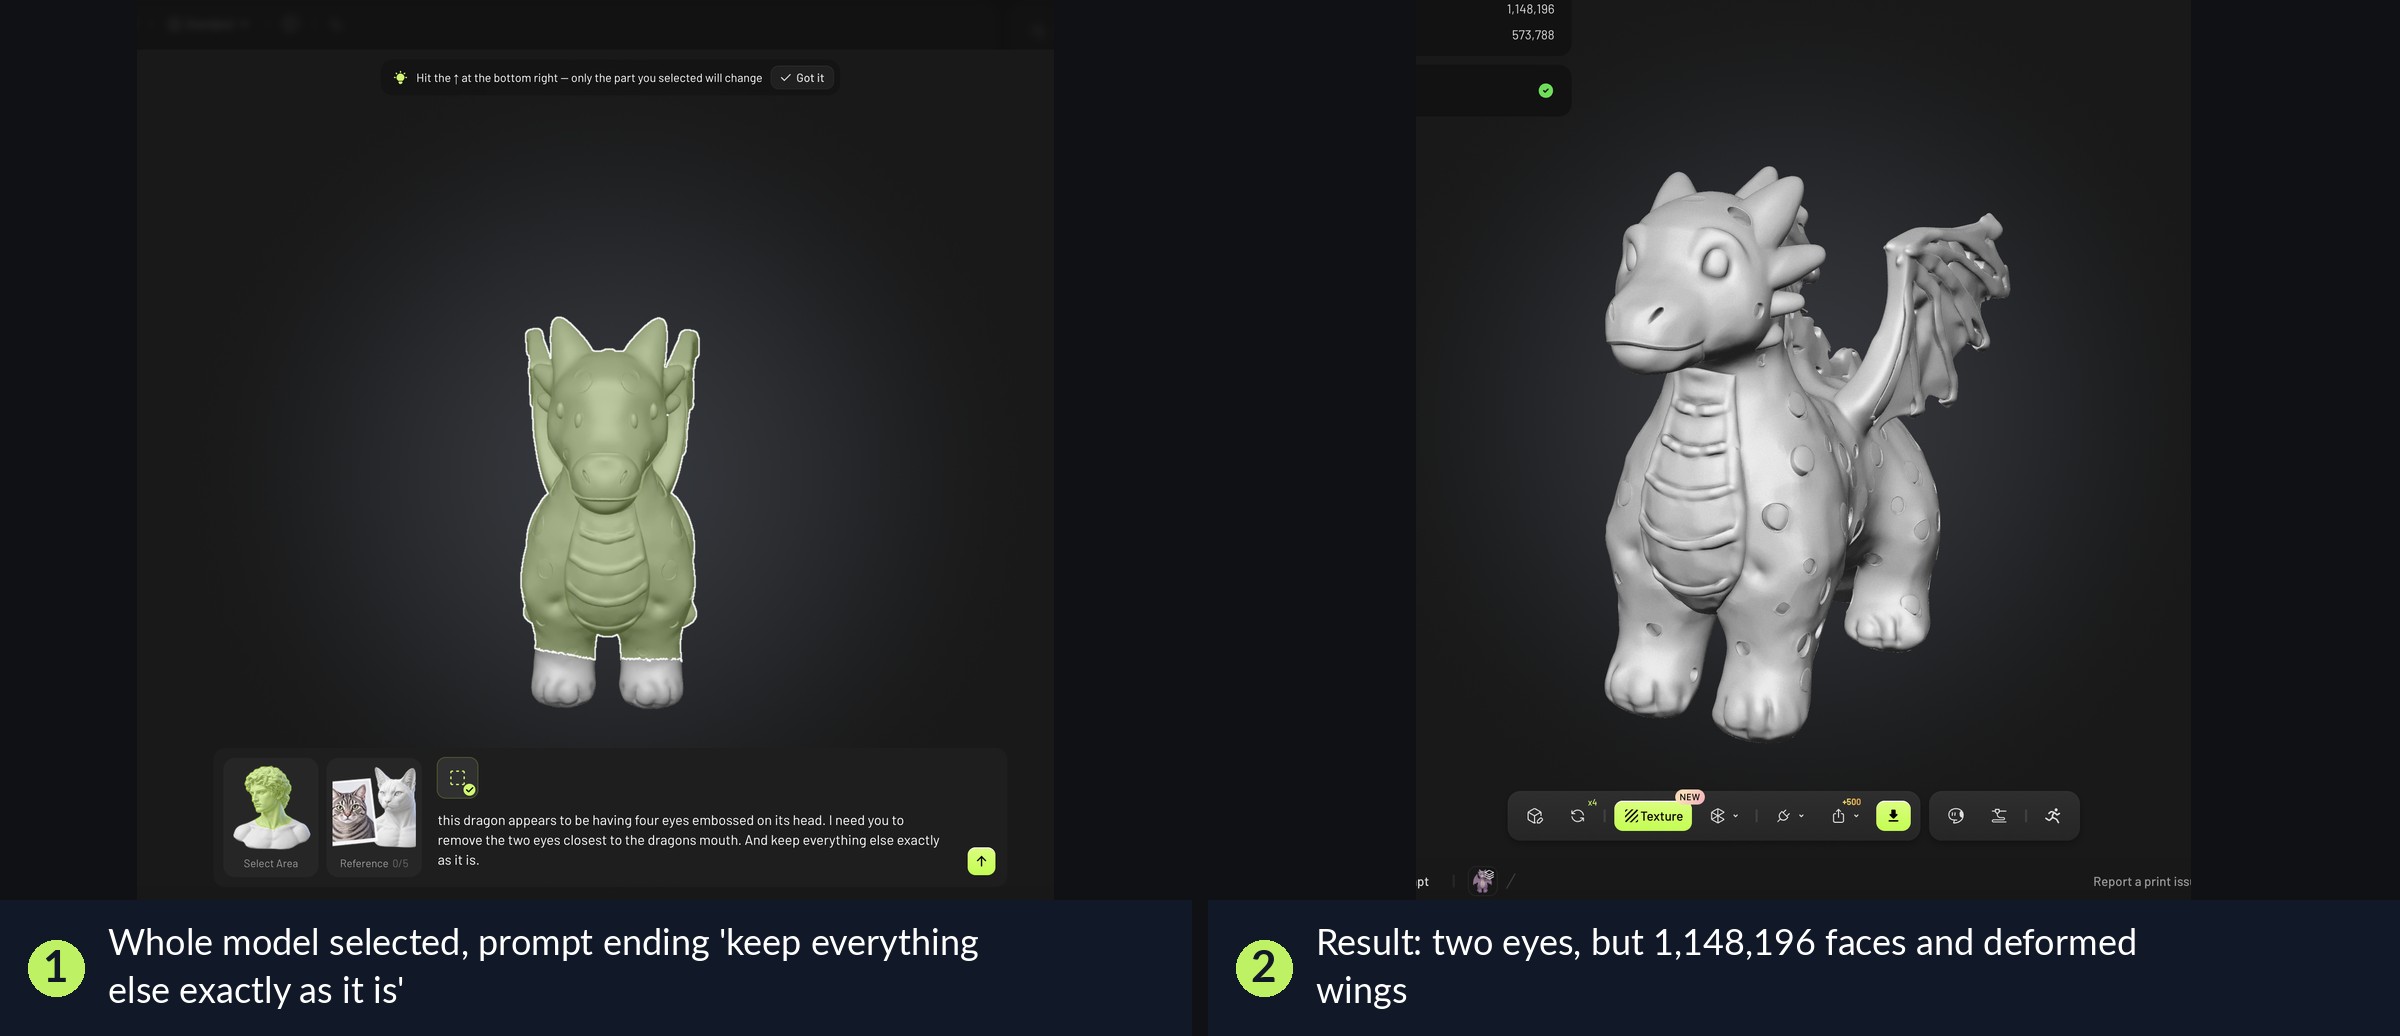
The whole-model attempt: the face came out right and the wings came back soft and lumpy, at more than three times the face count.

Attempt twelve put the two together. The prompt stated what was there and then stated the change, exactly as typed: “there are now four eyes on the head of this dragon. Remove two eyes”. The selection was a Brush band across the brow that covered all four eyes, so the regeneration had the whole feature to work with and little else. The dragon came back with two eyes in the right place, its horns and the rest of the head untouched, at 380,304 faces. That was the favorite, repaired.

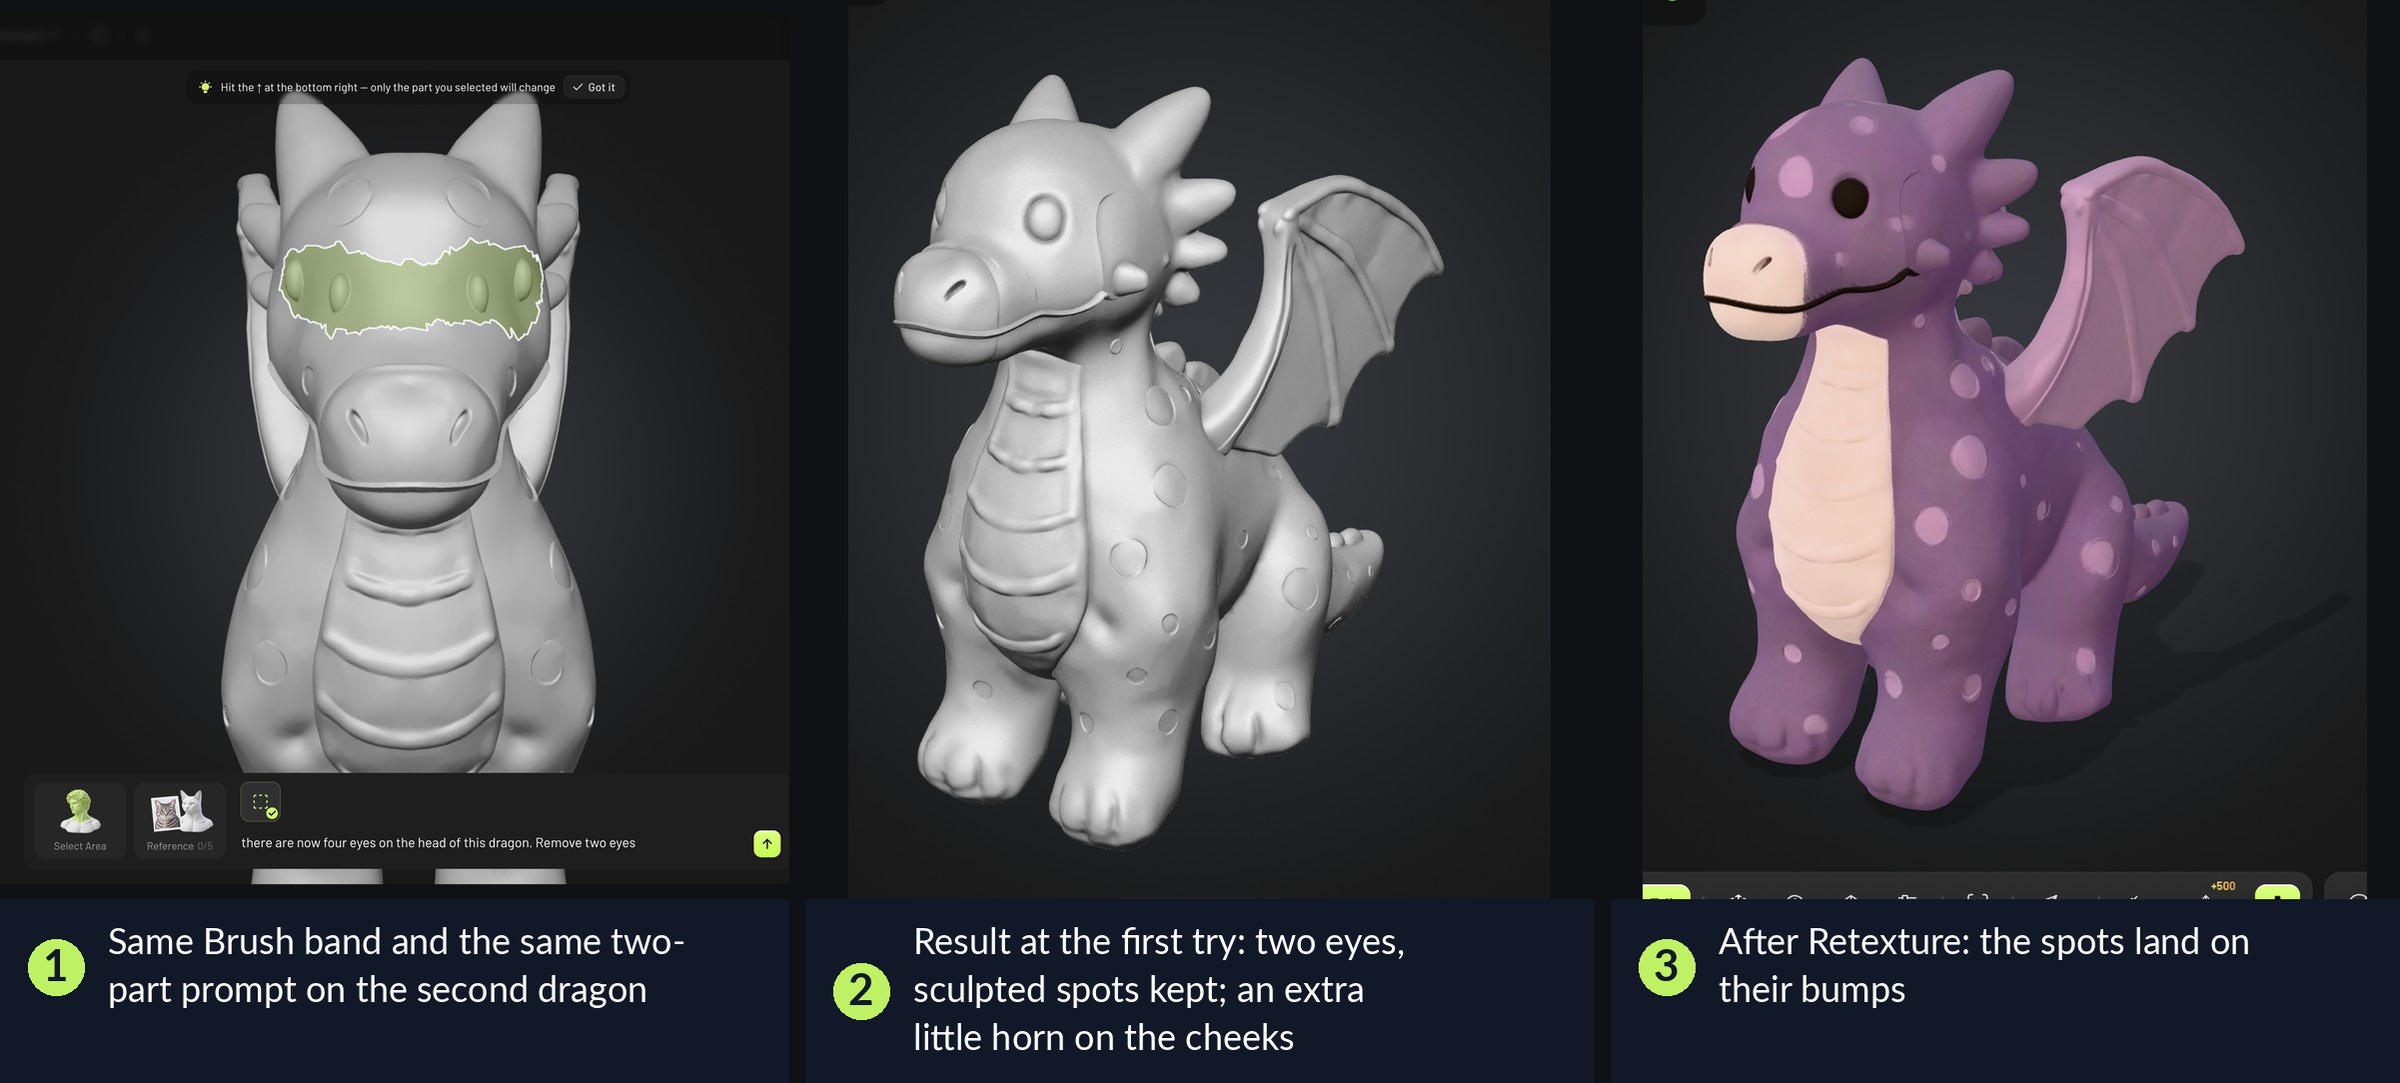
I then ran the identical prompt and selection on the second dragon, where the first seven attempts had failed. It worked at the first try: two eyes, and the spots, which on that model are sculpted into the mesh, all still there, so the Retexture later landed every spot on its bump. The one blemish is an extra little horn on each cheek, a reminder that everything inside the band is regenerated.

That thirteenth attempt is what turns a lucky twelfth into a recipe: a different model, the same selection, the same sentence, success at the first try. The thirteen edits cost about 260 credits. With the recipe, the same repair is one or two edits and under a dollar.
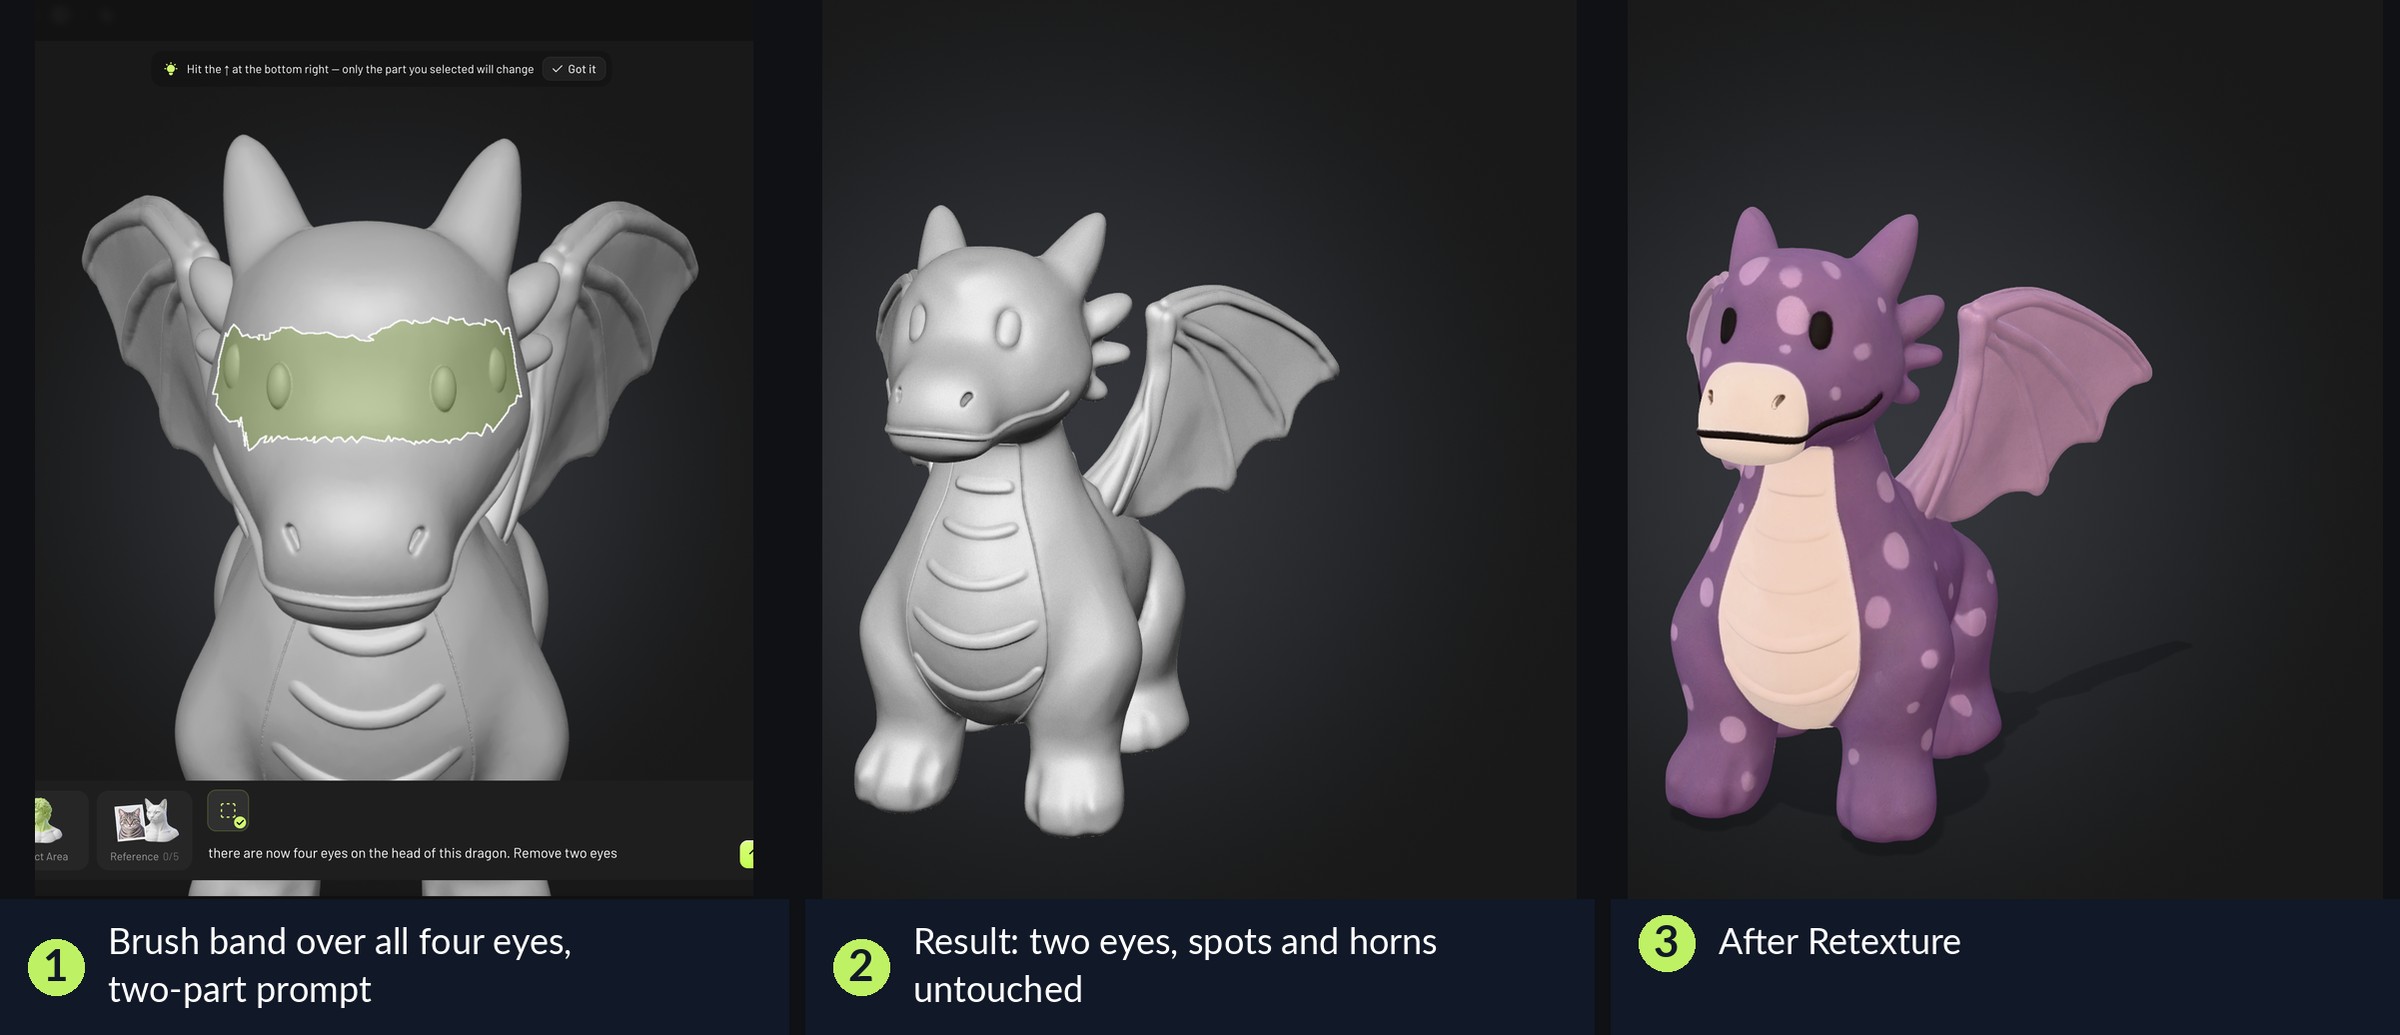
The recipe on the favorite: a Brush band across all four eyes, the two-part prompt, the gray result with two eyes, and the same model after Retexture.
The same recipe on the second dragon, at the first try: Brush band and two-part prompt, the gray result with two eyes and the sculpted spots kept, and the retextured model with the spots landing on their bumps. An extra little horn appeared on the cheeks.
Attempt Selection Prompt What came out
1 of 13 Lasso around the two forehead eyes only (second dragon) smooth skin, no eye sockets All four eyes and the cheek bumps gone, skull spots gone, head reshaped
10 of 13 Whole model (the favorite) this dragon appears to be having four eyes embossed on its head. I need you to remove the two eyes closest to the dragon’s mouth. And keep everything else exactly as it is. Face right, two eyes; the whole model regenerated, 1,148,196 faces, wings deformed
12 of 13 Brush band across all four eyes (the favorite) there are now four eyes on the head of this dragon. Remove two eyes Two eyes in the right place, rest untouched, 380,304 faces. Printed
13 of 13 Brush band across all four eyes (second dragon) there are now four eyes on the head of this dragon. Remove two eyes First try: two eyes, sculpted spots kept, an extra little horn on the cheeks, 457,590 faces. Printed
Eleven prompts that did not work, in full: five with their results, six more listed. In the first two only the forehead pair was selected, and all four eyes went anyway.

Meshy’s own tips, select generously and describe the shape, are half right. Describing the shape was not enough on this model: ten prompts in that style failed, and the two prompts that got the face right both began by describing the situation. I did not test Meshy’s own showcase, removing a hat, and on a worn accessory the short style may well be enough. Selecting generously is right for the Brush and wrong for the Lasso, which already selects more than it shows. Expect to try more than once, as Meshy itself says, and change the sentence first and the selection second.

Retexture, Multicolor, and a pink dragon

An edit drops the texture, as Meshy had told me it would, so a repair is a chain: Edit, Retexture, Multicolor 2.0, slicer. I ran a 2K Retexture from the original reference views, 10 credits per dragon, and it painted two eyes where the two remaining eyes were. That answers a question I had carried over from September, whether the texture stage follows the mesh or the reference images: on an edited mesh it followed the mesh. September’s print model had a 4K pass and these two had 2K, and the spots and eyes printed crisply all the same. Multicolor 2.0 behaved as before: Cartoon, four colors, the spool codes typed into the slots, a 3MF download at 75 mm.

Then the first print of the repaired favorite started coming off the U1 with a pink body, and I stopped it. The September review had a reader tip about this: the extruder order in the exported 3MF is the reverse of the panel’s list and changes between exports. It had changed again. In the new file the body was assigned to filament 4 and the spots to filament 1, the opposite of the September file, and my printer holds purple in slot 1 and pink in slot 4. Nothing in Meshy warns you, and nothing in the file looks wrong until the slicer’s filament table shows the body’s 21 grams on the wrong number.

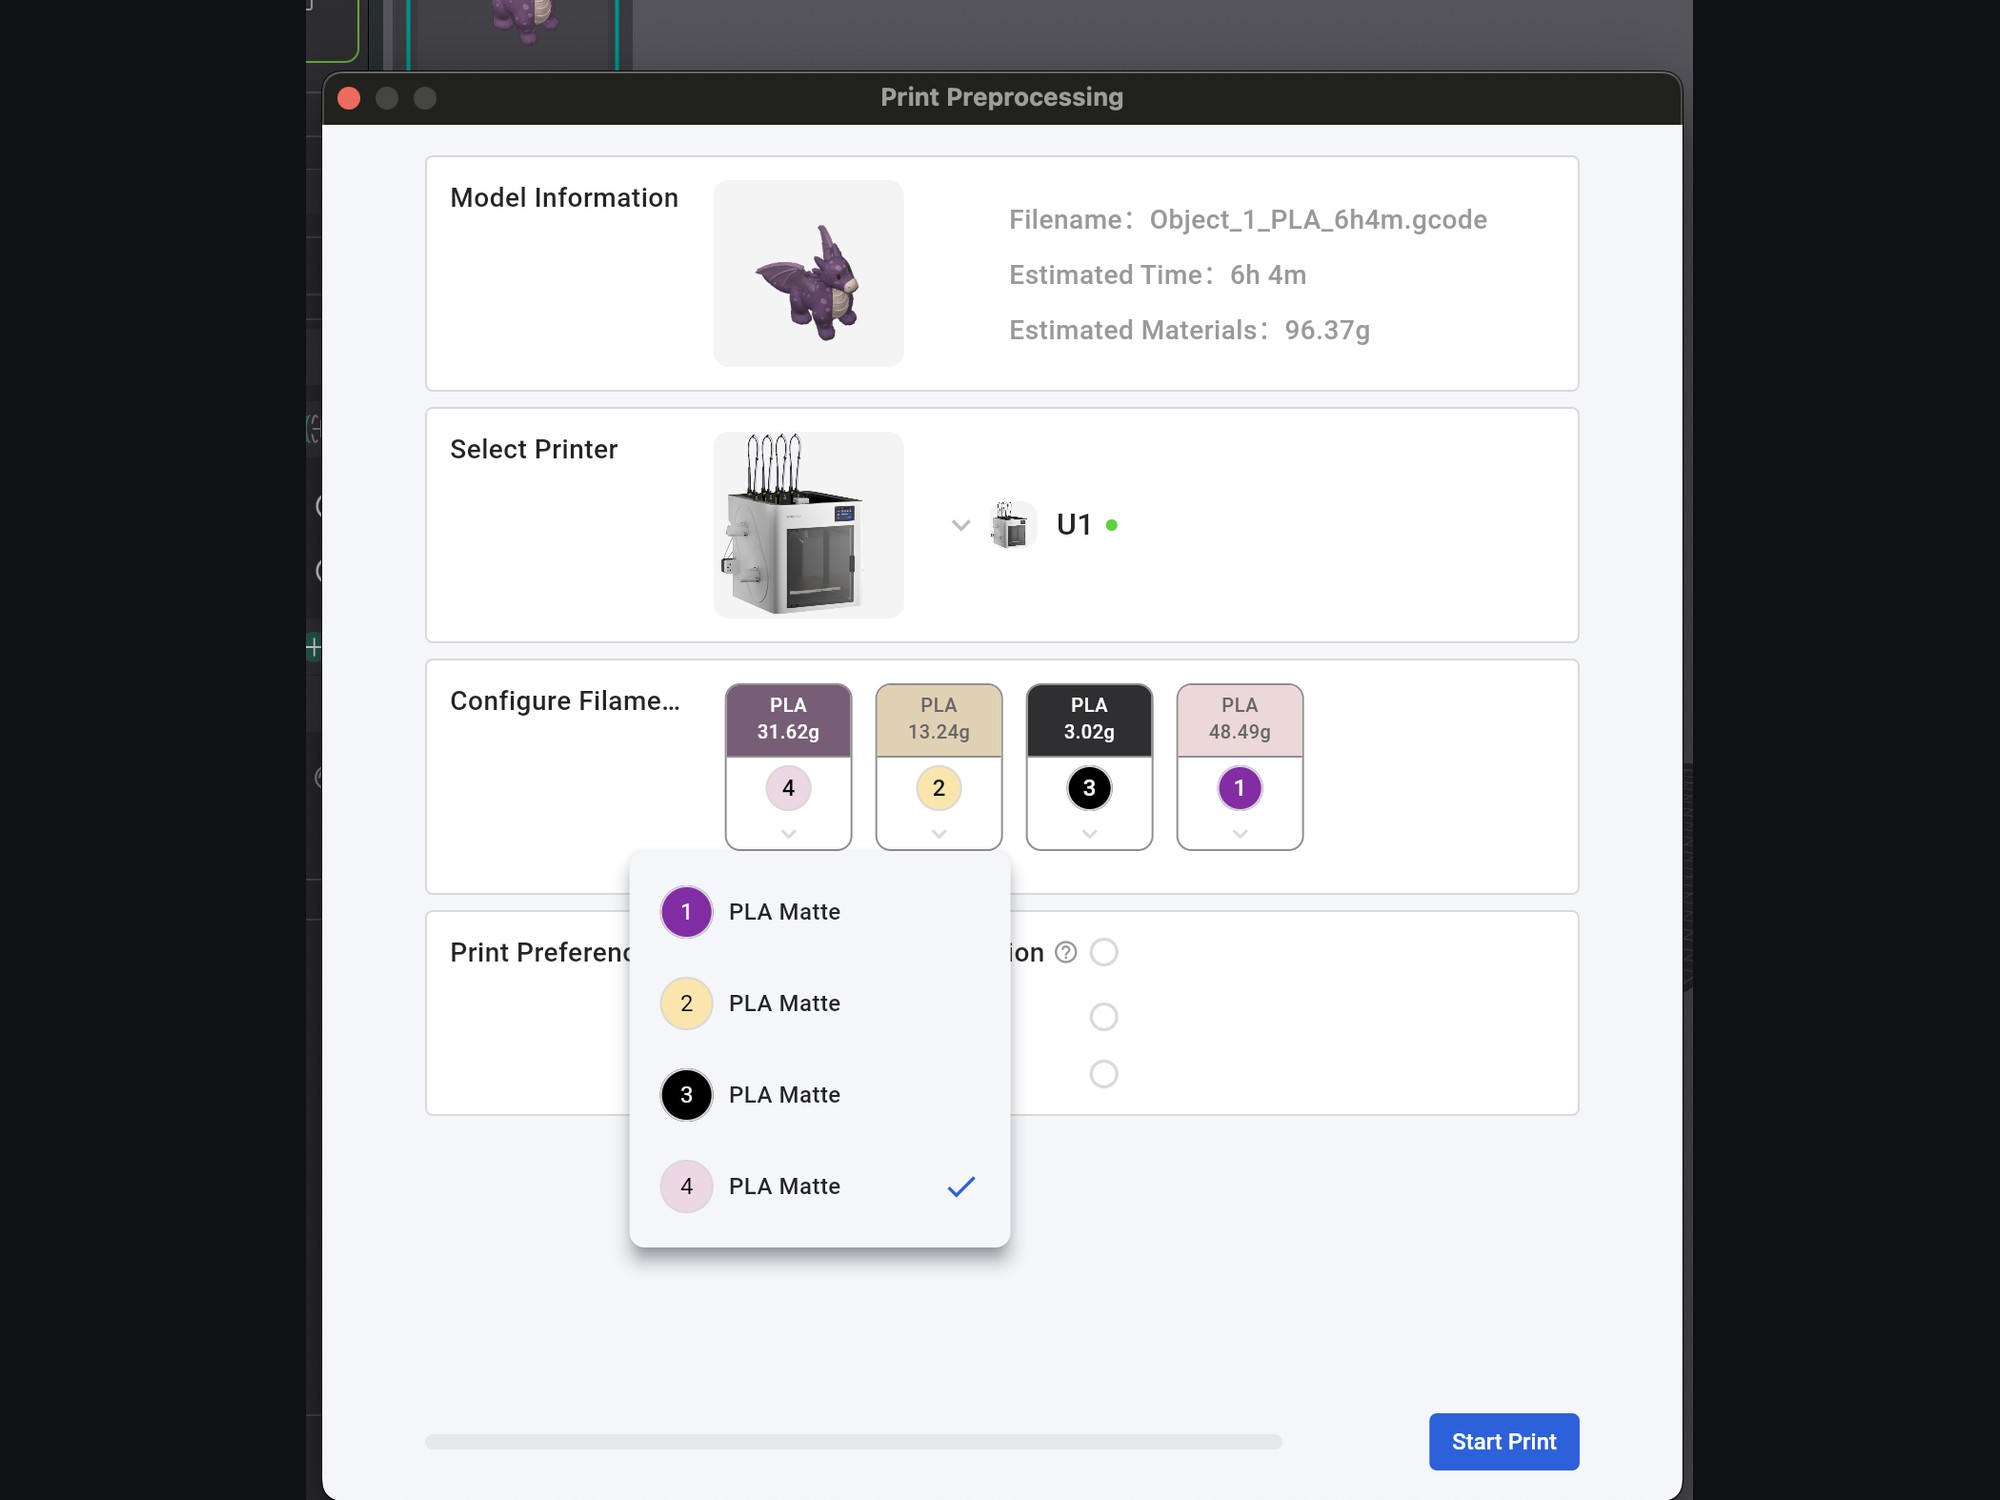
The fix takes ten seconds, and for anyone with a multi-tool printer it is the most useful practical finding in this piece. On the way to the U1 over the network, Snapmaker Orca’s Print dialog has a Configure Filaments step that maps each slicer filament to a physical slot and pre-matches them by color. It had already moved the body to the purple spool before I touched it. Check that screen before Start Print, reading the cards by their gram figures, and the slot order problem disappears. Other slicers that send prints to a multi-color printer may offer a comparable mapping step; I tested only this one.

That step exists only on the network path. Export G-code to a USB stick and the tool numbers are baked in. For USB users the alternative is a text edit in the 3MF, where the codes 4, 8, 0C and 1C stand for filaments 1 to 4 and can be swapped. I prepared such a file as a fallback and did not need it: all three dragons here were printed from the untouched files, with the same slicer settings and only this mapping changed. Still, it is not something a product should make its users learn.
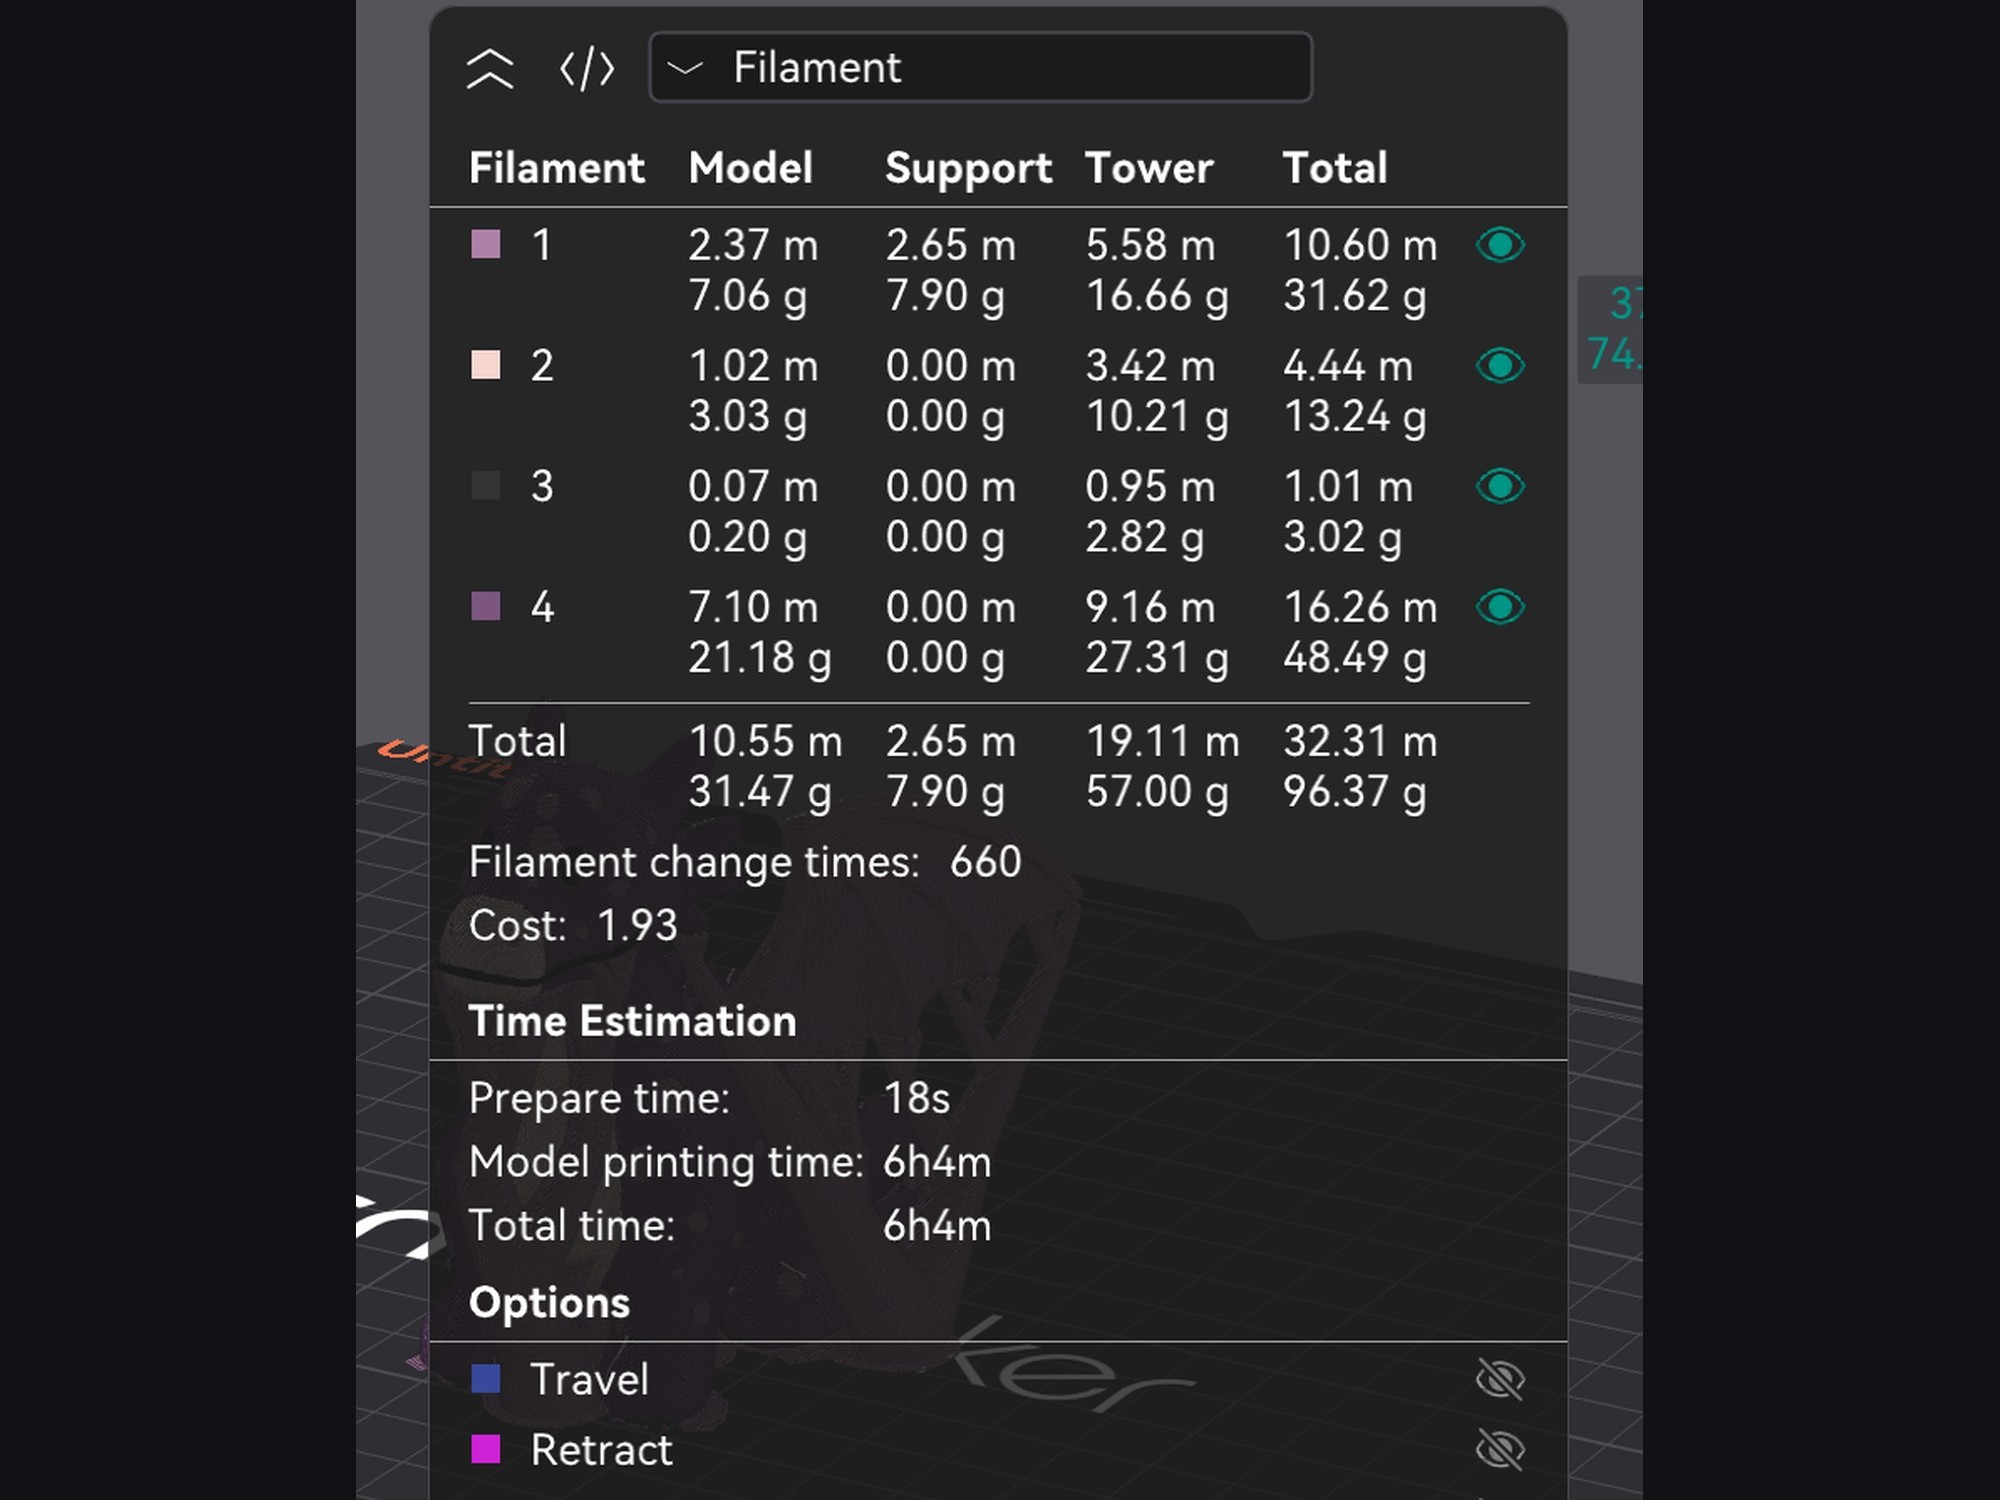
Orca's filament table for the repaired favorite: 21 grams of body on filament 4, the pink spool.
Orca’s filament table for the repaired favorite: 21 grams of body on filament 4, the pink spool.
Snapmaker Orca's Configure Filaments step before Start Print, with the body card mapped to slot 1 and the spots to slot 4.
Snapmaker Orca’s Configure Filaments step before Start Print, with the body card mapped to slot 1 and the spots to slot 4.

The print

Three dragons stand on the board, all 75 mm, all printed on the same day from the same four spools with the same settings: the September pawn as the benchmark, the repaired favorite and the second repaired dragon.
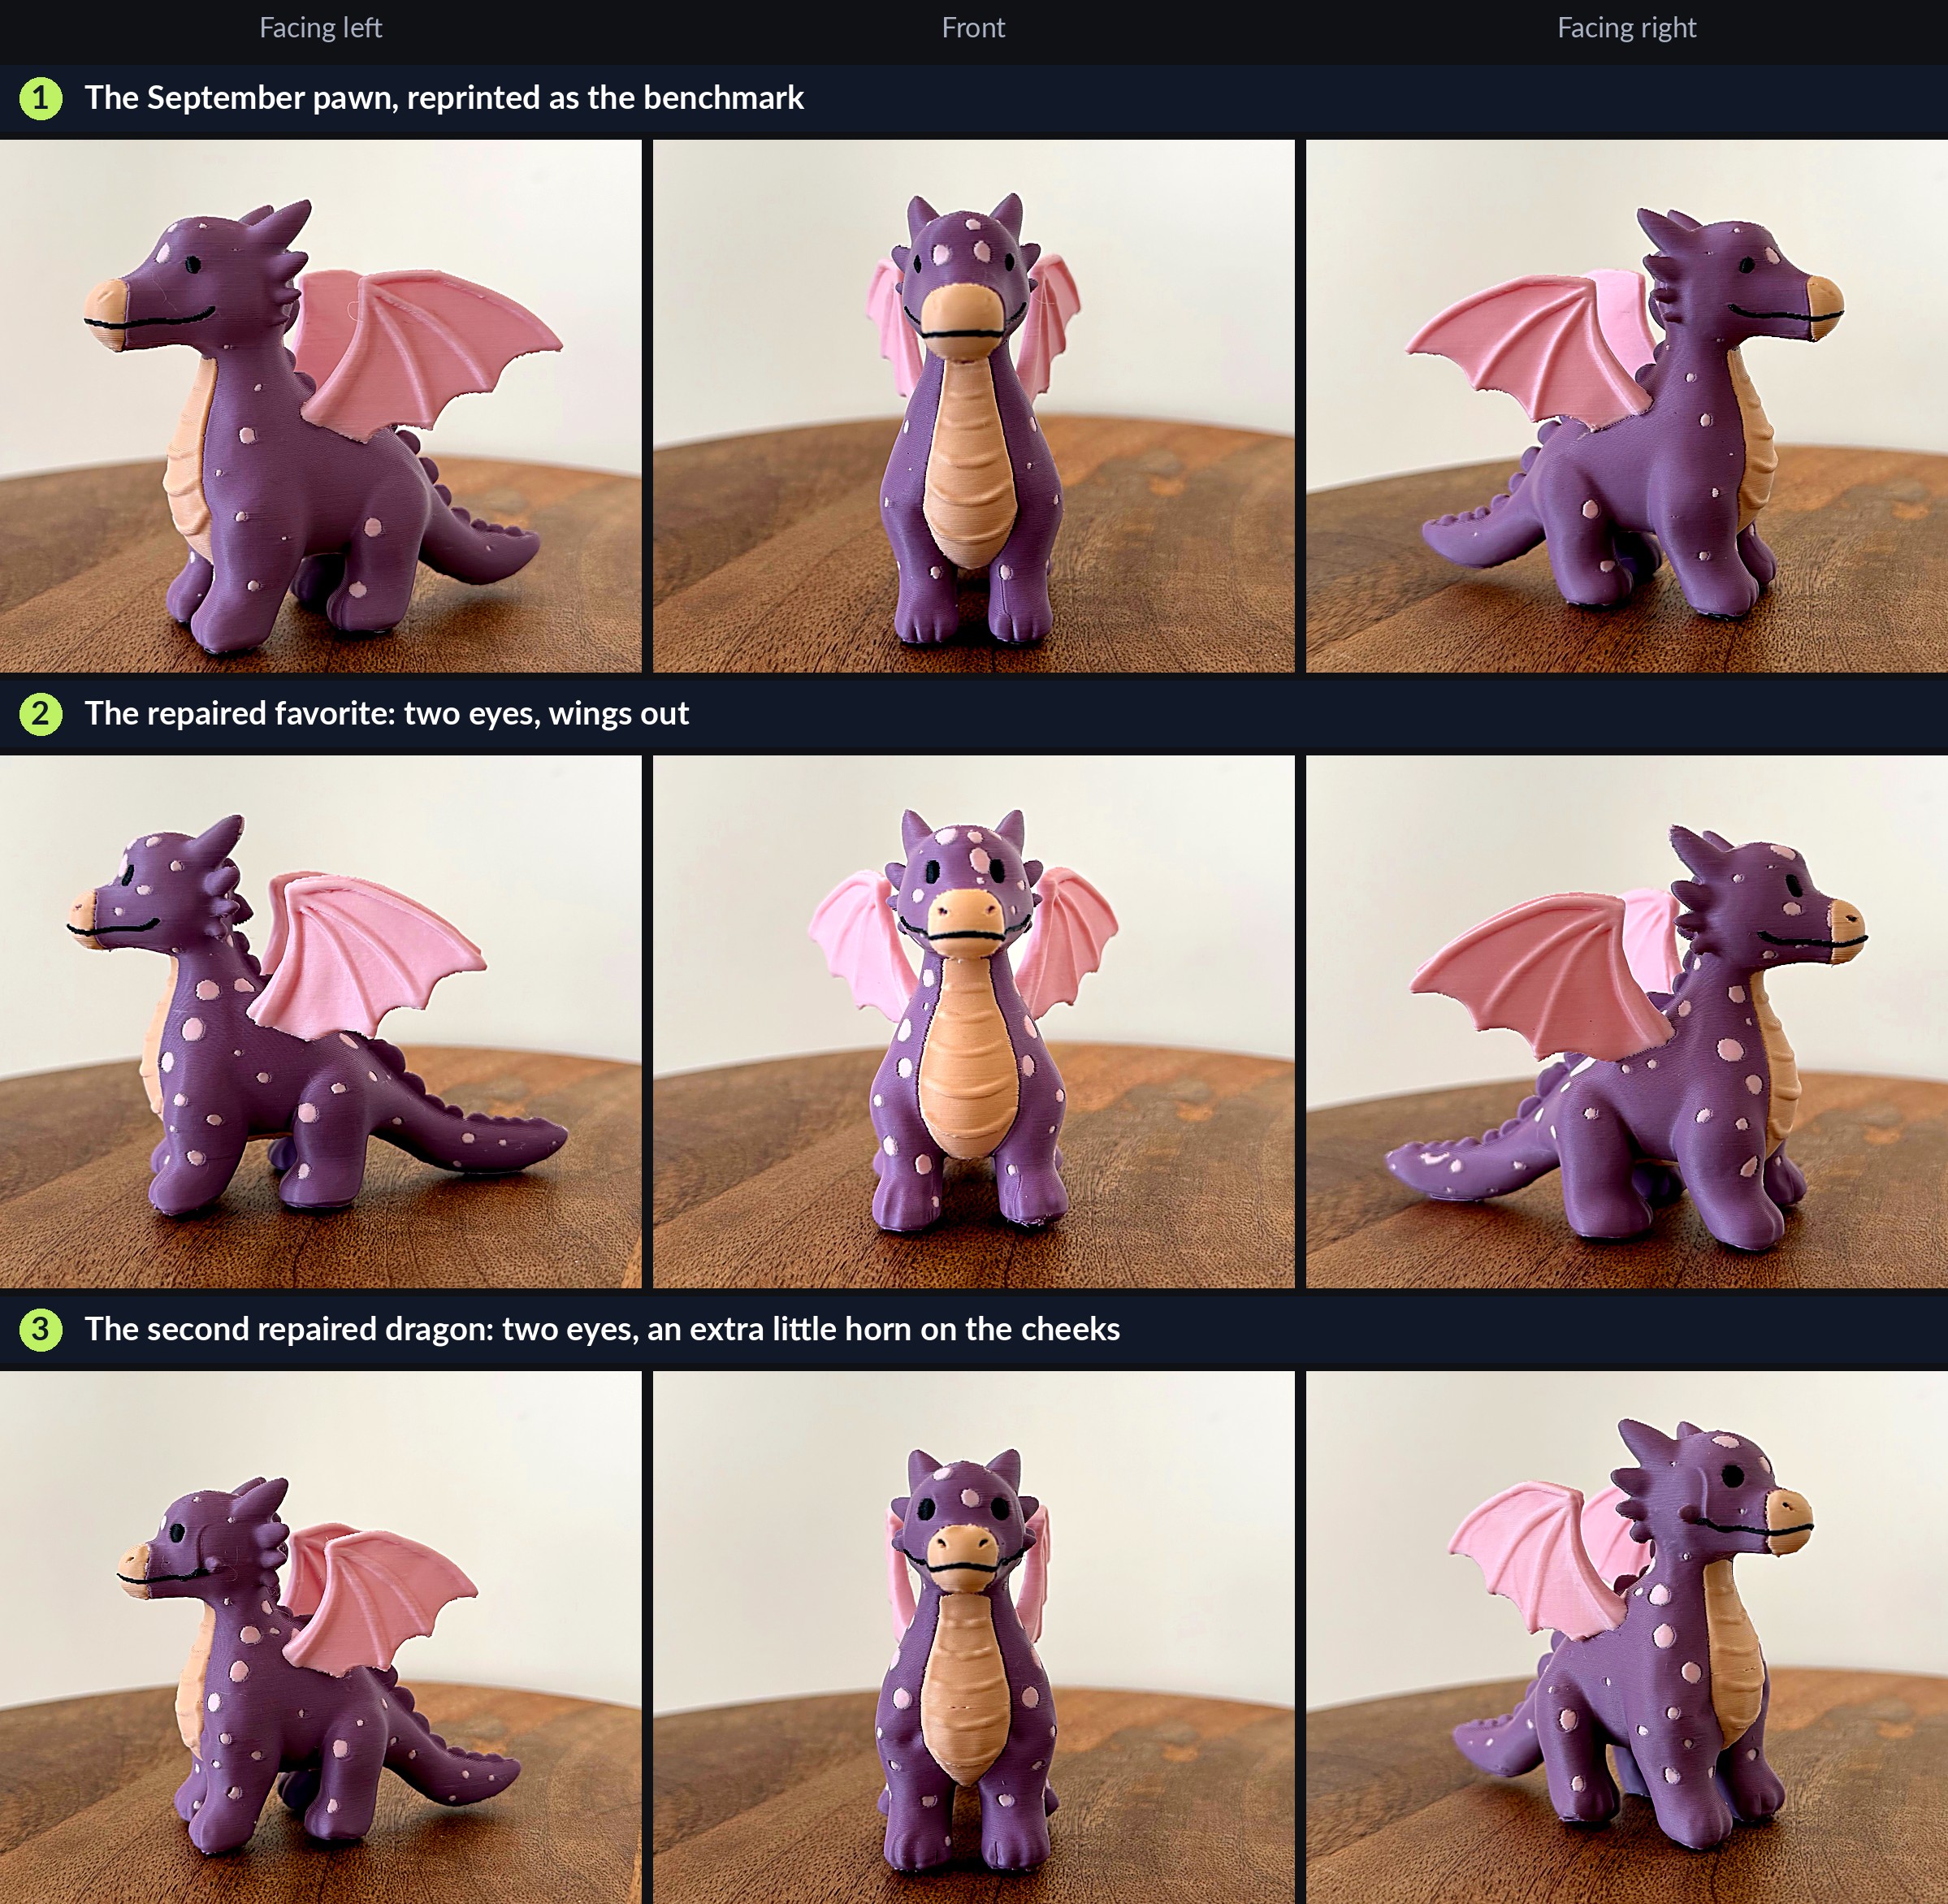
The three pawns from three sides. Top: the September pawn, reprinted as the benchmark. Middle: the repaired favorite. Bottom: the second repaired dragon.

The favorite is the one this review was for, and it has two eyes. They sit forward on the face, the brow above them is smooth, and nothing on the print shows where the brushed band began or ended. Its wings stand out wide, the way they are drawn, and it carries more and larger spots than the September pawn.
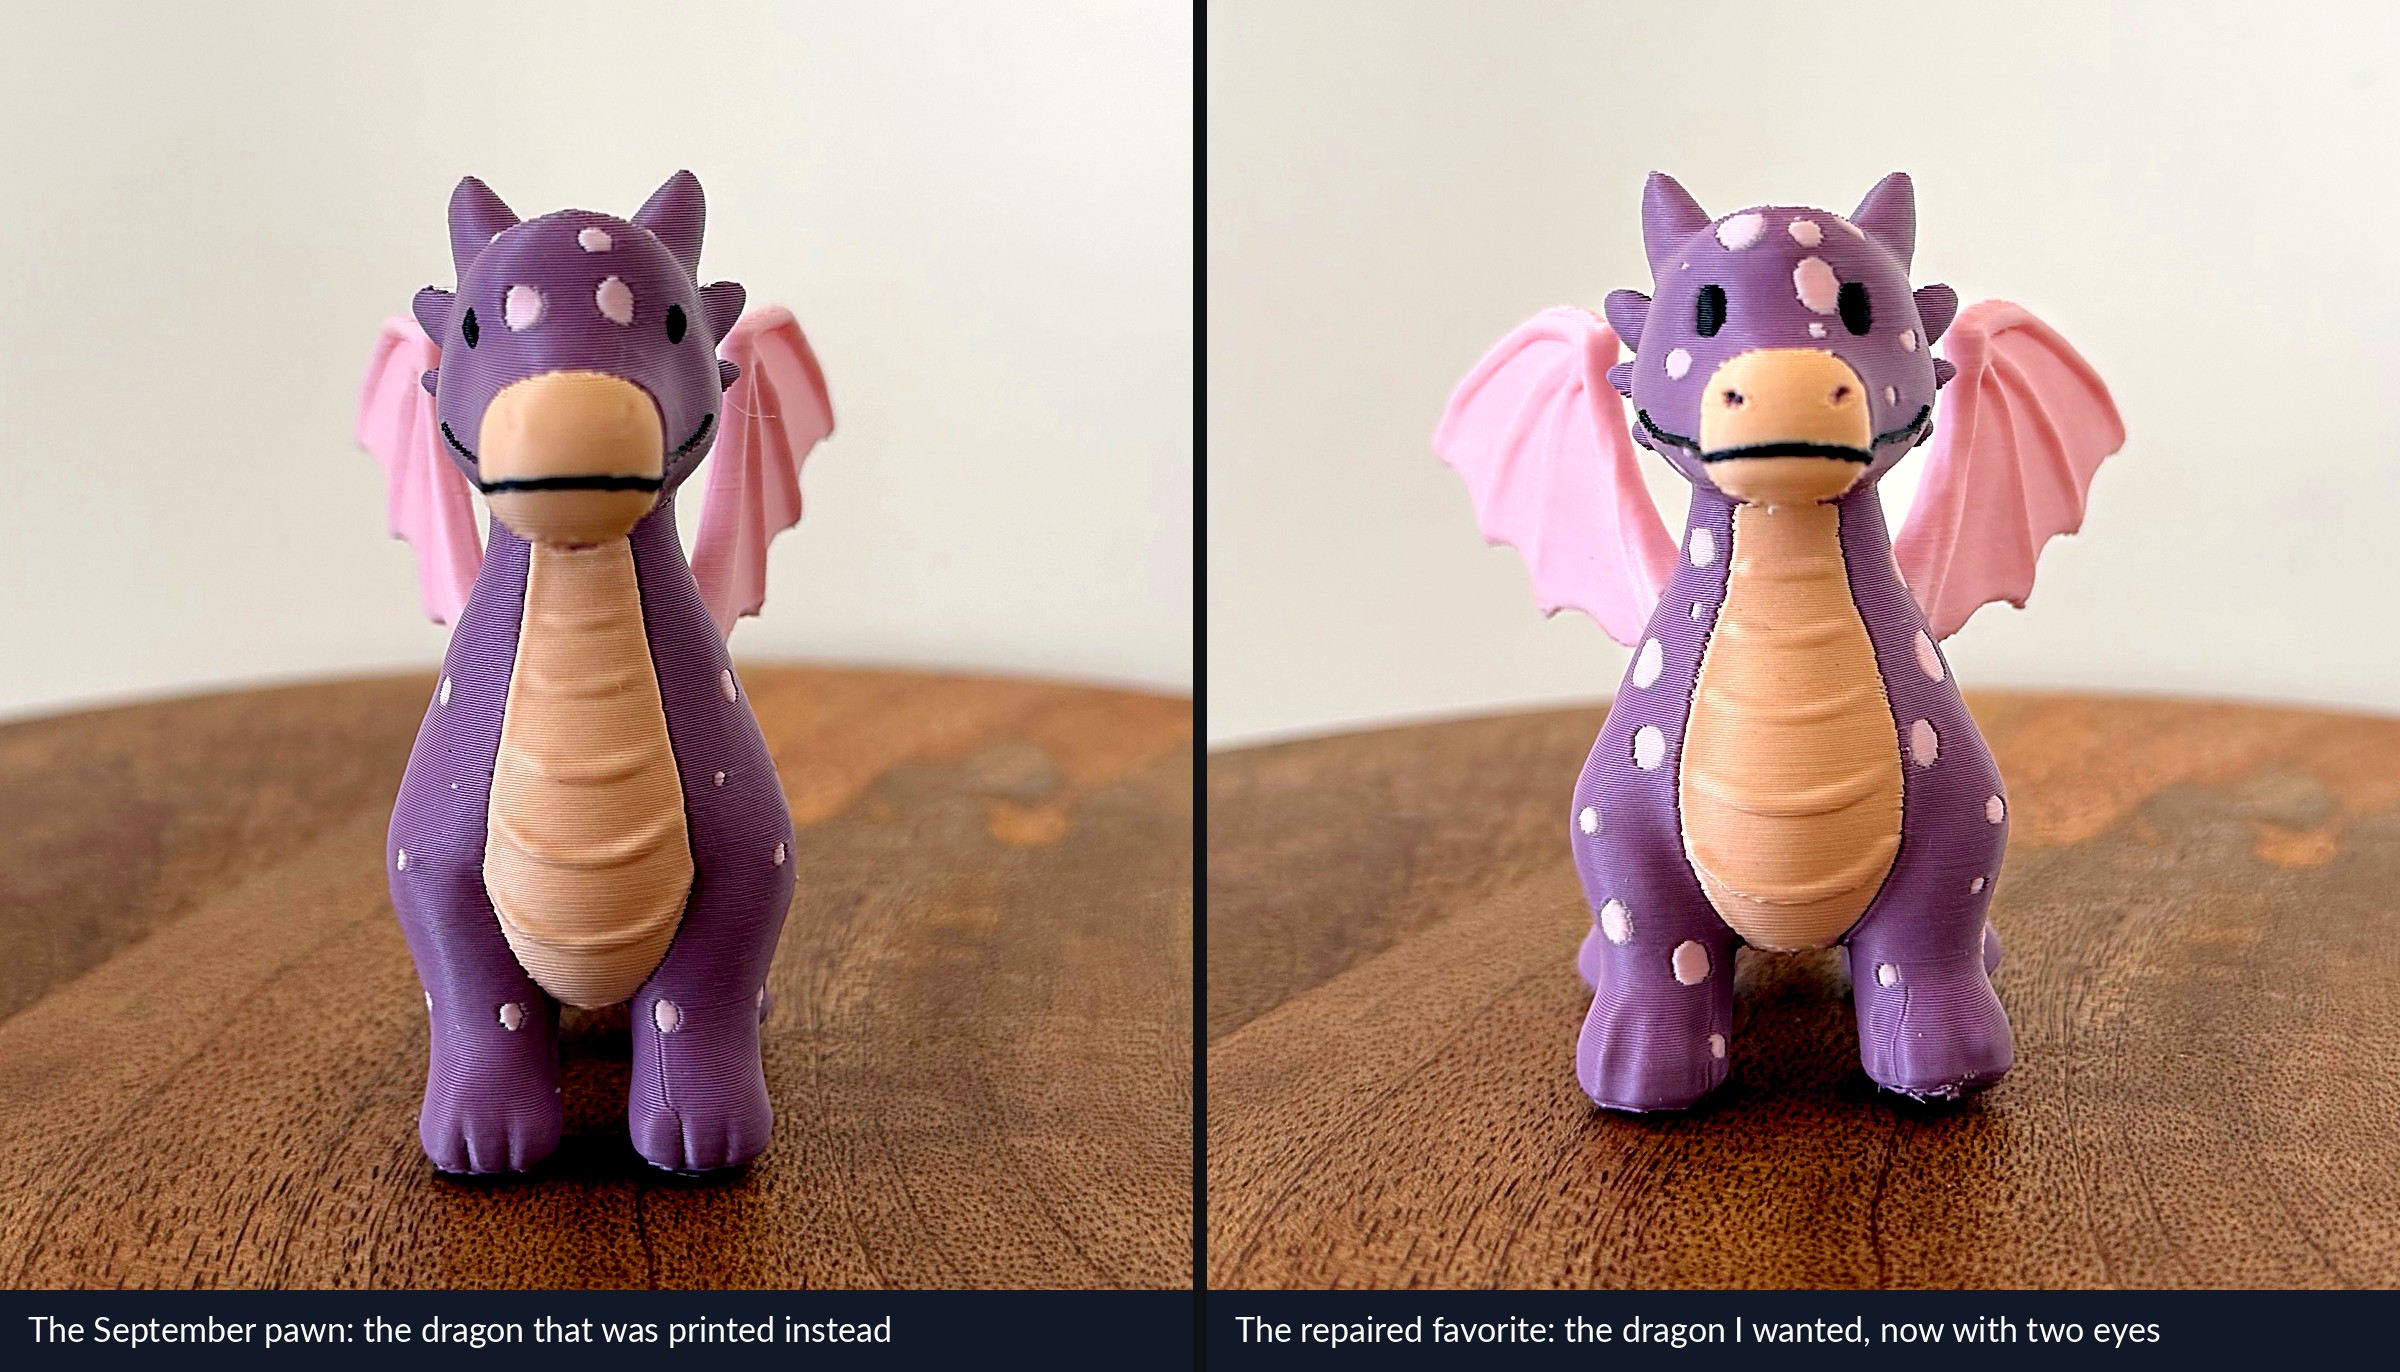
The September pawn and the repaired favorite, front. Same printer, same spools, same day.

The second dragon also came out with two eyes. Its spots are small and sit in shallow relief, because on that model they were sculpted into the mesh and the edit left them alone. It also wears the one thing Edit added that nobody asked for: an extra little horn at each corner of the mouth. On a pawn it reads as part of the character. On a model where it mattered it would take a second edit.
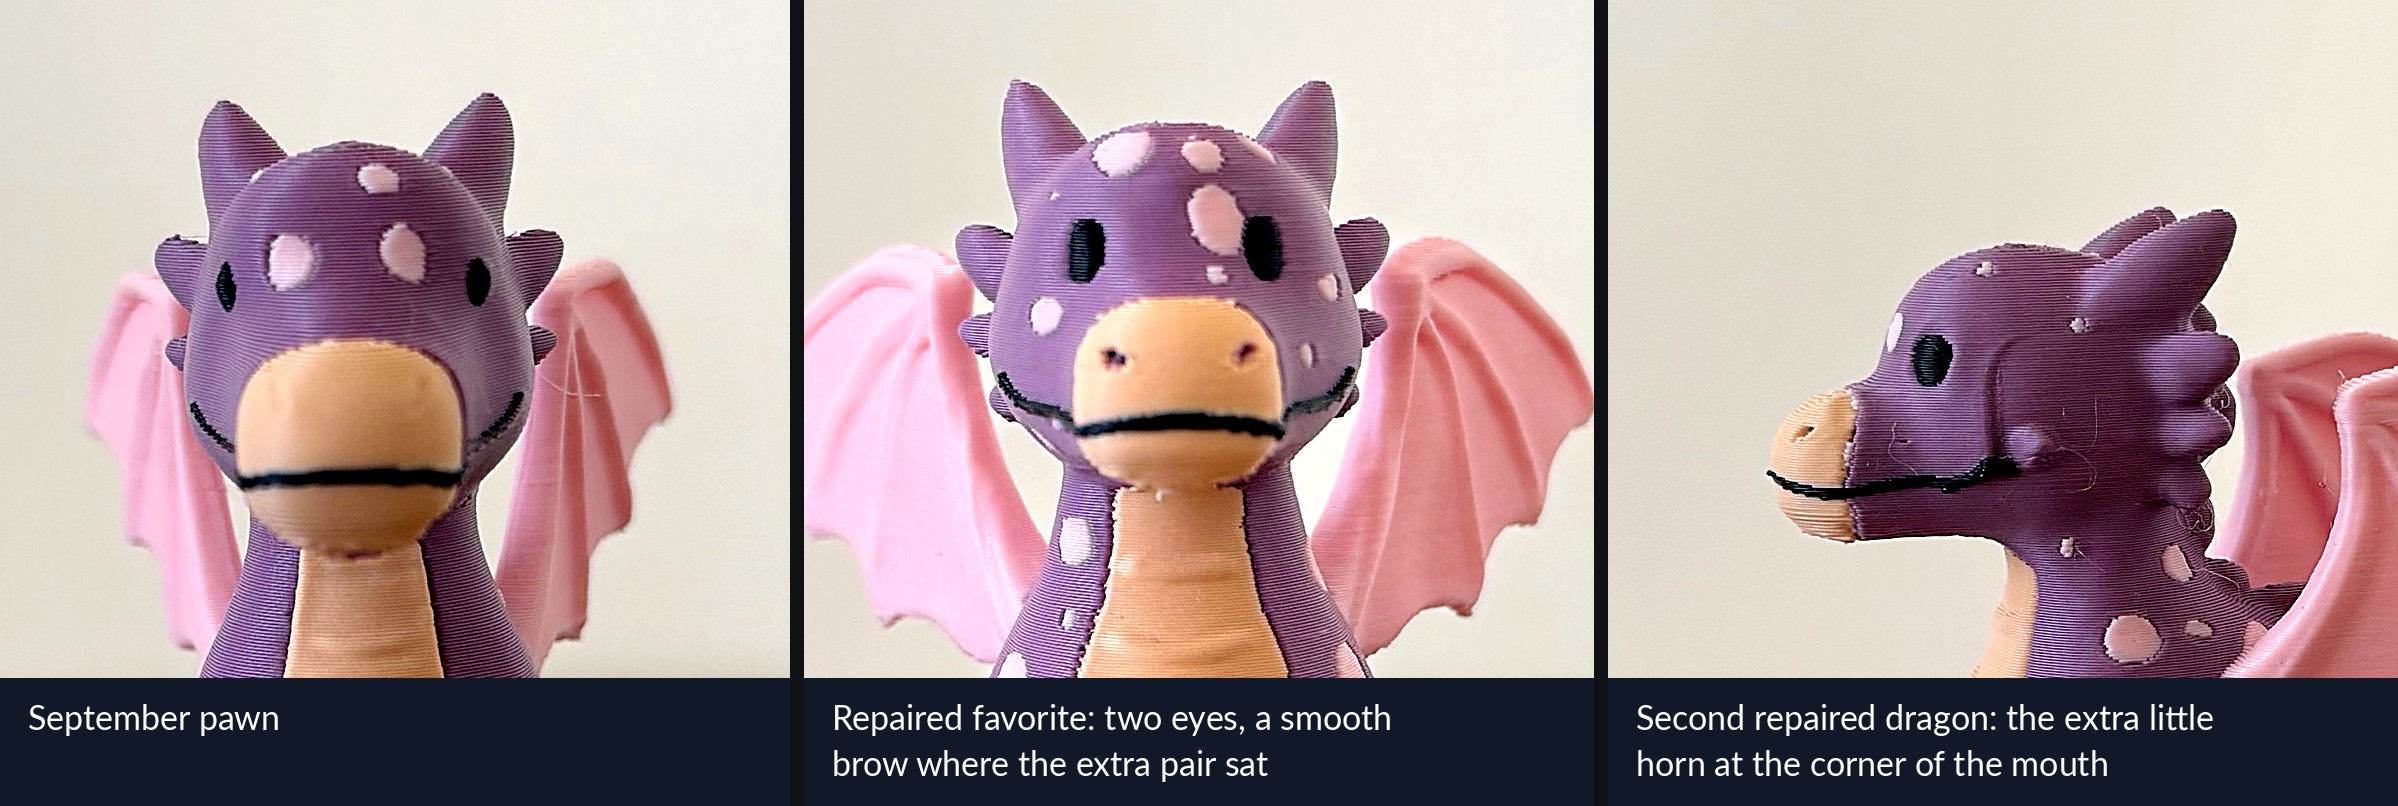
Three faces: the September pawn, the repaired favorite with a smooth brow where the extra eyes sat, and the second repaired dragon with the extra little horn at the corner of its mouth.

All three share the same small print flaw, a slightly ragged trailing edge on the wings. It shows on the September pawn as much as on the repaired ones, so it comes from the print and not from the edit.

The slicer figures below come from reslicing all three in the current Snapmaker Orca with the same U1 preset: 0.20 mm layers, tree supports on filament 1, prime tower on.

Pawn Tool changes Print time Filament
September pawn (benchmark) 522 4 h 52 min 81 g, of which 48 g prime tower
Repaired favorite 660 6 h 04 min 96 g, of which 57 g prime tower
Second repaired dragon 629 5 h 30 min 95 g, of which 58 g prime tower

September’s own slice of the first pawn said 4 h 46 min and 76 g, with the same 522 tool changes. These are three different dragons, so the differences come from shape, not from Edit.

The numbers

Regenerate and hope (September) Edit (this review)
What it took 11 dragon generations and 8 texture passes to reach a printable dragon that was not the one I liked 13 edits across two models, of which 2 successes
Credits about 800 about 260 for the edits, 20 for two Retextures
Wall clock an afternoon about two and a half hours for the first twelve edits, by the screenshot timestamps, and a few minutes for the thirteenth two days later; roughly a minute of waiting per edit, not timed
Result a good dragon, a different dragon the dragon I wanted, two eyes
Cost of the recipe once known n/a one edit, 20 credits

At two cents a credit on the Pro plan, the thirteen attempts cost about $5. The recipe, once you have it, costs forty cents. Meshy’s press release says the same fix by hand in Blender takes hours; in September I guessed two minutes for someone who has Blender open and knows it. Neither number was measured, because the rule of both reviews was never to open a modeling program. What Meshy’s “minutes instead of hours” leaves out is the afternoon it took to find the recipe, and that is the part this review is meant to save you.

What we would tell Meshy

Most of this list is documentation, which is a compliment to the feature: it works, and the product does not yet tell people how.

Put the two-part prompt in the tip bar; it would have saved me ten tries. Make the Lasso’s through-cut visible before the user submits, with a side-view ghost of the selection or simply a note that the loop selects through the model, and make a surface-only mode the default for features. Show what was regenerated: the new version should be able to highlight the region that changed, because today the only way to know is to count sockets and faces. And either honor the one instruction every user will type sooner or later, “keep everything else as it is”, or say in the interface that Edit cannot.

On the chain: the slot order of a Multicolor export should match the panel every time, or be pinned by the user. It cost a print in the September review and another one now, and it is a sorting problem, not an AI problem.

And the wish from September stands, half fulfilled. Edit repairs a region of one model. It does not borrow a part from another version, which is what the wizard in the first review needed, when one export had the feet right and the next had the face right.

Reader tips: what I would do differently next time

Say what is there first.
“There are now four eyes on the head of this dragon. Remove two eyes” worked where “no eye sockets”, “smooth skin” and “remove the two eyes that are selected” did not. State the situation, then the change. This was the difference between eleven failures and two successes, the second of them at the first try on a different model.
Lasso or Brush.
The Lasso selects through the model, front to back, and is for parts: hats, hands, props. The Brush selects the surface you see and is for features: eyes, bumps, text. For a feature, use the Brush and check it from three angles.
The prompt does not set the scope.
Everything inside the selection may be regenerated, whatever you write, and in practice the change often reaches beyond it. “Keep everything else as it is” is ignored. Keep the selection honest and let the sentence do the explaining.
Check the slot order before you print.
Multicolor 2.0 exports change which filament number carries which color. In Snapmaker Orca the Configure Filaments screen before Start Print maps slicer filaments to printer slots by color; read the cards by their gram figures and the body will land on the right spool. Exporting G-code to USB skips this step.

Verdict

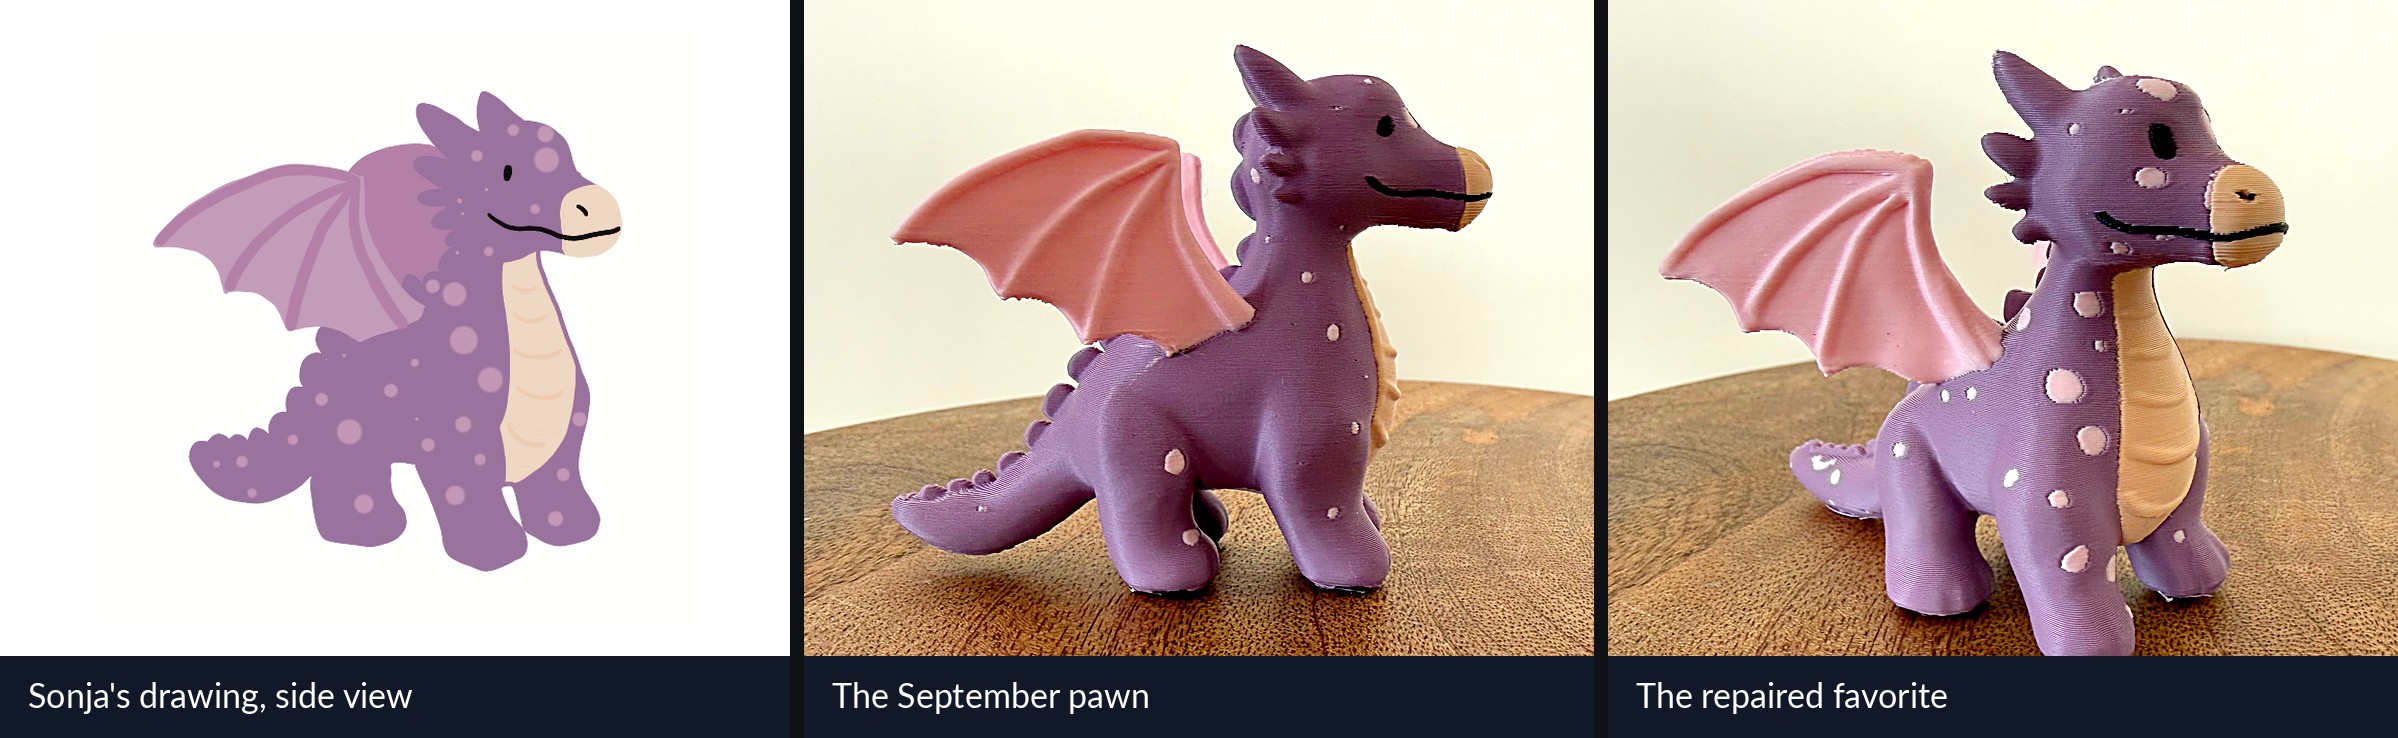
Sonja's drawing, the September pawn and the repaired favorite, all from the same side.
Sonja’s drawing, the September pawn and the repaired favorite, all from the same side.

Start with what is on the board. In September the dragon I liked best could not be printed, and the only ways out were to regenerate and lose it or to open a modeling program and break the rule of the review. Today it stands next to the September pawn with two eyes, its horns and spots in place and its wings out, and nothing touched it but Meshy. That was the top line of my wishlist seven weeks ago, and it is done, for 20 credits an edit. For anyone who has looked at a nearly right generation and sighed, that is the result that matters, and it is impressive.

The road there is the useful part of this review, because it is shorter for you than it was for me. Edit is not a scalpel that removes the thing you circle. It regenerates the region you select, steered by your sentence. Once that is understood, the recipe is three lines. Describe what is there before you say what should change. Use the Brush and cover the whole feature you are talking about. Expect two or three tries and keep the one you like, which Meshy’s version strip makes easy. My thirteen attempts were the price of learning that; with the recipe in hand, the second dragon was repaired at the first try.

On the board the result holds up. The favorite’s brow is smooth where the extra eyes were, the 2K Retexture printed crisp spots and eyes, and of the three pawns it is the one closest to the drawing. The second dragon shows the limit in miniature: a first-try repair, plus an extra little horn on each cheek that came with the regeneration.

So the score is 4.25, judged from the seat of the reader this tool is for: someone who can draw or describe but cannot model, and who until last month had no way to fix one part of a generated model at all. For that reader Edit is the first repair tool that exists, and it delivered two repaired dragons. The point it loses is for the manual: the selection and the sentence that make it work are nowhere in the product. The 7.1 verdict stands at four, and its biggest wish is half answered: a region of one model can now be fixed, even if a part cannot yet be borrowed from another. The dragon that prompted the wish is on the board.

Scorecard

  • Result qualityThe dragon that could not be printed in September stands on the board with two eyes, and so does the second one, with one small extra horn on its cheeks; for someone who does not model, that is a repair where there was none
  • Usability and controlIt worked without any modeling knowledge, which is the point; but nothing in the product teaches the selection and the sentence that make it work, and that cost me twelve tries
  • Workflow and performanceRoughly a minute per edit, every version kept, straight into Retexture, Multicolor and the slicer; the export’s slot order still changes between files
  • Value20 credits an edit, about $5 for the whole search and forty cents once you know the recipe; the September route cost about 800 credits and did not deliver this dragon

Overall4.25 / 5

Reader offer

Meshy gives 3DPrinting.com readers 60% off the first month of Pro with the code 3DPRTG60, for new customers. The link below is an affiliate link from our promotional agreement with Meshy; it costs you nothing and did not influence this review.

Get 60% off Meshy Pro with 3DPRTG60 ↗

Also from Meshy: the company recently launched a library of free 3D files at meshy.ai/3d-print-files ↗. Despite the name it is not limited to print files: according to Meshy it covers all common 3D formats and can be filtered by file type and use case. It was not part of this review and I have not tested it.

Meshy provided a Pro membership and paid an editorial fee for this independent review; Snapmaker provided the U1 and Polymaker the filament for the September review, as disclosed above. Neither company saw the piece before publication. The reader code and affiliate link above come from a separate promotional agreement with Meshy and did not influence the review. Dragon drawn by Sonja Uittenboogaard, swurls.nl, used with permission. Read the first part: Meshy 7.1 review. 3DPrinting.com has covered additive manufacturing since 2012. Last reviewed: 10 November 2026.

About the author

Robert is co-founder of 3DPrinting.com and has worked in the industry since the site launched in 2012. LinkedIn ↗
Share:
WhatsApp Twitter Facebook LinkedIn Buffer Reddit E-mail

Robert Dehue

Robert is co-founder of 3DPrinting.com and has worked in the industry since the site launched in 2012. LinkedIn ↗
Join our newsletter

Our newsletter is free & you can unsubscribe any time.

Latest posts

Stanford Uses a 3D-Printed Model to Plan First US Adult Osteobionix Chest Wall Implant

Stanford surgeons used a 3D-printed model to plan a 16-hour operation that ended with the first US adult implantation of an osteobionix chest... read more »

Medical
Stanford Uses a 3D-Printed Model to Plan First US Adult Osteobionix Chest Wall Implant

SPEE3D Plans 50 Cold Spray Metal Printing Factories Across Asia Pacific, Starting in Darwin

SPEE3D plans 50 advanced manufacturing factories across Asia Pacific. Phase One of the first, its NodeZERO hub in Darwin, has now launched.

3D Printing Metal
SPEE3D Plans 50 Cold Spray Metal Printing Factories Across Asia Pacific, Starting in Darwin

SWISSto12 Passes Design Review for 5G Satellite Antennas With 3D-Printed Front Ends

SWISSto12 has cleared the critical design review for the S- and Ka-band phased array antennas on UNIVITY's 5G demonstration satellites.

News
SWISSto12 Passes Design Review for 5G Satellite Antennas With 3D-Printed Front Ends

Bambu Lab H3C Mixes Layer Heights on the Same Surface

Bambu Lab's H3C slicer lets a fine nozzle print thin layers and a larger nozzle print thick ones, side by side on the... read more »

News
Bambu Lab H3C Mixes Layer Heights on the Same Surface

UT San Antonio Turns Sargassum Seaweed Into 3D-Printed Runoff Filters

UT San Antonio engineers are making reusable runoff filters with 3D-printed backbones from Sargassum seaweed collected on the Texas coast.

Environmental
UT San Antonio Turns Sargassum Seaweed Into 3D-Printed Runoff Filters

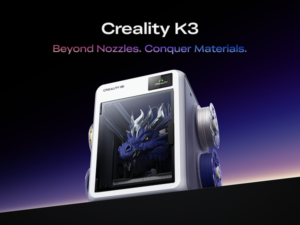
Creality K3 Goes on Sale at $849: Four Nozzles, Swapped Instead of Filament

Creality's K3 is now shipping in the United States at $849. It keeps four filaments loaded on four separate nozzles and swaps the... read more »

3D Printers
Creality K3 Goes on Sale at $849: Four Nozzles, Swapped Instead of Filament

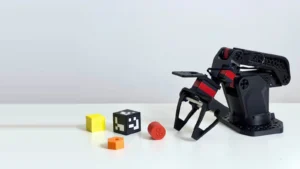
Robo Nine Starts Printing First Fifty Robot Leader Arms

Robo Nine is 3D printing its first batch of 50 SO-ARM102 leader arms in China for the open-source education kit.

Electronics
Robo Nine Starts Printing First Fifty Robot Leader Arms

Callaway Plans $15M Titanium 3D Printing Facility in Fort Worth

Callaway Golf will invest $15 million in a Fort Worth titanium 3D printing facility, expected to open mid-2027 and support custom titanium products... read more »

3D Printing Metal
Callaway Plans $15M Titanium 3D Printing Facility in Fort Worth

Blue Origin Northstar Booster Engine Is Over 65 Percent Printed

Blue Origin's new Northstar liquid oxygen and LNG booster engine is more than 65 percent additively manufactured, with 30 percent less mass than... read more »

Accessories
Blue Origin Northstar Booster Engine Is Over 65 Percent Printed

Printed Tungsten Tiles Survive Plasma Tests at DIII-D

NC State, Oak Ridge National Laboratory, and JEOL put full-size electron-beam printed tungsten divertor tiles through 74 plasma shots at DIII-D.

3D Printing Metal
Printed Tungsten Tiles Survive Plasma Tests at DIII-D

Social

  • Facebook Facebook 3D Printing
  • Linkedin Linkedin 3D Printing
Join our newsletter

Our newsletter is free & you can unsubscribe any time.

revopoint bf sidebar

Tripo

Free to $110/mo
  • 60% off Tripo Pro with code 3DPRINTING.
Tripo
View at Tripo tripo3d.ai

Bambu Lab P2S

~$549
  • A next-generation enclosed CoreXY with DynaSense servo extruder, AMS 2 Pro with active…
Bambu Lab P2S
Buy Now bambulab.com

3DMakerpro Moose Lite

~$399
  • Entry-level NIR medium crossover scanner with AI visual tracking at 0.05mm accuracy and…
3DMakerpro Moose Lite
Buy Now store.3dmakerpro.com

Creality CR-Scan Ferret Pro

~$359
  • Wireless Wi-Fi 6 version of the Ferret with anti-shake technology, ability to scan blac…
Creality CR-Scan Ferret Pro
Buy Now store.creality.com

Creality SparkX i7

~$239-$299
  • A CES 2026 award-winning beginner multicolor bedslinger with CFS Lite 4-color printing,…
Creality SparkX i7
Buy Now creality.com

Polymaker Fiberon PA6-CF20

  • With 20% carbon fibre loading in a PA6 base, delivers the highest stiffness of mainstre…
Polymaker Fiberon PA6-CF20
Buy Now polymaker.com

Creality K3

~$849 (pre-order)
  • Creality's first toolchanger using the KliTek system to dock and swap complete nozzle a…
Creality K3
Buy Now creality.com

Bambu Lab X2D

~$649
  • The P2S with a 65°C actively heated chamber and a second Bowden-fed nozzle for support…
Bambu Lab X2D
Buy Now bambulab.com

Site footer

The 3DPrinting.com newsletter

The week’s best reviews, buyer’s guides and deals. One email every Friday, no spam.

By subscribing you agree to our privacy policy. Unsubscribe anytime.

3D PRINTING.COM

Independent reviews, buyer’s guides and news about 3D printers, materials, scanners and software.

Reviews

  • All reviews
  • 3D printers
  • Filament & materials
  • 3D scanners
  • Software
  • Compare products

Buyer's guides

  • Best 3D printers
  • Best resin 3D printers
  • 3D printers for beginners
  • Best PLA filament
  • Best slicers
  • Best pro 3D scanners

Learn & news

  • Latest news
  • Deals
  • What is 3D printing?
  • FDM vs resin
  • Use cases by industry
  • Glossary

Company

  • About us
  • Contact us
  • Advertise with us
  • Media kit
  • Nederland 3D Printing

© 2026 3DPrinting.com · Strikwerda en Dehue

  • Privacy policy
  • Terms of use
  • Affiliate disclosure
  • RSS