
Our first laser engraver review. Creality’s entry-level enclosed Falcon A1C is sold as safe for the home, beginner-proof, and clever enough that a camera does the thinking. We put it on a desk in a spare room, lived with it, and found out which of those is true.
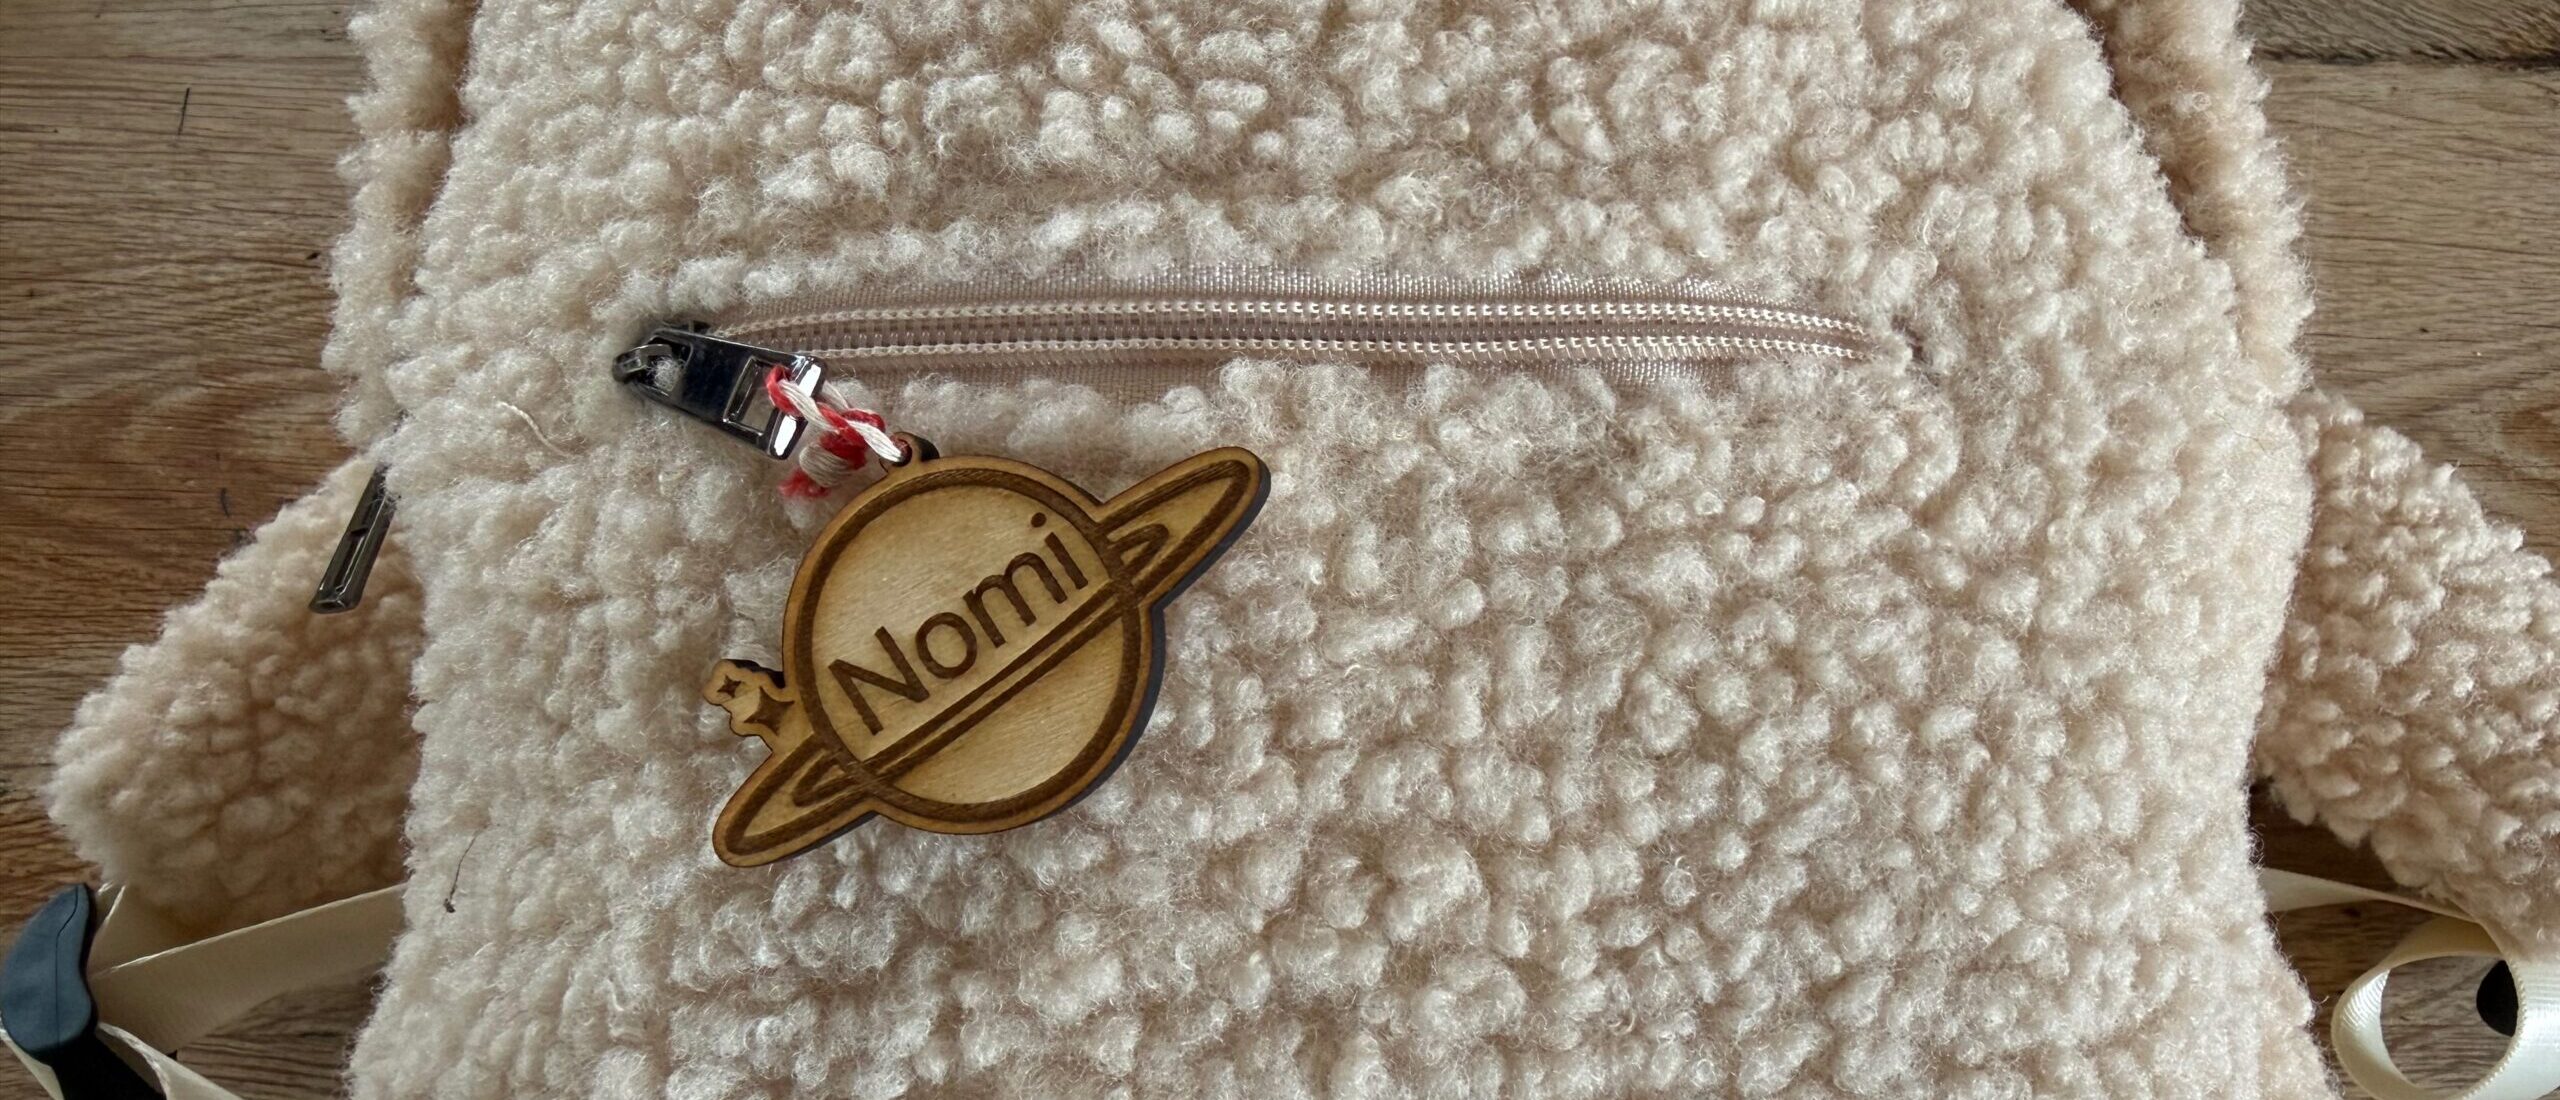
In service. The keychain the machine made for the reviewer’s daughter, on her backpack. This is the second one, cut from 5 mm plywood after the first broke; the story is in the setup section.
Let me be upfront about something before we start: this is the first laser engraver we have ever reviewed at 3DPrinting.com. We know 3D printers and 3D scanners inside out. Lasers are new territory for us, and I came to this one with zero hands-on experience. I am telling you that because it shapes everything that follows. Where an experienced laser user would shrug at a rough edge, I walked straight into it and then wrote it down, and I think that makes this review more useful to the person the Falcon A1C is actually aimed at, which is someone exactly like me on the day the box arrived.
It also means this is the start of something. We are building out buyer guides for laser engravers alongside these reviews, and the A1C is the machine that taught us what to look for.
One more thing you should know. Most of what I engraved was aimed at satisfying a single person in the house, who turned out to be the most enthusiastic audience the machine had: my two-year-old daughter. A keychain with her name on it, a coaster, a sign for her bedroom door. If that sounds like a strange basis for a review, I would argue it is exactly the right one, because that is what people buy a laser at this price for. Nobody buys this machine to make aerospace parts.
So, the machine. The Creality Falcon A1C is a compact, fully enclosed diode laser engraver that starts at 269 dollars, or 289 euro, for the 5 W model without a camera, which makes it Creality’s cheapest enclosed laser and one of the cheapest enclosed lasers we know of. Creality pitches it as safe for the home, beginner-proof, and clever, with an AI camera that positions your work and recognises materials for you. The camera adds 30 dollars to either model: 299 dollars for the 5 W, 399 dollars (429 euro) for the 10 W. The version I tested is the 10 W with the AI camera and the optional 1.2 W infrared module for bare metal, a kit that lists at 647 dollars or 707 euro. At the time of writing Creality is discounting it to 519 dollars or 629 euro, and the 10 W camera model without the infrared module to 339 dollars.
The unit was supplied by Creality for review. Everything below is what happened when I put it on a desk in a spare room and tried to use it the way a buyer would.

What you are buying
The A1C is small. The whole machine is 336 by 377 by 341 millimetres and weighs just under ten kilos, which means it sits on a desk rather than needing a bench, and one person can lift it. Inside is a 150 by 150 millimetre engraving area, which sounds tiny until you realise the things people actually make with a laser like this, coasters, tags, small gifts, all fit comfortably. What you cannot do is anything large.
The more interesting number is the height. There is 148 millimetres of clearance under the laser, so you can put a tall or oddly shaped object in it without giving up the enclosure. That is unusual in a boxed machine at this price. It is also, as you will read below, a promise with a catch.
The laser modules swap without tools. Creality sells a 5 W diode, a 10 W diode, and a 1.2 W infrared module. The blue diode is what you use for wood, cork, fabric, slate and coated metal. The infrared is for bare metal and, it turned out, dark stone; at 1.2 W it marks rather than cuts. Focus is automatic, via a pin that touches the material. And the whole thing is a Class 1 laser device, which means the enclosure is designed to contain the beam and you are not required to wear goggles in normal use.
One thing Creality does not tell you anywhere: how thick a piece of material this machine will cut through. There is no figure on the product page, none in the manual, and none in the press material. For a machine that sells itself partly as a cutter, that is an odd omission, and it is one of the things I set out to find for myself.
Out of the box
The packaging is excellent. The machine arrives fully assembled, sitting in a thick foam cradle inside the shipping box, with the quick start guide and the certificate on top where you cannot miss them. I opened the box, lifted the machine out by its bag, peeled the film off the orange lid, and it was ready to switch on. There is no assembly. One small thing to watch: a sticker on the lid tells you to remove the protective silicone strips before operation, and it is the kind of sticker that is easy to read and then forget.
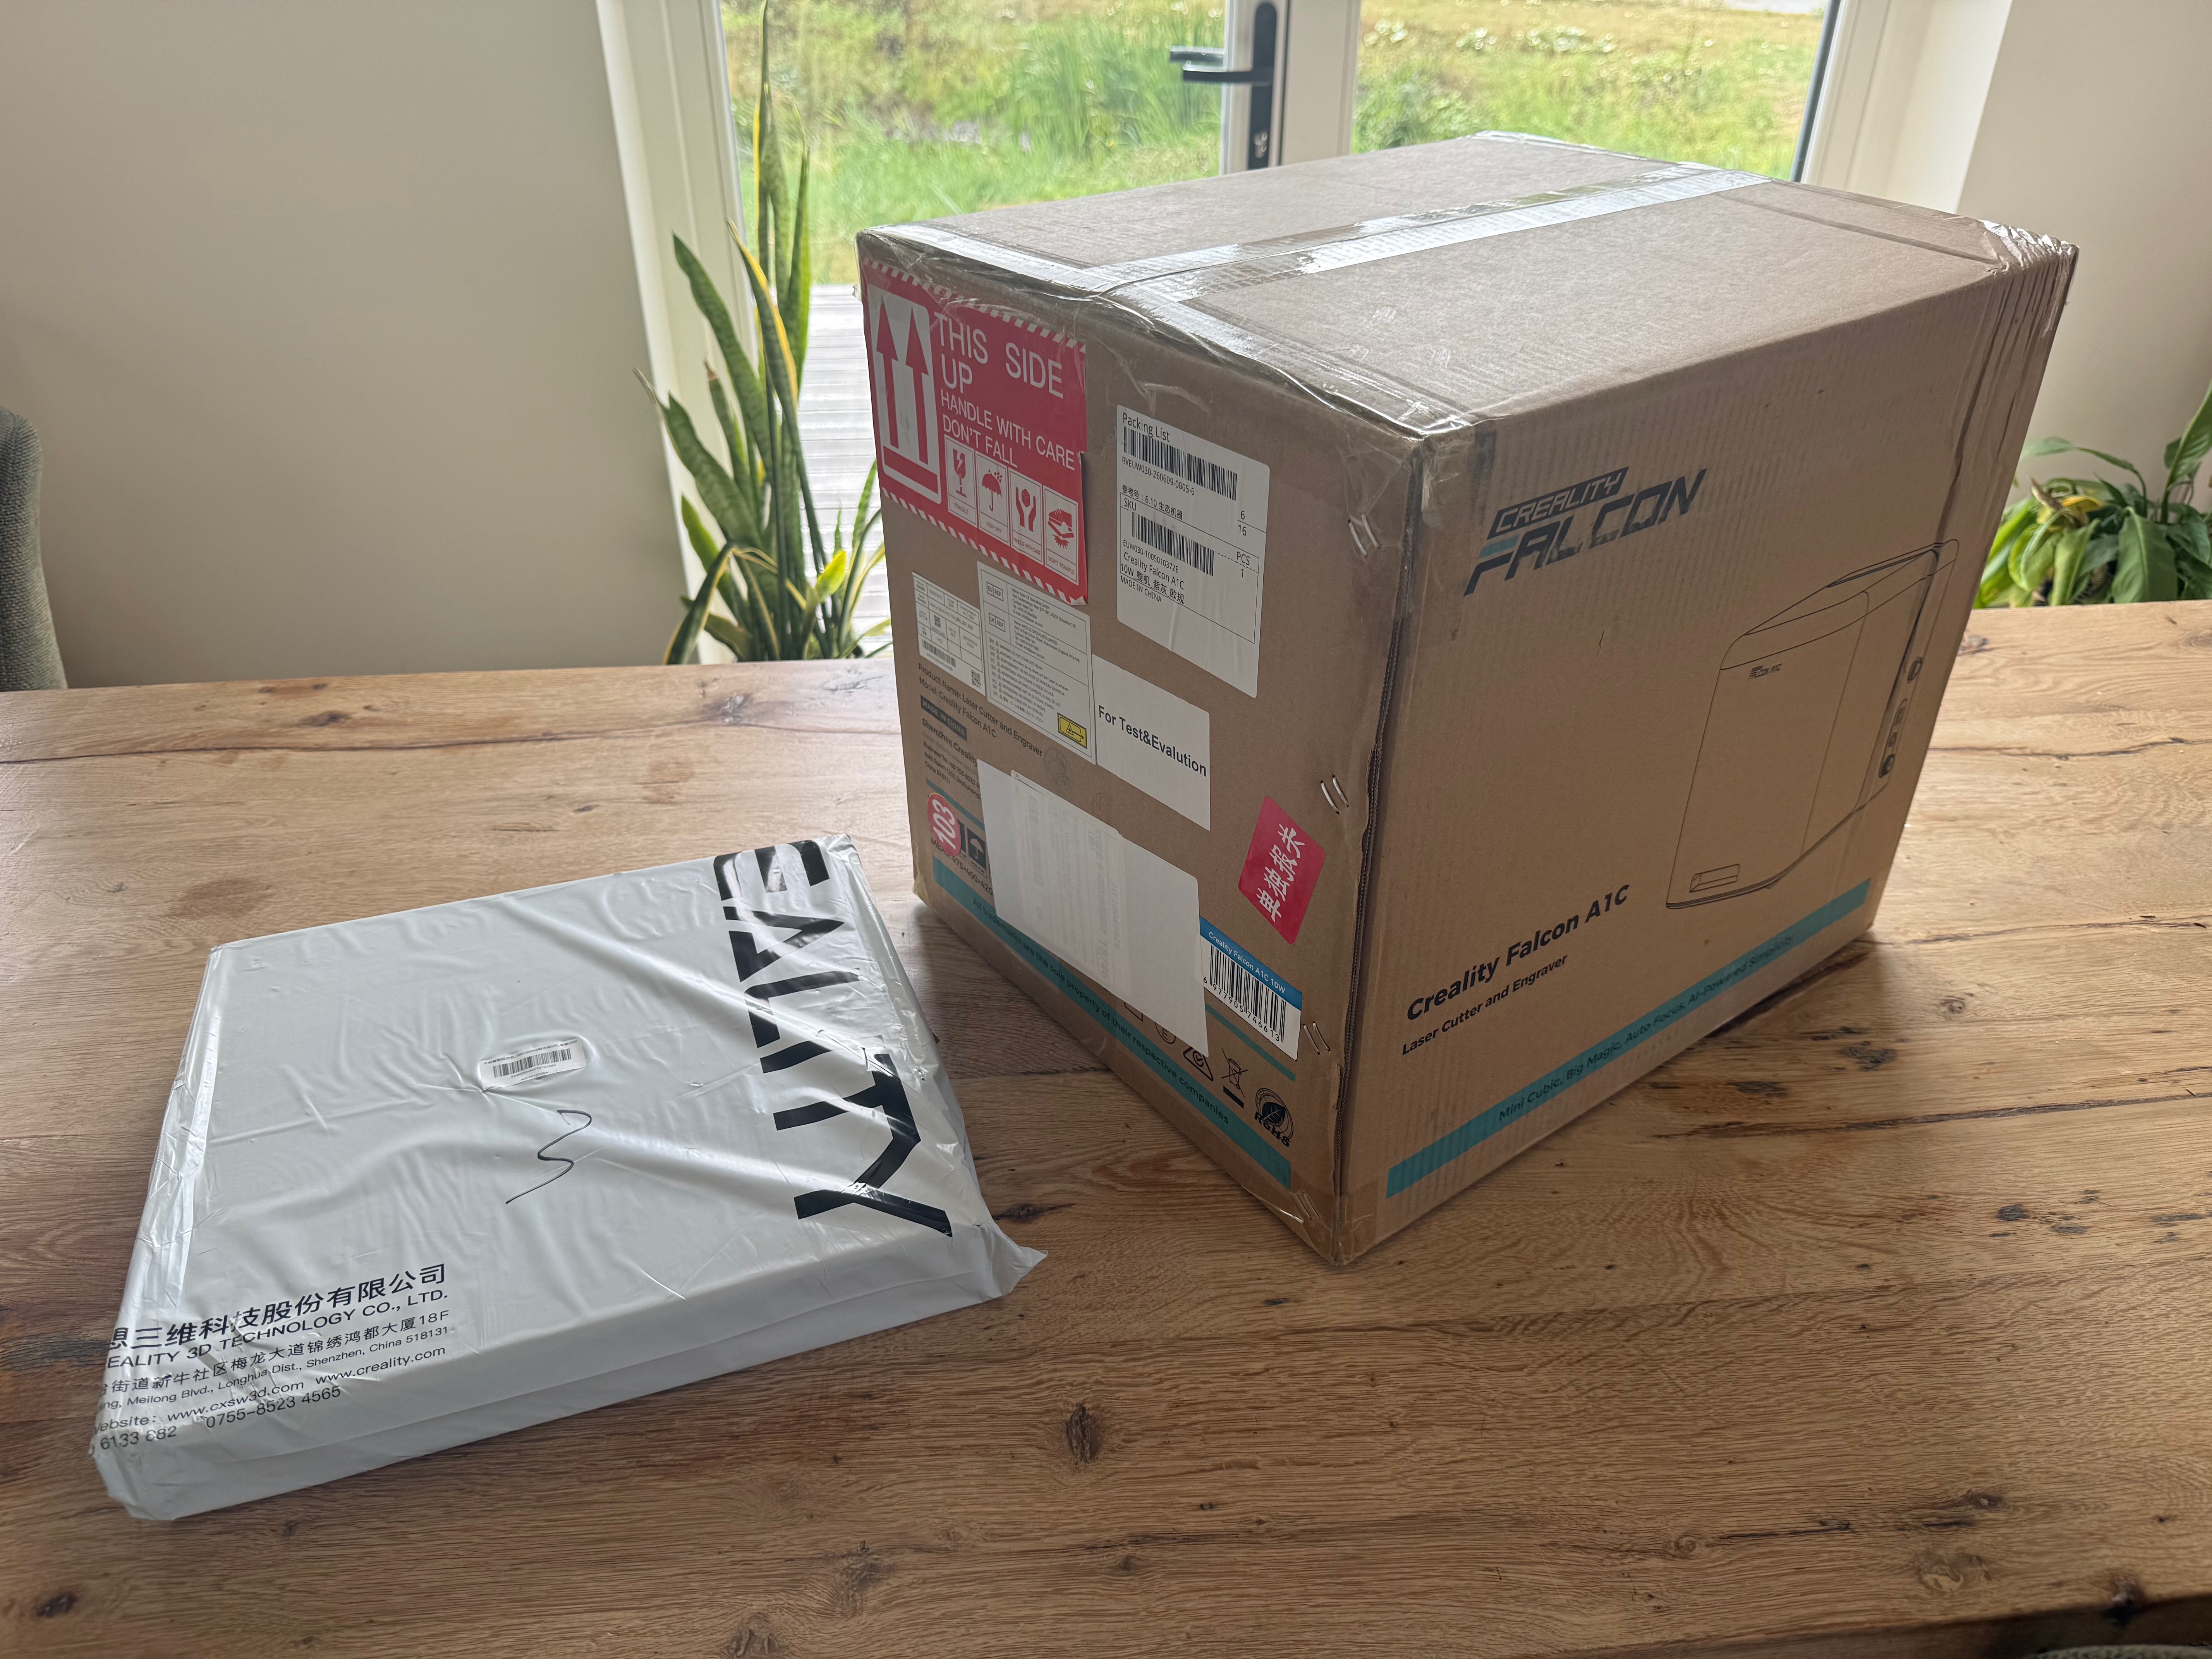
As it arrived: the machine in its box, and a separate pack of 5 mm plywood from Creality beside it.
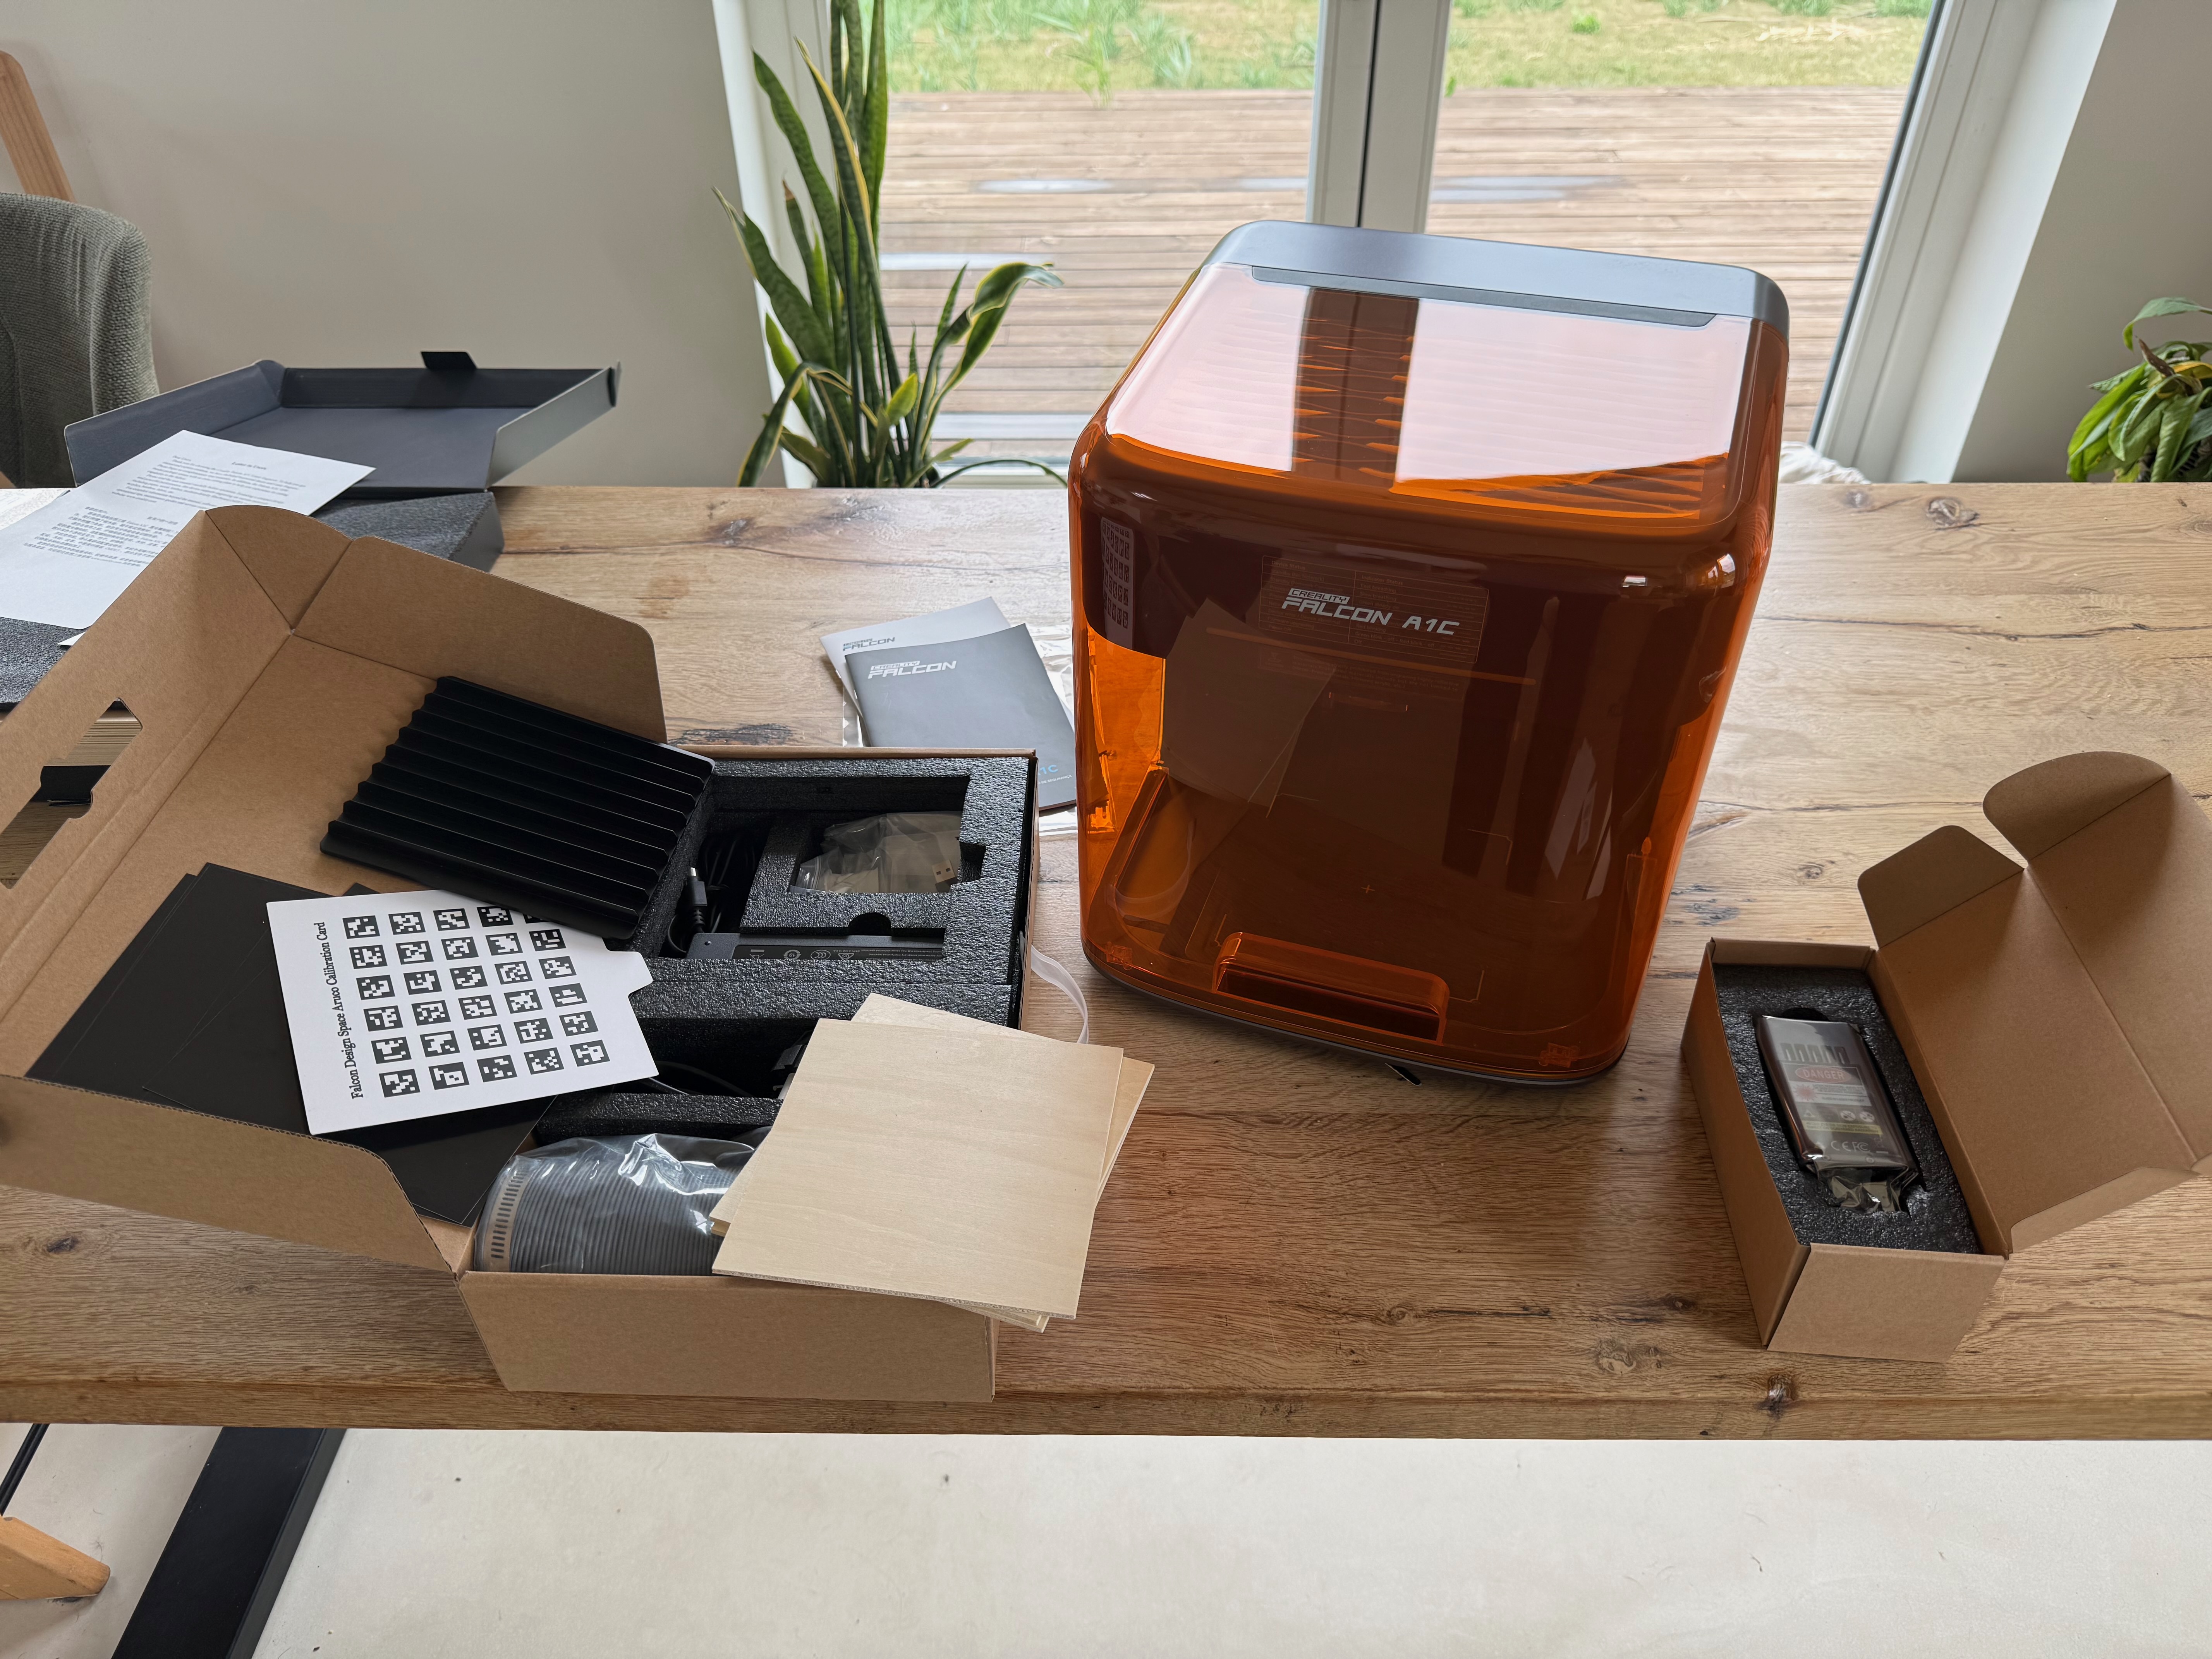
Everything in the box. The orange lid is the whole safety story in one picture.
What was in the box: the machine with the 10 W diode fitted, the 1.2 W infrared module in its own small box, the exhaust hose, the power supply, the USB cable, the safety key, a printed camera calibration card, and three small squares of plywood. Alongside it came a separate pack of 5 mm plywood sheets, which were larger than the bed and needed cutting down with a hand saw before I could use them. What was not in the box: Creality’s air purifier, which is sold separately, and anything to engrave other than plywood.
That last point matters more than it sounds. A complete beginner opening this box has plywood and nothing else. I ended up in the kitchen, and then in the shops, looking for things to engrave, which is not how the first evening was meant to go. A handful of coasters in cork and bamboo, a scrap of slate, a bit of cloth: it is a cheap thing to include and it is the difference between a first evening of discovery and a first evening of shopping.
Build quality is fine for the money. It is plastic, and it feels like a product at this price rather than one at twice it, but nothing creaks or flexes, and it sits firmly on the desk. TechRadar’s Alastair Jennings called it “slightly cheapish”, and I would not argue with that, but I would add that it does not feel fragile.
Setup and first impressions
Setup was short. Power on, install the desktop software, connect over USB, load a design. I did not run a stopwatch, which I regret, but I can tell you that the first thing the machine ever made was a keychain with my daughter’s name on it, cut from 3 mm plywood, on the first day, by someone who had never touched a laser and did not look anything up to get there. That is the beginner claim met on day one. The keychain itself did not survive its owner for long: the small attachment ring at the top, cut in 3 mm plywood, was no match for the forces a two-year-old can apply to anything with her name on it, and it broke off. That is a note on 3 mm plywood rather than on the laser. I cut a second one from the 5 mm plywood, and that is the one on her backpack at the top of this review, still in one piece.

The first job. A keychain in 3 mm plywood, engraved and cut in one go, photographed before its owner got hold of it. The attachment ring at the top is the part that broke.
The autofocus is a small mechanical pin that lowers with the head and touches the material. You press a button, it does its thing, and the focus is right. TechRadar found it faultless, and when I remembered to use it, so did I. That is the catch: it is a step you run, not something that happens when you press start, and the machine does not keep the last focus between jobs, even on the same piece with the same settings. I forgot twice. Both times the lines came out soft and wide because the material was further from the lens than the machine thought, and both times the software had let me start without a word. Creality calls this true autofocus with no manual adjustment. The adjustment is automatic. The trigger is you.
The autofocus also has a blind spot that cost me a project. I put a shallow mango wood bowl in, moved the head over the flat floor of the bowl, and ran the focus, which is the correct order. The pin found the floor, 15 millimetres below the rim, and the head then travelled sideways to its home corner at that height, straight through the rim, and jammed. I powered it down, freed the head, checked the belts and the lens, and tried again. Same result. The machine was unharmed, it homed cleanly afterwards and a test frame on flat scrap landed where it should, but the bowl was abandoned. The lesson, which nothing in the box tells you, is that the head does not lift after focusing, so anything taller than a coaster must either be flat across the whole bed or sit over the home corner. The 148 millimetres of clearance is real. Using it takes more care than the brochure suggests.
Then there is the button on the side of the machine. For the first hour I had no idea what it was for. I pressed it several times, in the way one does, and the machine kept its own counsel. Nothing in the quick start explained it. It turns out to be the Bluetooth pairing button, and it only makes sense once you have installed the phone app, which I had not. More on that below, because it turned out to be the key to half the machine.
Where I put it, and why that matters
The A1C is sold as a home machine, and I tested it as one. It sat in a spare room with a door to the outside and a small opening window. I ran the exhaust hose out of the door and used the window as the air inlet. No purifier, because none was supplied, and that is the configuration anyone who does not add one will have.
The built-in extraction fan does its job well. Even when cutting through the thicker plywood, no smoke escaped the enclosure and the fan had enough pull to clear it out through the hose. What it lacks is a run-on: the fan stops the moment the laser does, which is exactly when the enclosure is fullest, so I learned to leave the lid shut for a minute or two before opening it. A timer that keeps the fan going after the job would cost nothing and is on my wishlist.
Two honest notes. First, that is a better setup than most people will manage; a desk in a spare bedroom with a window is more typical, and my fume experience will have been better than theirs. Second, ventilation is not optional with this machine. The enclosure keeps the beam in. It does nothing about what comes off the wood, and you will smell it. Plan for a way to get the hose to the outside before you buy. I did not measure particulates or noise; that is on the list for the next laser we test.
And one more, which is personal rather than technical. Class 1 means you do not need goggles with the lid closed. I found I still wanted to wear them. The lid has a tinted window and the beam is contained, but watching a 10 W laser fire at a piece of wood from half a metre away, I was simply more comfortable with glasses on. The physics say I did not need them. The physics were not the ones sitting next to it. That is not a criticism of the machine. It is a note for anyone who, like me, finds the idea of a laser in the house slightly unnerving at first.
Software, Wi-Fi, and the camera that took a month to connect
I used Creality’s own Falcon Design Space throughout. It is free, it runs on Mac and Windows, and there is a phone app. Over USB it does the basics without fuss: import a design, assign it to a layer, set power and speed, send. TechRadar called it “really easy to use, well thought out”, and for the everyday work that was my experience too. Personalising a template from the built-in library, removing the sample name and typing my own, took a minute. Moving part of a design from the cutting layer to the engraving layer is a click on a colour swatch. The material presets are the heart of it for a beginner: pick cork, or basswood, or stone, and the power and speed fill themselves in, and more often than not they are right, which I will come back to.
Where the software falls down is everything around the design. There is no history of what you have made, so a job from last week has to be rebuilt from scratch. The search in the design library is poor, on the desktop and on the web, and the two do not even offer the same catalogue: the web version at Craftseek has more designs than the desktop app shows, and searches better, so the practical advice is to find things in the browser and bring them across. The job time estimate is unreliable in a particular way: a 30 minute infrared job finished within seven seconds of the estimate, while a three-layer fill on slate estimated at 6 minutes 25 took 10 minutes 45, and most jobs in between ran about a quarter longer than predicted. Fine for a single layer, out by a lot once layers are involved.
The real problems started with everything that is not USB. And since the AI camera, the feature this model charges extra for, only works over Wi-Fi, the problems started with the feature I most wanted to test.
Getting onto Wi-Fi
Here is the sequence, because a beginner will hit exactly this. The desktop software showed no camera option and no way onto my Wi-Fi. The reason, which took an evening to find, is that the camera only works over Wi-Fi, Wi-Fi can only be set up through the phone app over Bluetooth, and nothing had told me to install the phone app. That unlabelled side button is its pairing button. Once the app was installed and the machine paired, the Wi-Fi option appeared on the desktop and the camera became something I could select. Progress. Except that it then reported itself as Disconnected, and stayed that way for a month. None of this is hard once you know. All of it is invisible until you do, and a single line in the quick start would have fixed that.
The camera
I want to be careful here, because this is the headline feature, and for the first month I could not get it to work, and I want you to be able to judge whether that was the machine or me. As it turned out, it was neither. It was a cable. But the month matters, so here is how it went.
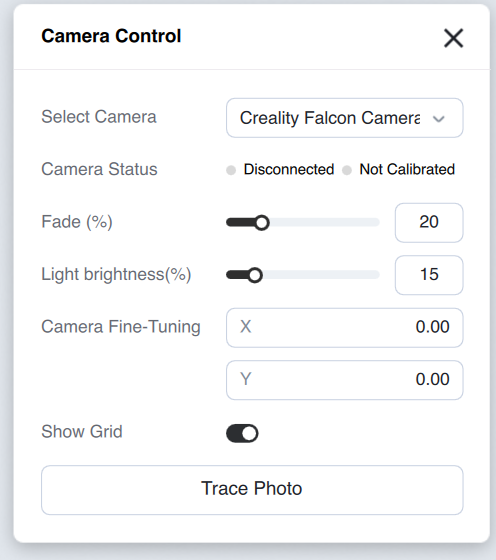
As far as the camera got for a month. Selectable, Disconnected, Not Calibrated.
What I tried, briefly. These machines only speak 2.4 GHz, so I split the bands on my router and put the machine, my Mac and my phone on a dedicated 2.4 GHz network. I unplugged the USB cable, as the phone app asks. I power-cycled, confirmed the firmware was current, removed the machine from the app and paired it again from scratch, and tried with each laser module fitted in case the software was sulking about one of them. I checked that there is physically a camera in the lid, and there is, and that its illumination LED answered the brightness slider, which it did. The module had power. The video stream never arrived, on the Mac or on the phone. At that point I stopped, because a buyer would have stopped several steps earlier, and I raised it with Creality.
The answer came on a call with Creality’s team, who sent over a short guide to checking that everything inside the machine is actually plugged in. It was not. The cable from the camera in the lid had worked its way out of its connector, almost certainly somewhere between the factory and my front door. I pushed it home, closed the lid, and the camera connected first time. Everything I had tried for a month, the band splitting, the re-pairing, the module swapping, had been aimed at a problem that did not exist. I have rarely been so pleased to have been wrong.
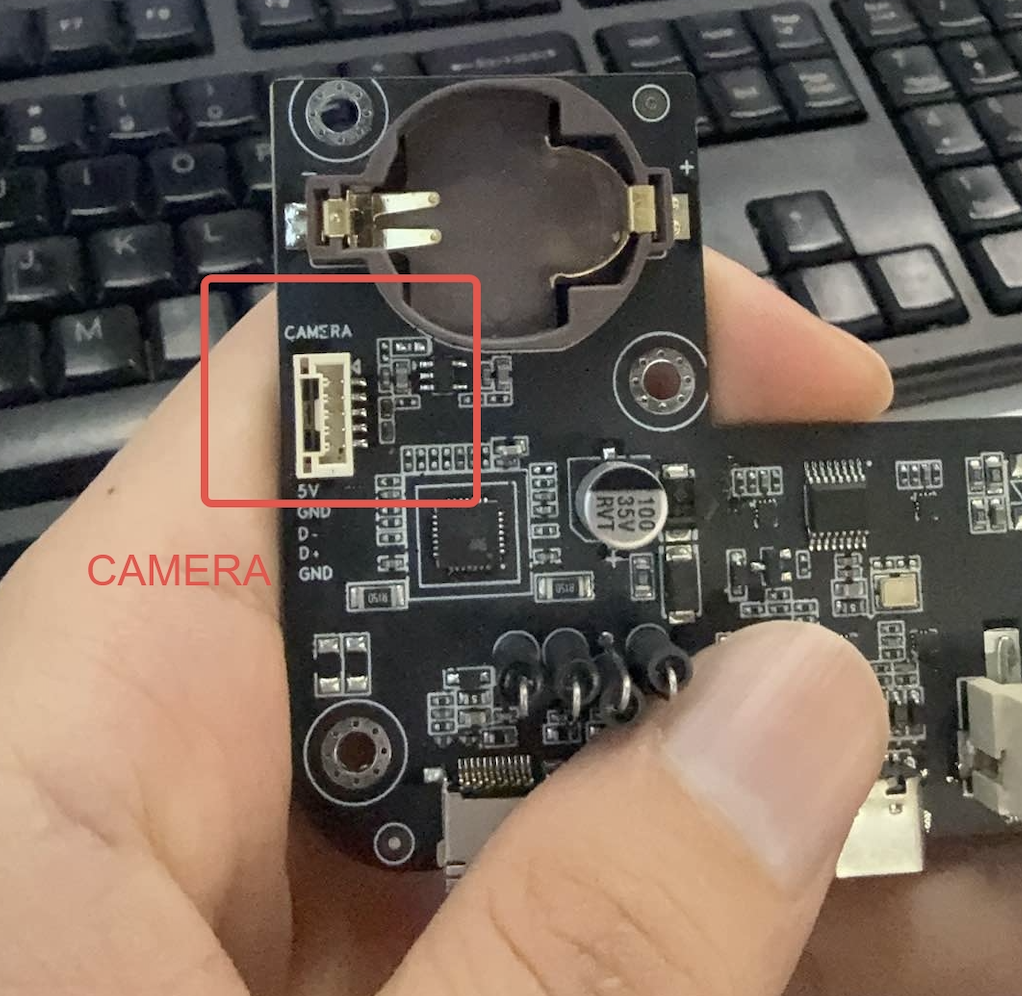
The guide Creality sent after the call: the mainboard and the connectors to check. The camera cable was the one that had come adrift. Image: Creality.
Two things follow from that, and they pull in opposite directions. The fix is trivial and the machine is fine. But a buyer would not have found it, because nothing in the box, the app or the software suggests opening the lid and checking a connector, and the software’s only word on the subject is Disconnected, which is accurate in the way that a doctor saying “unwell” is accurate. A line in the troubleshooting section, and ideally a connector that cannot shake loose in a courier’s van, would have turned a month into five minutes. Creality did not say whether they had seen it before.
What the camera is actually worth
Here is where a month without the camera turned into an advantage, because I am probably the only reviewer who has used this machine both ways. Without the camera, placing a design on an object is a guessing game. The software has a Frame function, which traces the outline of the job with the laser at low power so you can see where the edges will land, and I used it constantly. It tells you the job fits on the piece. It does not tell you whether the design sits where you want it on the piece, so you nudge, frame again, nudge again, and hope. With the camera, you see the coaster on screen, drop the design on top of it, and what you see is what the laser does. It is not a small difference. It is the difference between a job taking one attempt or three.
I did not measure the camera’s positioning accuracy against Creality’s 0.1 millimetre claim, and I did not test the material recognition or the batch engraving feature, so I cannot tell you whether those claims hold. What I can tell you is that the positioning is good enough that I stopped thinking about it, which for a beginner is the only test that matters. Two small notes. The camera preview defaults to a light brightness of 15 percent, which may explain why TechRadar found it dark; the slider is right there. And the software asks you to recalibrate the camera after you swap laser modules, with no explanation of why. The likely reason is that the two modules sit at slightly different positions, so the camera’s idea of where the laser is has to be redone, and that is fair. What is not fair is making you guess, and not remembering the calibration per module. A calibration card cut to the exact size of the bed, so it self-locates in the corners, would also take the last bit of doubt out of it.
One more thing the camera cannot see through: a white background. I made a coaster design from a photo of my daughter’s birth card, run through an image generator to turn it into a coaster-shaped line drawing. The design was fine. The export, however I tried it, came with a solid white background, and on the camera view that white square hid the coaster I was trying to place it on. The fix was inside Falcon Design Space, if not where I first looked: Image Tracing with the default settings gave a poor result, but with Detail Restoration at maximum and the “layer by colour” option selected it produced a clean vector with the background gone, and the camera could see the coaster again. The same trick later split our company logo into three layers so I could engrave its drop shadow at a different power. It is a good tool. It is just a tool whose best setting is not its default, which is a pattern with this software.
Two smaller software oddities while I am here. On a Mac, the first time you open the camera panel, macOS asks whether Falcon Design Space may use your laptop’s webcam. As far as I can tell it has no use for it, and it would be a strange laser engraver that needed to see your face. A beginner has no way of knowing that, and it is exactly the kind of prompt that makes people click the wrong thing. And a thing I did not test: the phone app as a way to run a job, the machine with the router off, and LightBurn. The free software did everything I asked of it, so I never felt the need, which is itself the answer to whether a beginner can live on it.
Testing
Because almost nothing usable came in the box, I tested with what I could find in the house and at the shops nearby: the Creality 5 mm plywood and a little 3 mm, bamboo and cork coasters, a piece of black slate, a black marble coaster, a white polished marble coaster, a scrap of cotton cloth, a stainless steel door cover, and a mango wood bowl I had been wanting to engrave anyway. That is a fair spread of what people actually buy a machine like this for, coasters and small wooden gifts above all. A note on numbers: where I give settings they are the ones I used. Where I do not, I did not write them down, and I would rather say so than make them up.
A note on the presets before the results, because they decided most of them. For coasters, stone and plywood there is a preset in the software and I used it. On a cork coaster it was perfect. On a bamboo coaster, same preset, it went far deeper than I expected. On slate it was too weak. For the cotton there was no preset at all, only denim. So the presets are a starting point that is usually right and occasionally very wrong, and the material name on the preset tells you nothing about which of your coasters it was tuned for.
Test 1: cork coaster, the one that surprised me
The birth card coaster was the project I most wanted to get right, and cork turned out to be the material I least needed to worry about. Standard coaster preset, no changes, and the result looks printed rather than burned: the fine line work of the dragon, the lettering, the dithered ground and the little dog all came out clean, on a material that is basically compressed crumbs. The edges of the fine lines stayed sharp, with none of the crumbling I had been warned about. It is the piece I would show someone who asked what this machine does.
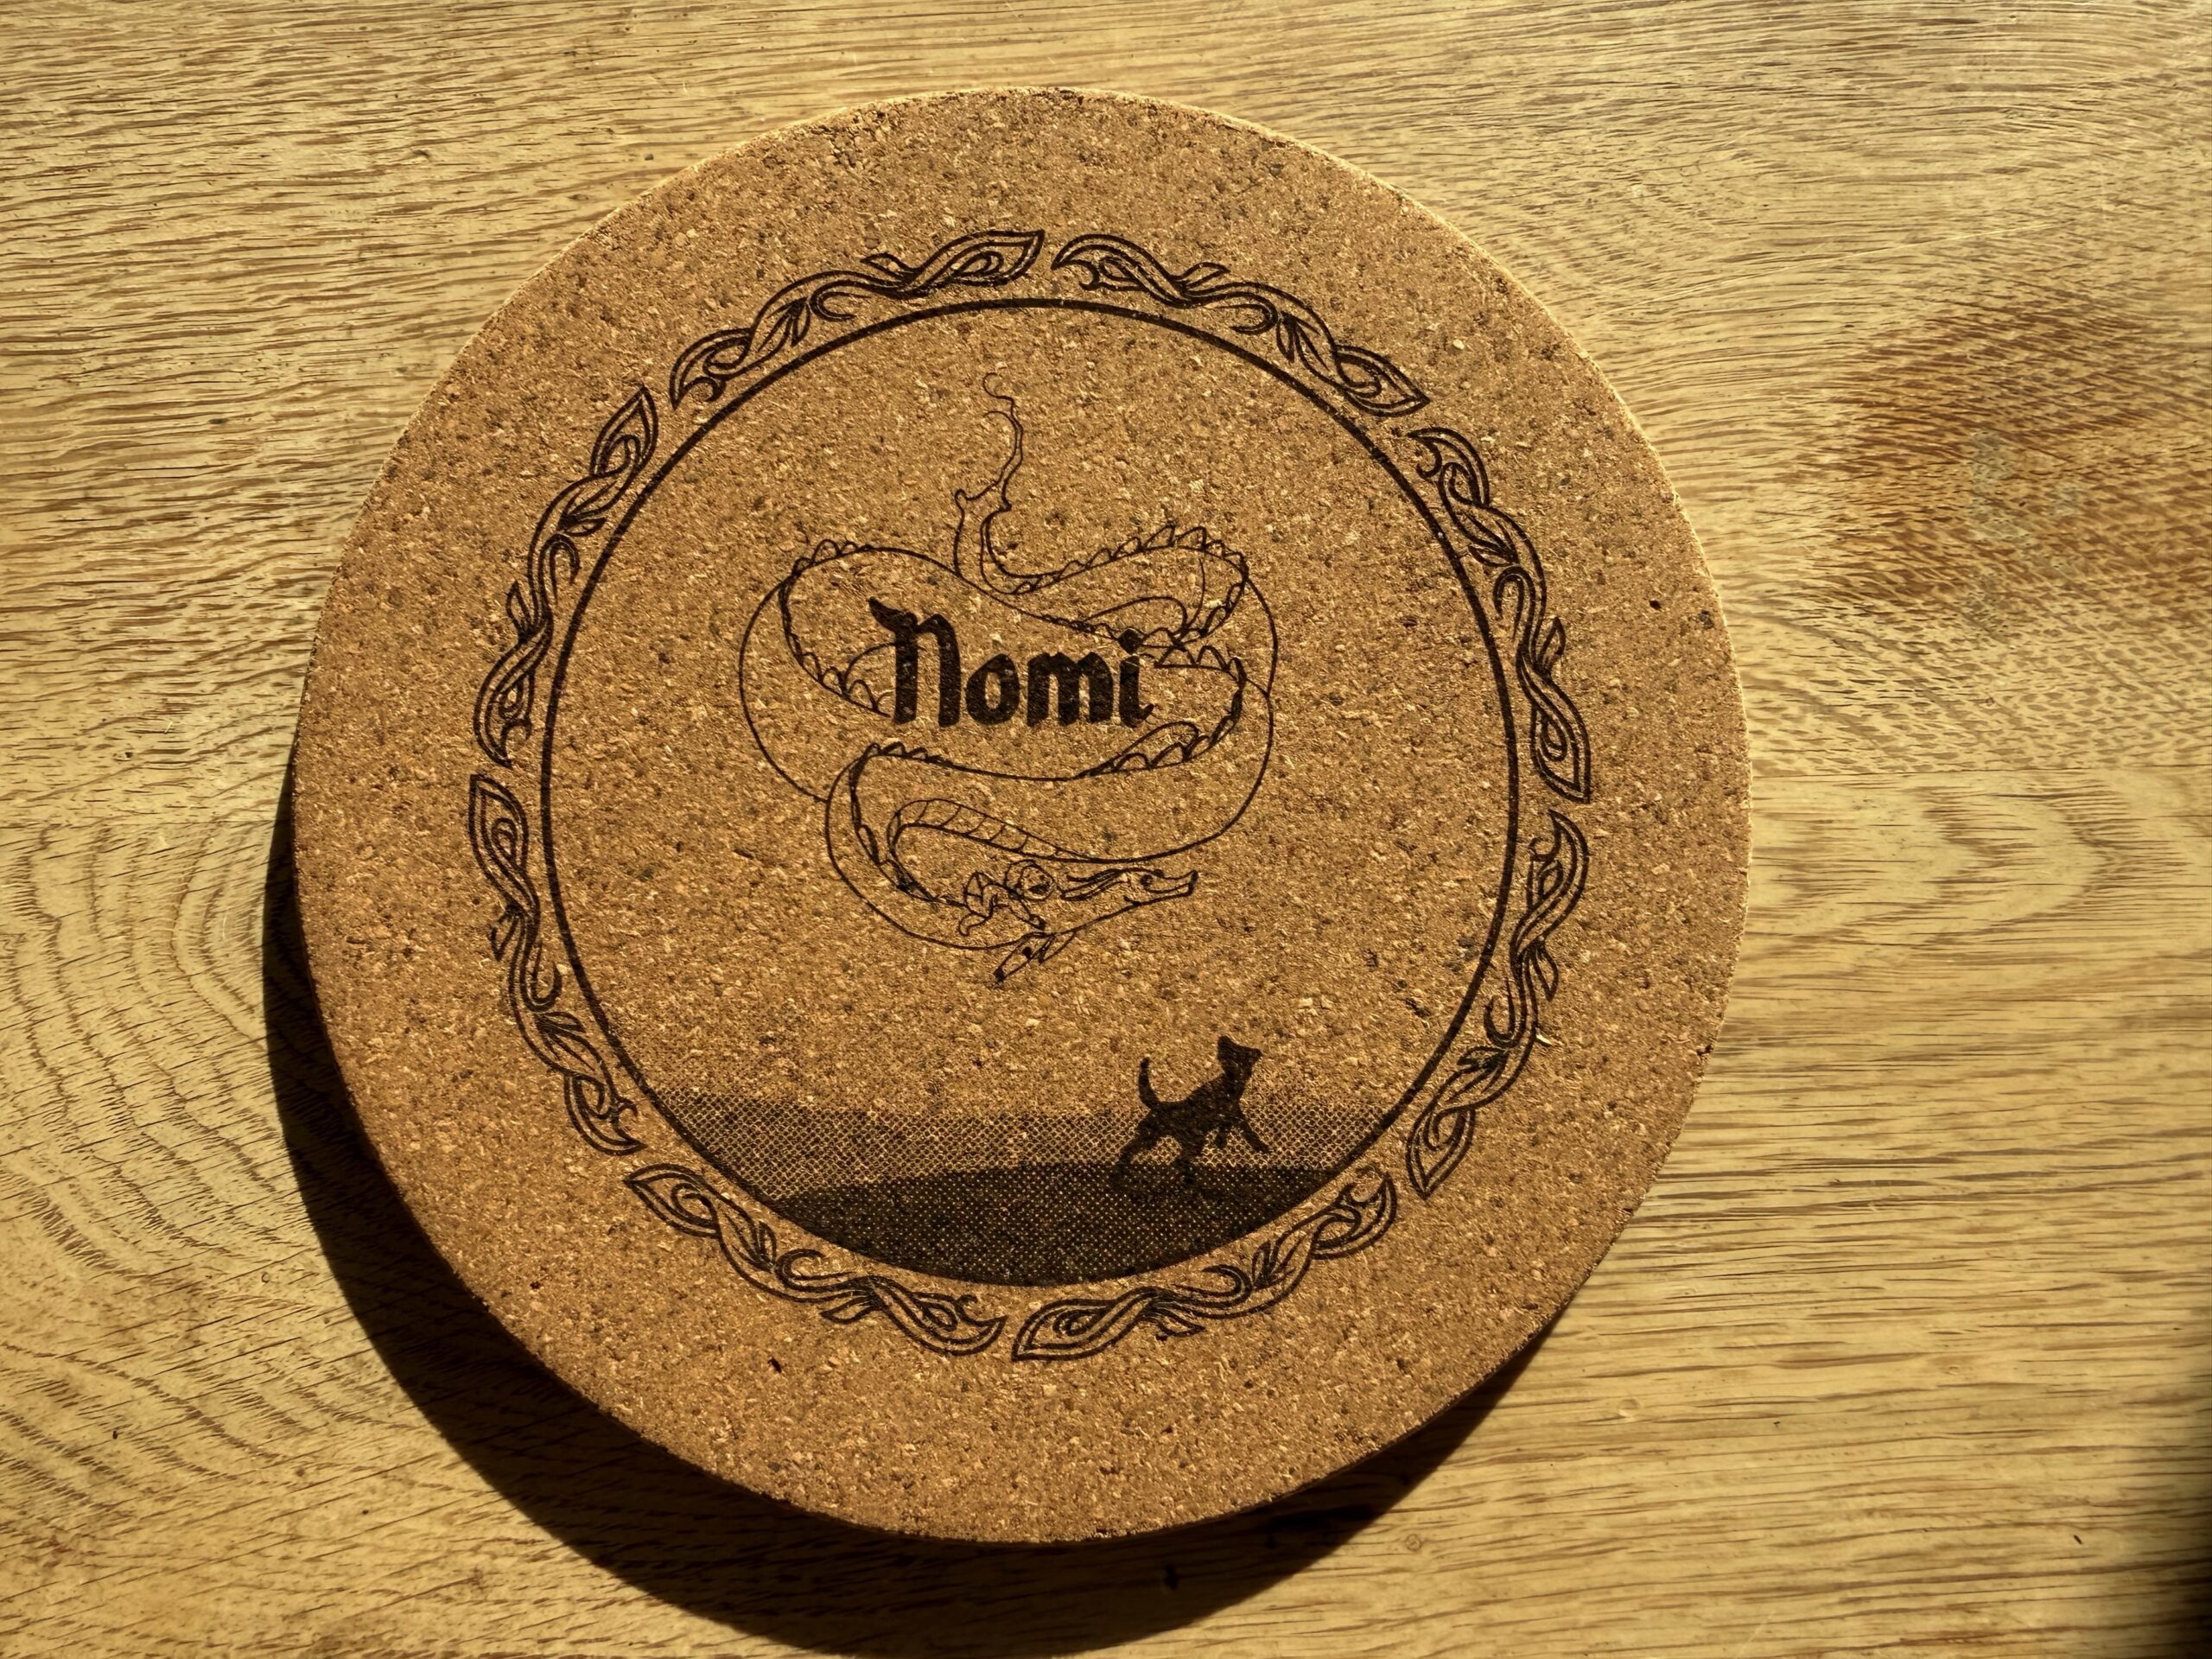
Cork, coaster preset, nothing changed. The design started life as a birth card.
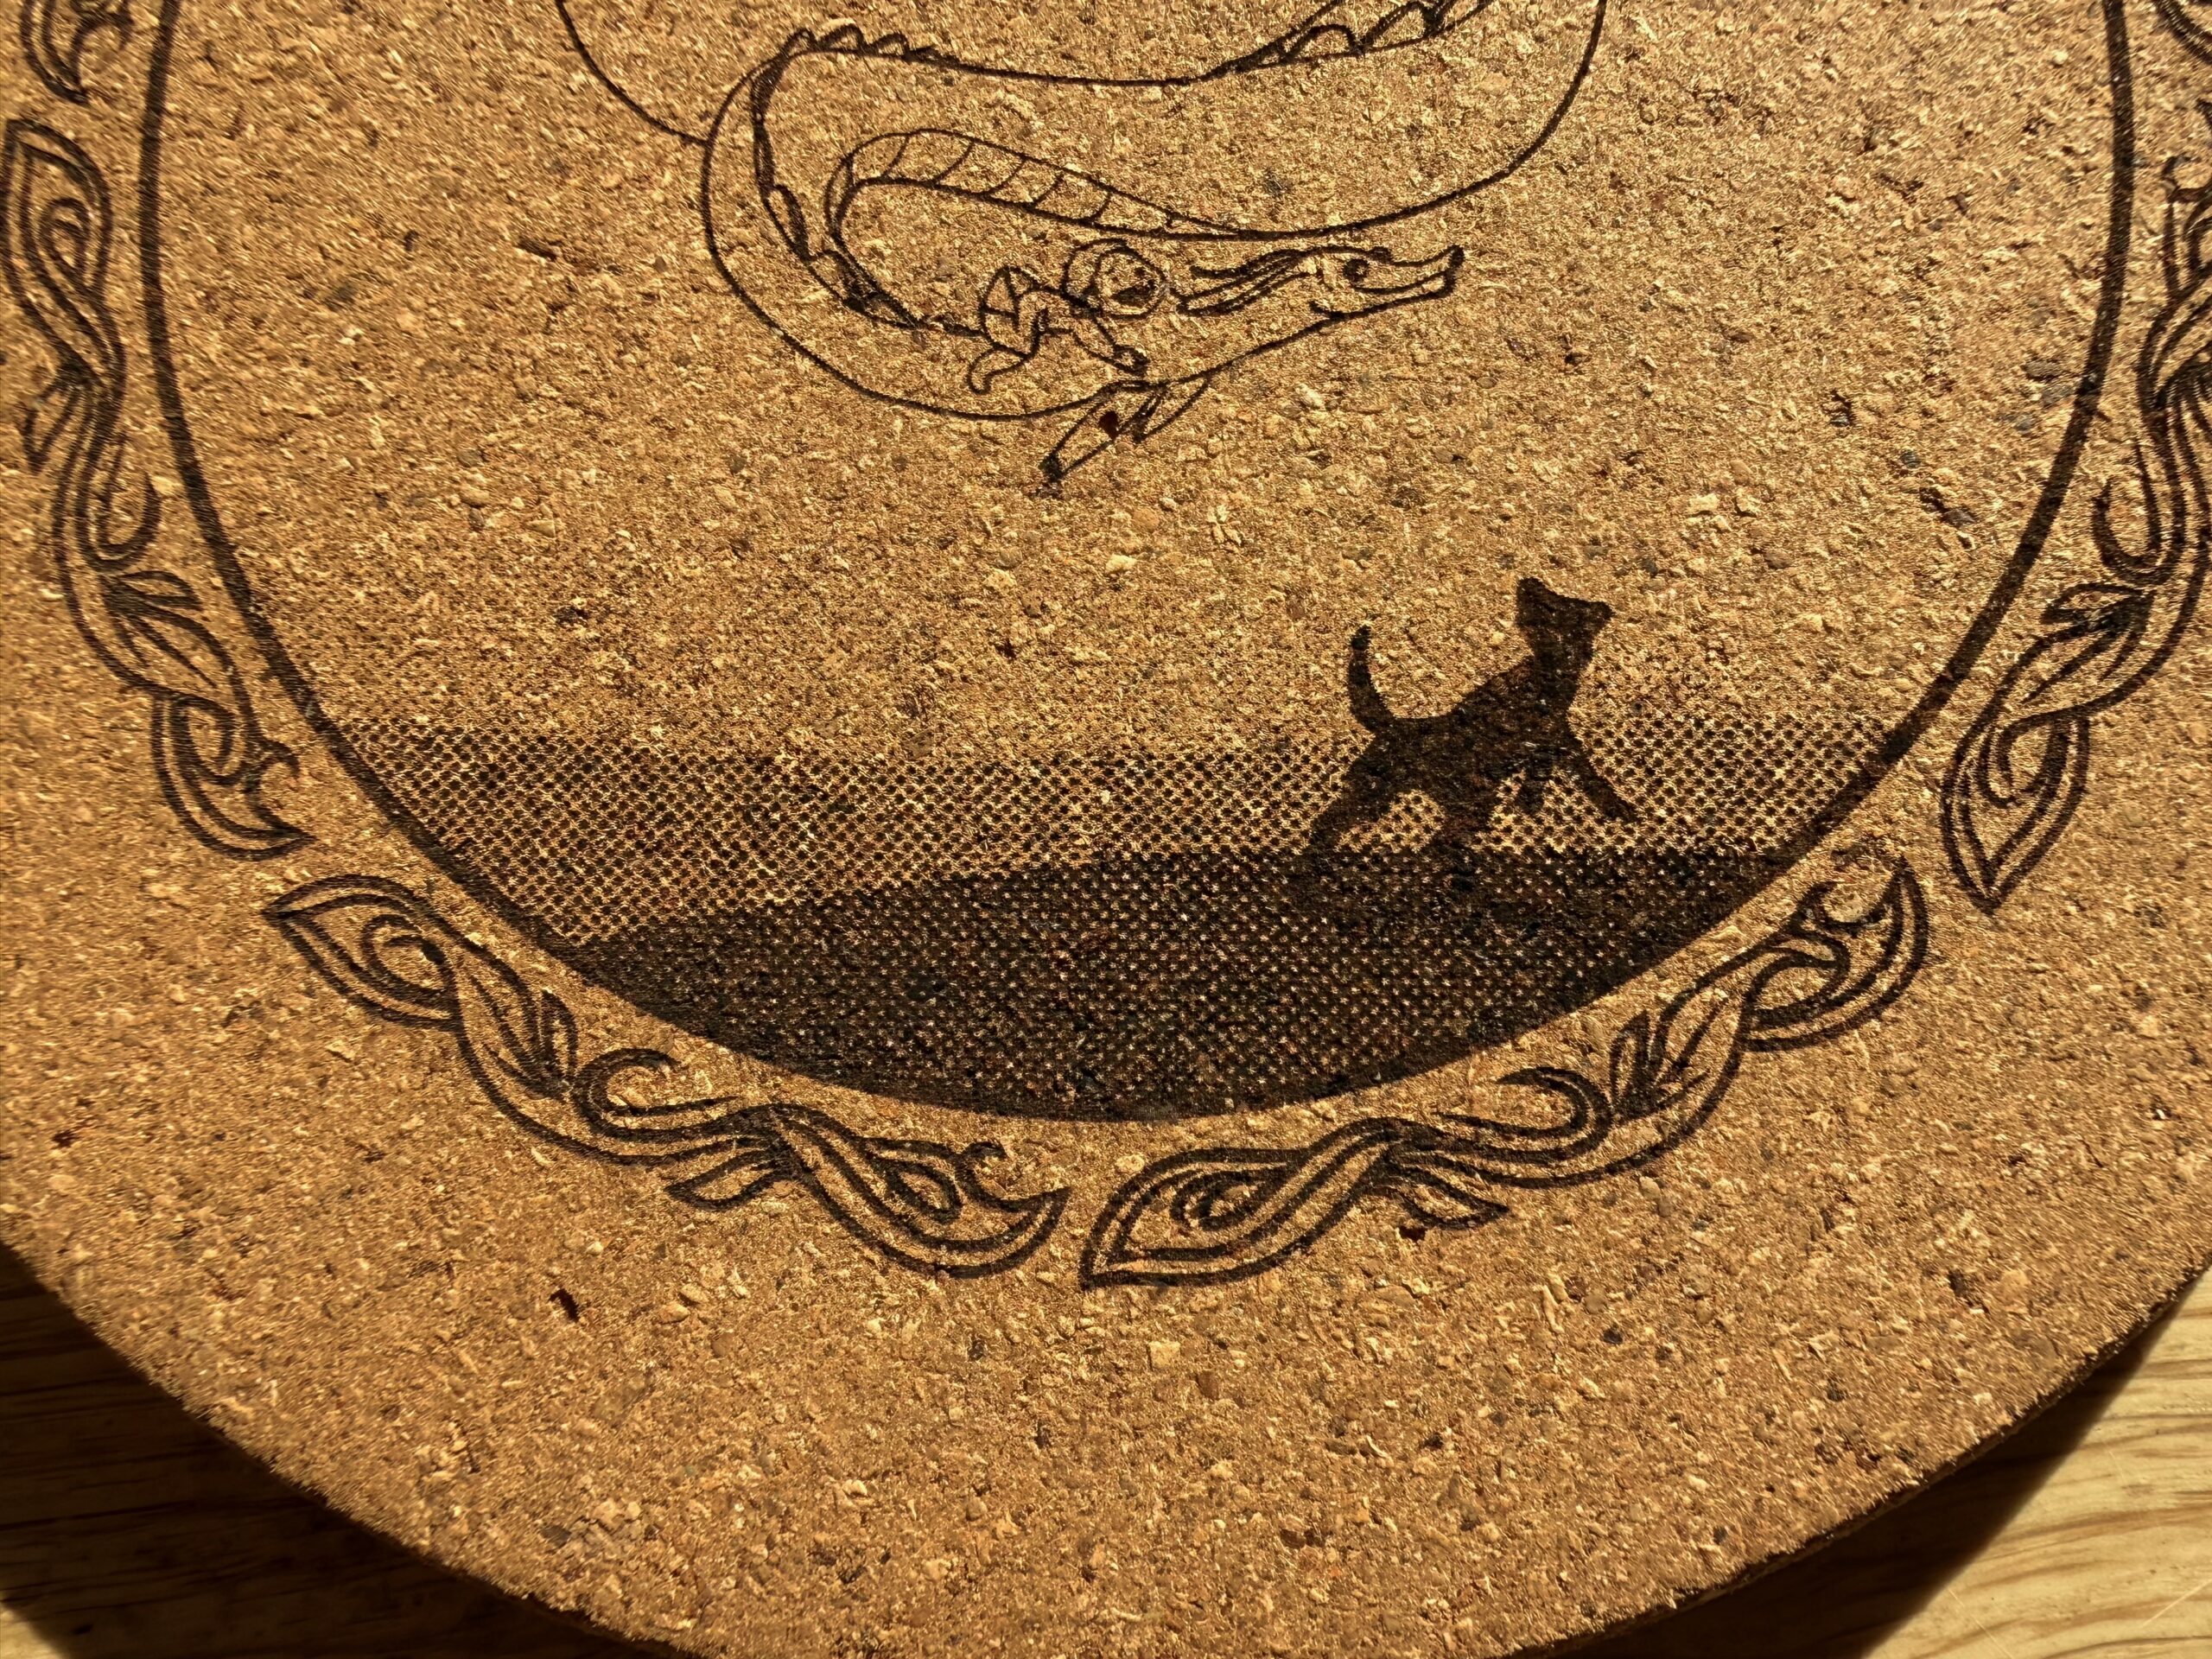
Up close. Dithered fill, solid silhouette and fine line work on the same pass.
Test 2: bamboo, where the same preset went deeper
Same coaster preset on a bamboo coaster, this one with a bottle opener slot cut through it, and a very different result. The filled area did not mark the surface so much as remove it. You can feel the mushroom cap with a fingertip; it is a proper debossed relief. Whether that is right depends on what you wanted. As a carved look it is handsome, and the contrast is the highest of anything I engraved. If you wanted the printed look I got on the cork, you would start by dropping the power and testing on the back of a coaster first; I did not, so I cannot give you the number. The preset does not know which you wanted, and it does not know that bamboo is far denser than cork, which is the point.
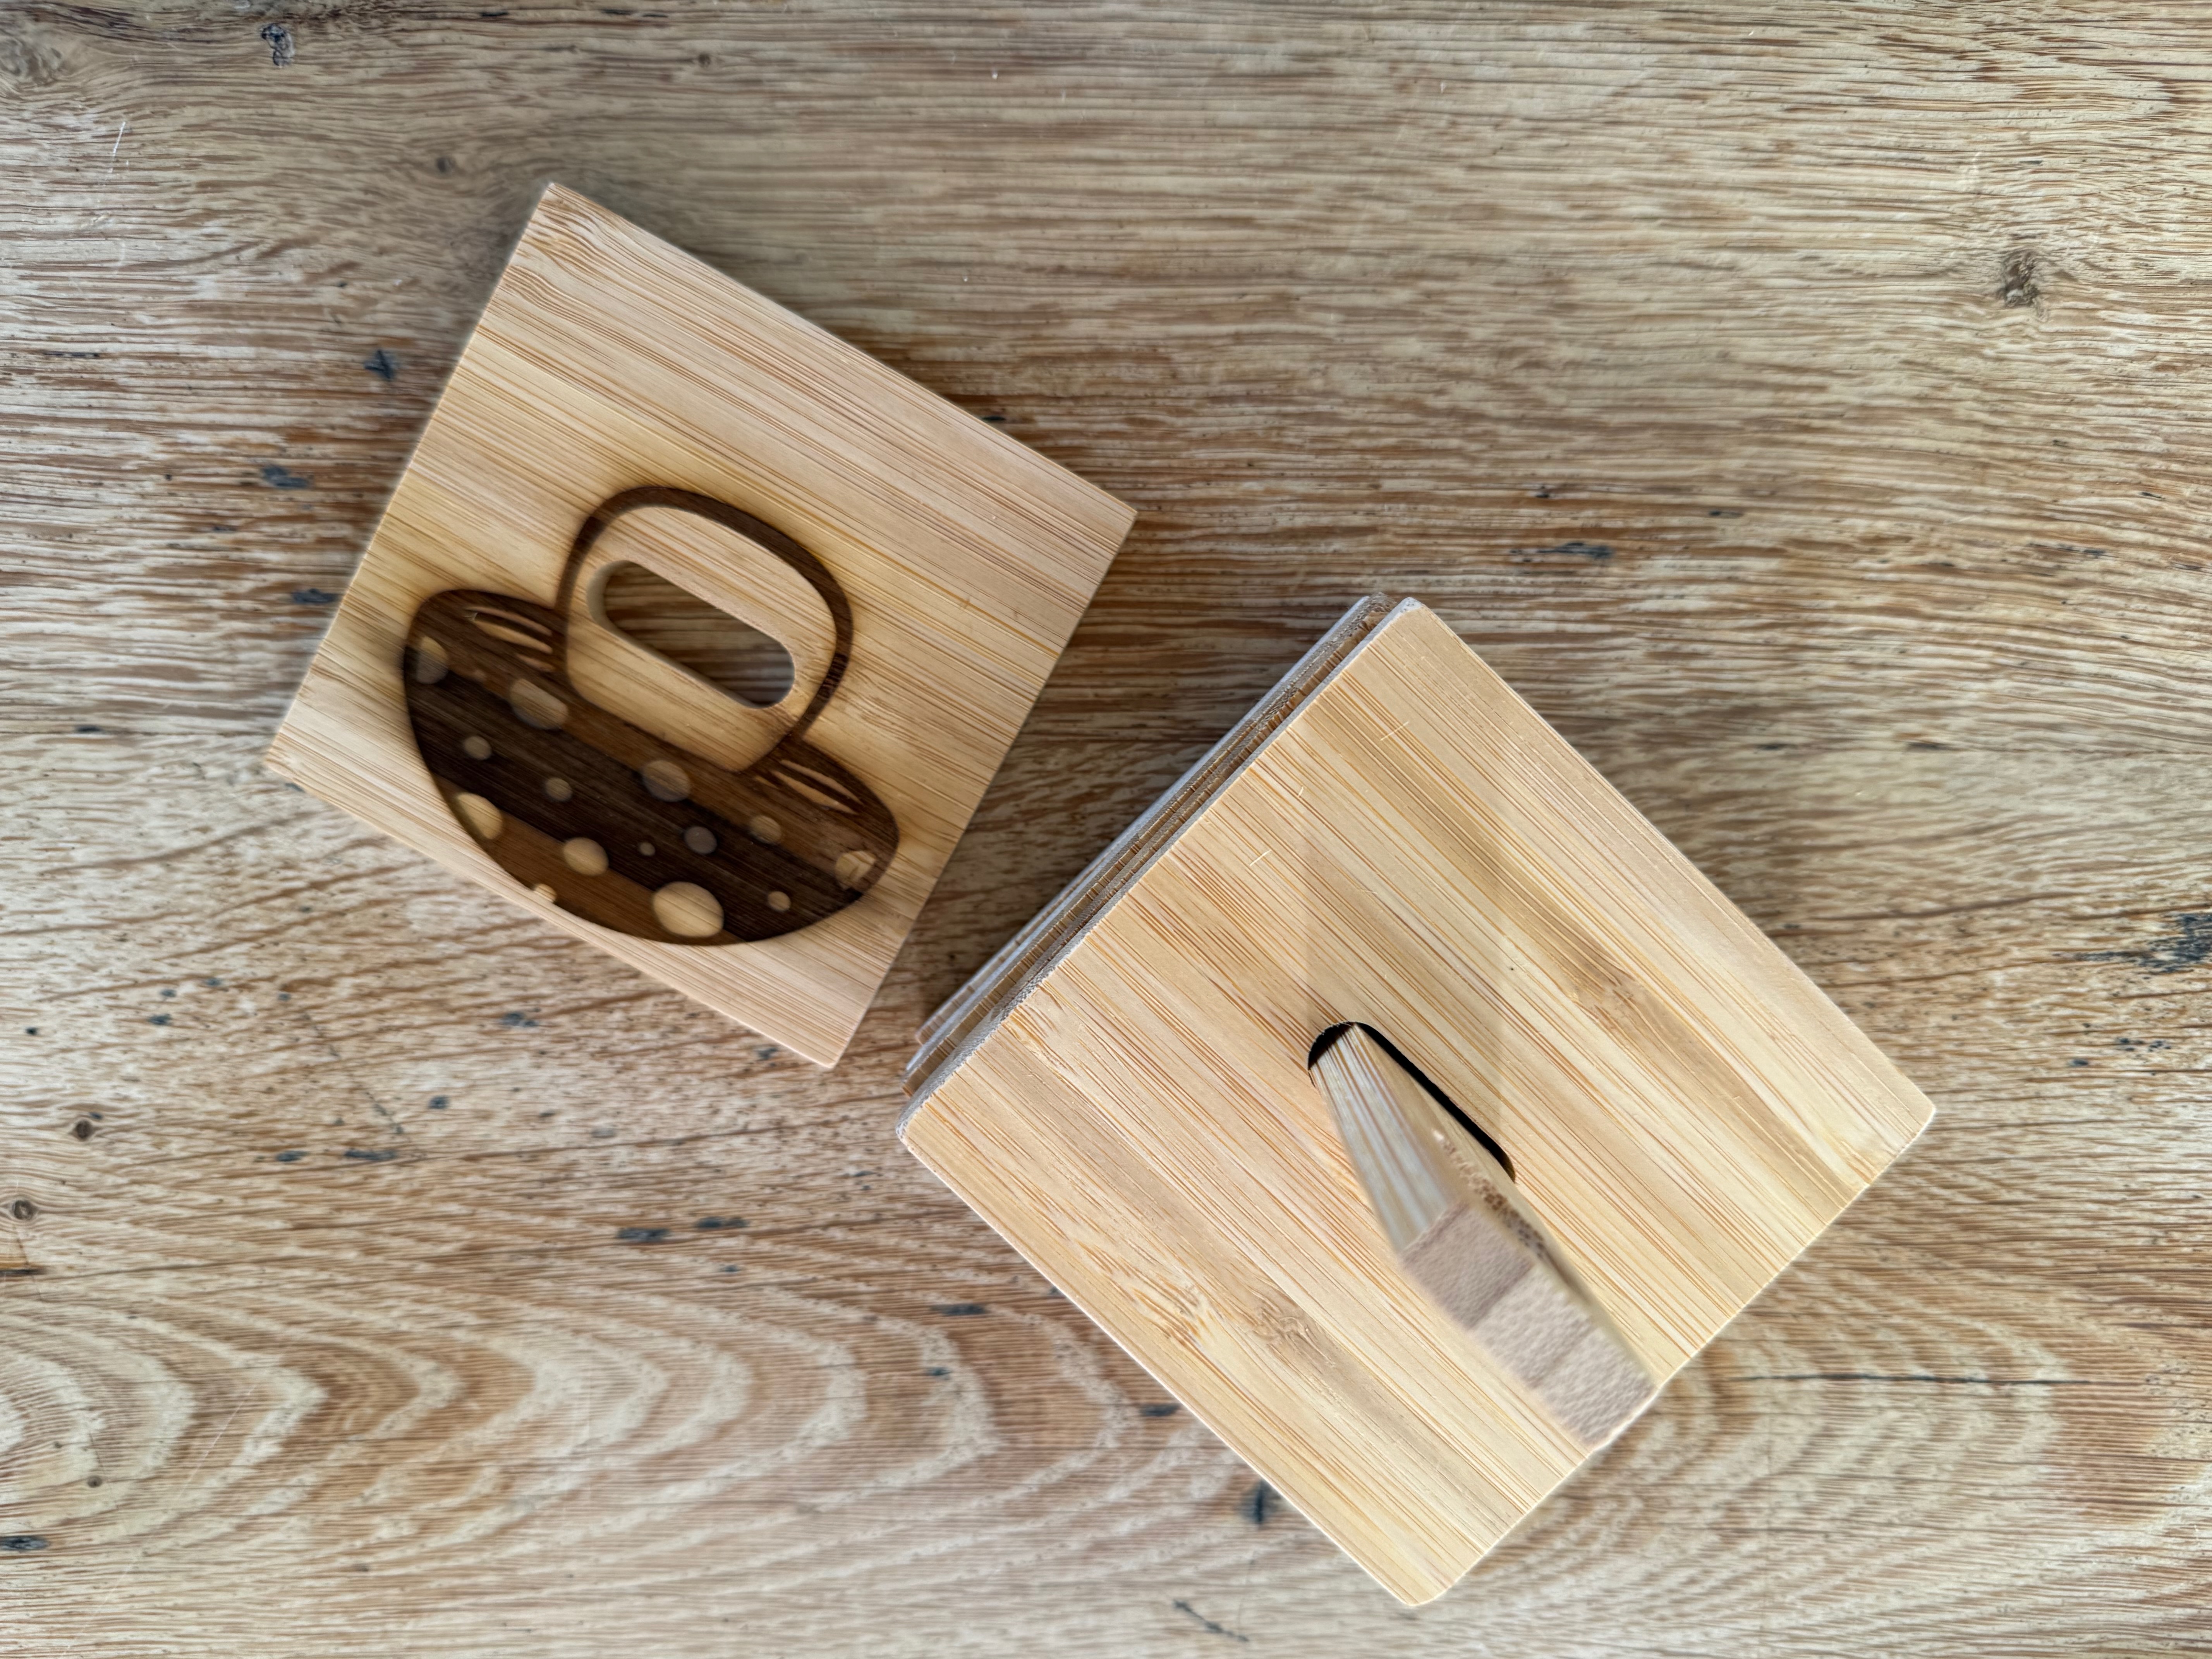
Bamboo on the same coaster preset as the cork. The coaster doubles as a bottle opener.
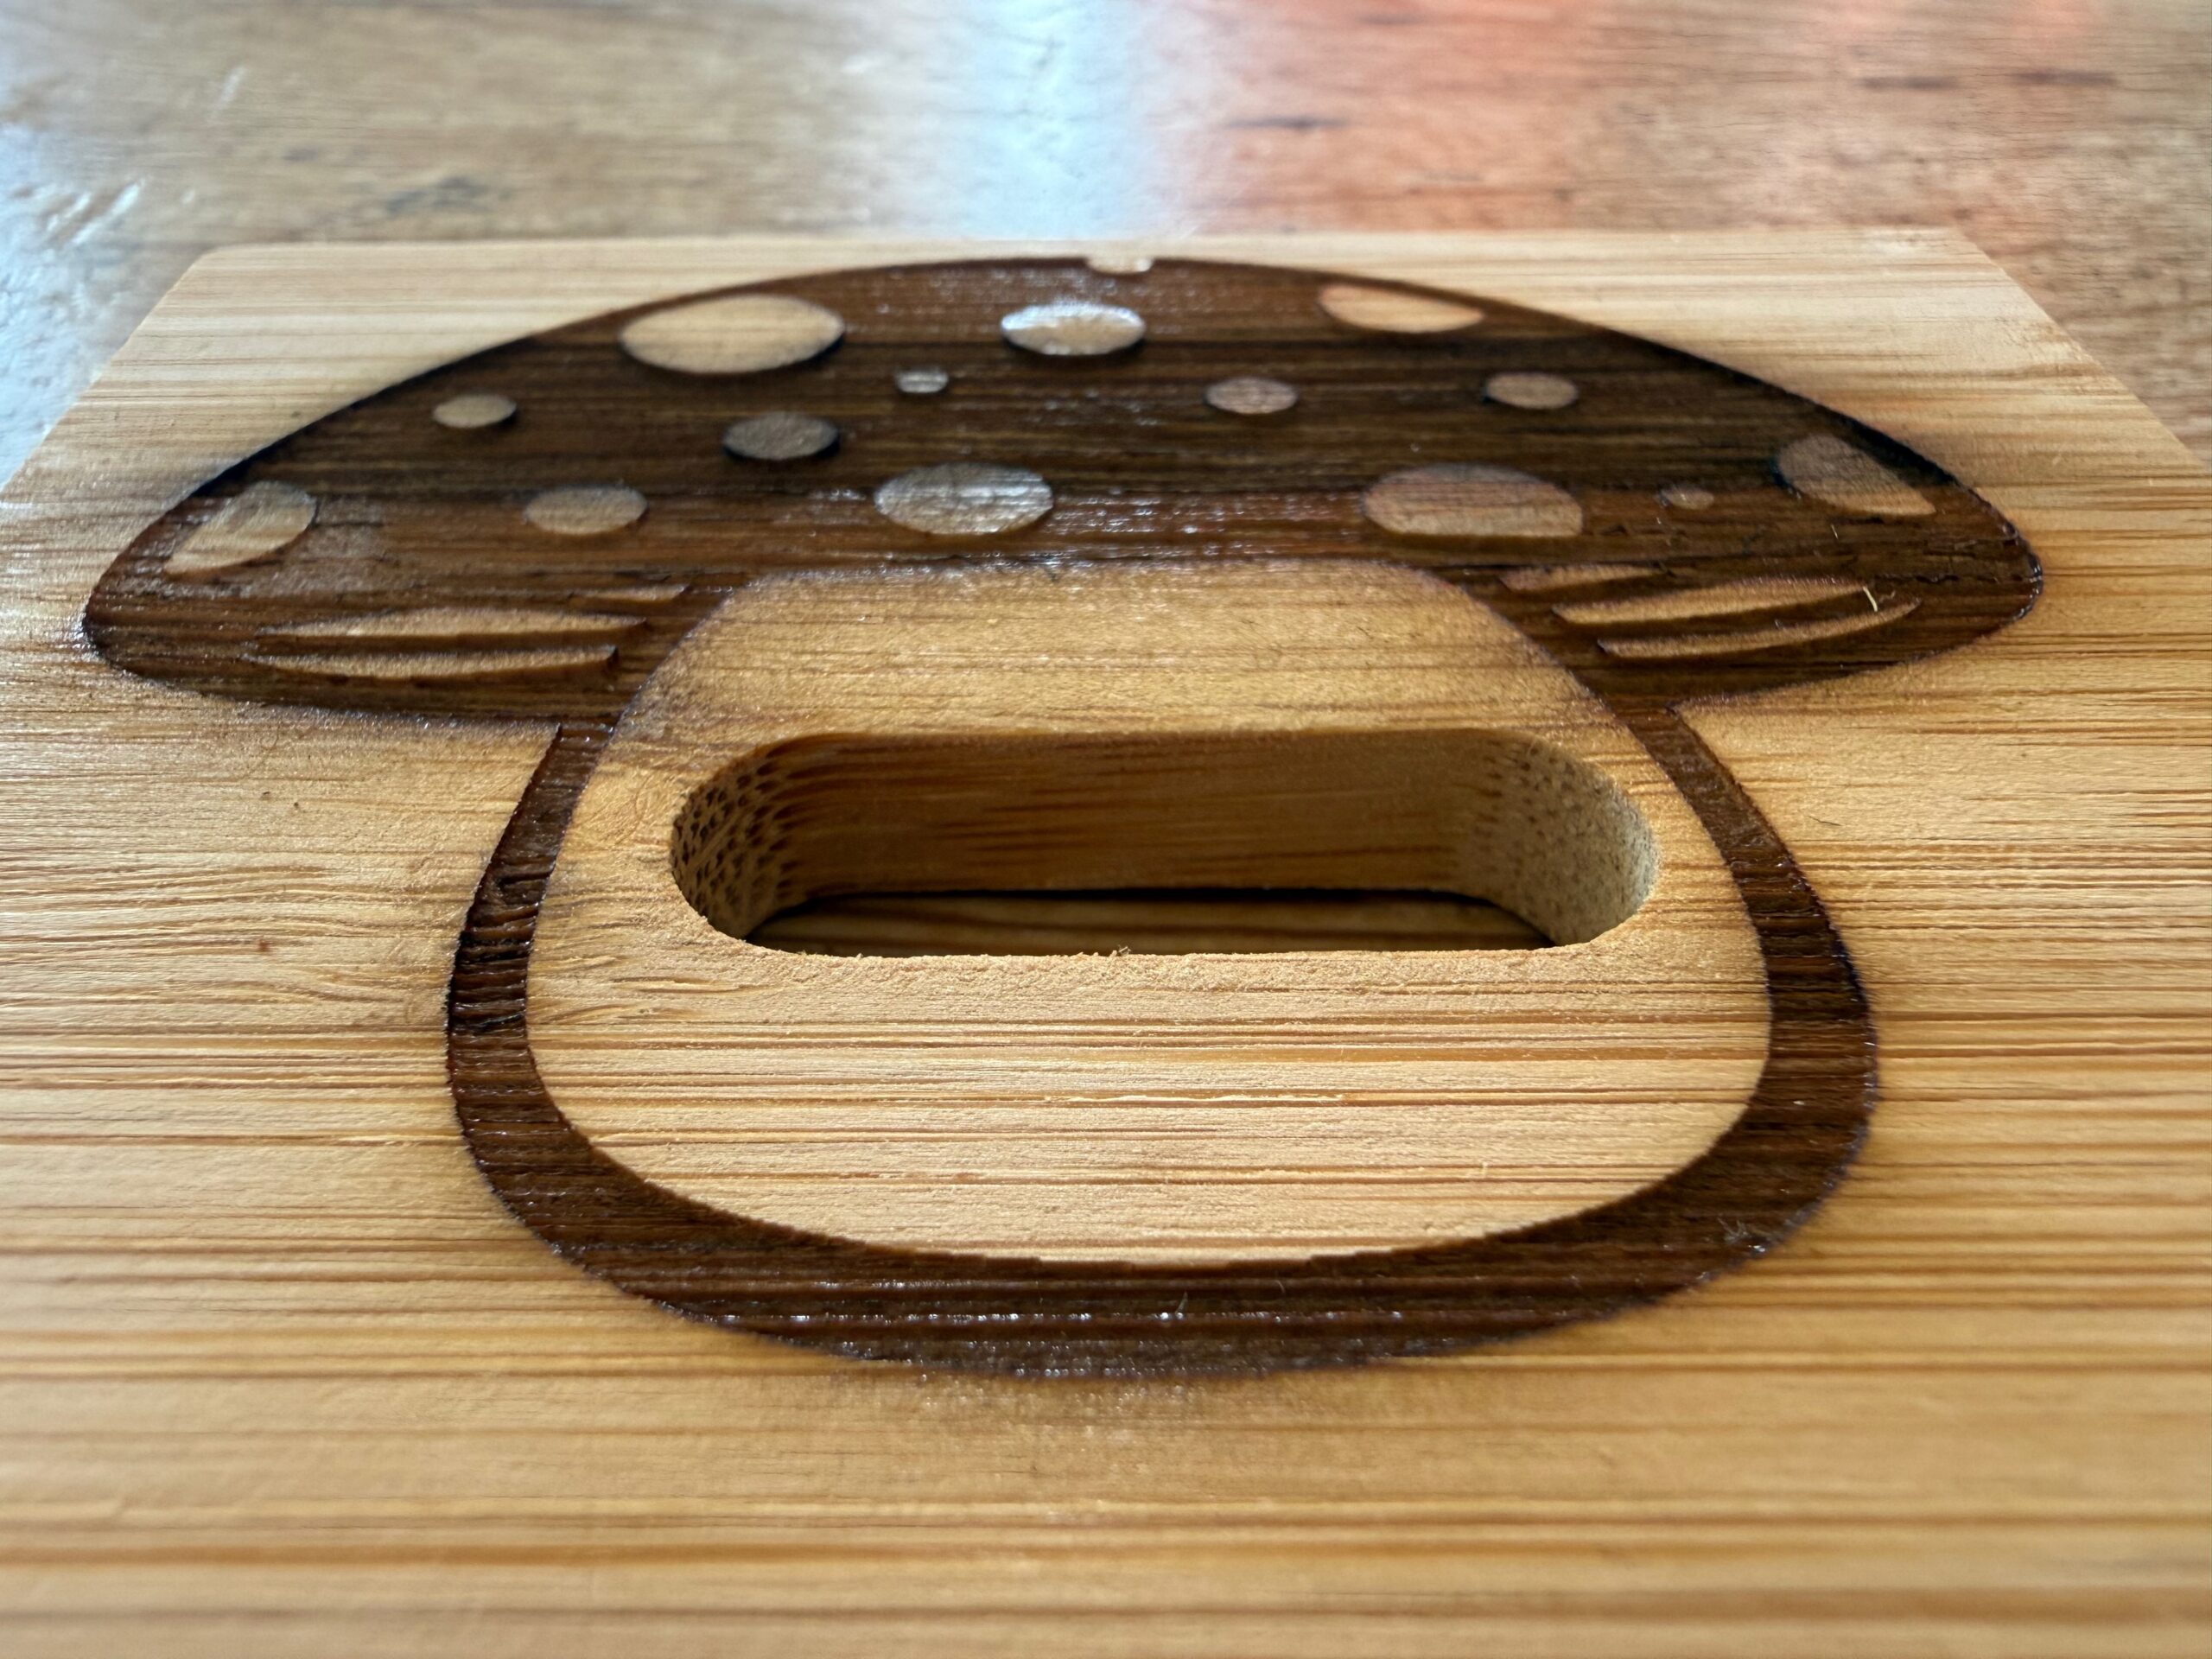
Up close and at a low angle. The cap is recessed into the bamboo, not just darkened; you can feel the step with a fingertip.
Test 3: cotton cloth, which has no preset
Fabric is on Creality’s list of materials, and I had not expected to care about it. The material picker offers denim and nothing else in the way of cloth, so I started from the denim preset at 35 percent and 10,000 mm/min, dropped the power to 25 percent because my cotton was far thinner, and got a clean brown mark on the first try. Then I ran it again at the full denim setting of 35 percent, and that one was better still, darker and crisper, with no sign of going through. Two things to take from that: the nearest preset was right after all, and a quick test at two powers settled it. Put a scrap of plywood under thin materials, because the beam goes straight through cloth and paper and marks the bed underneath.
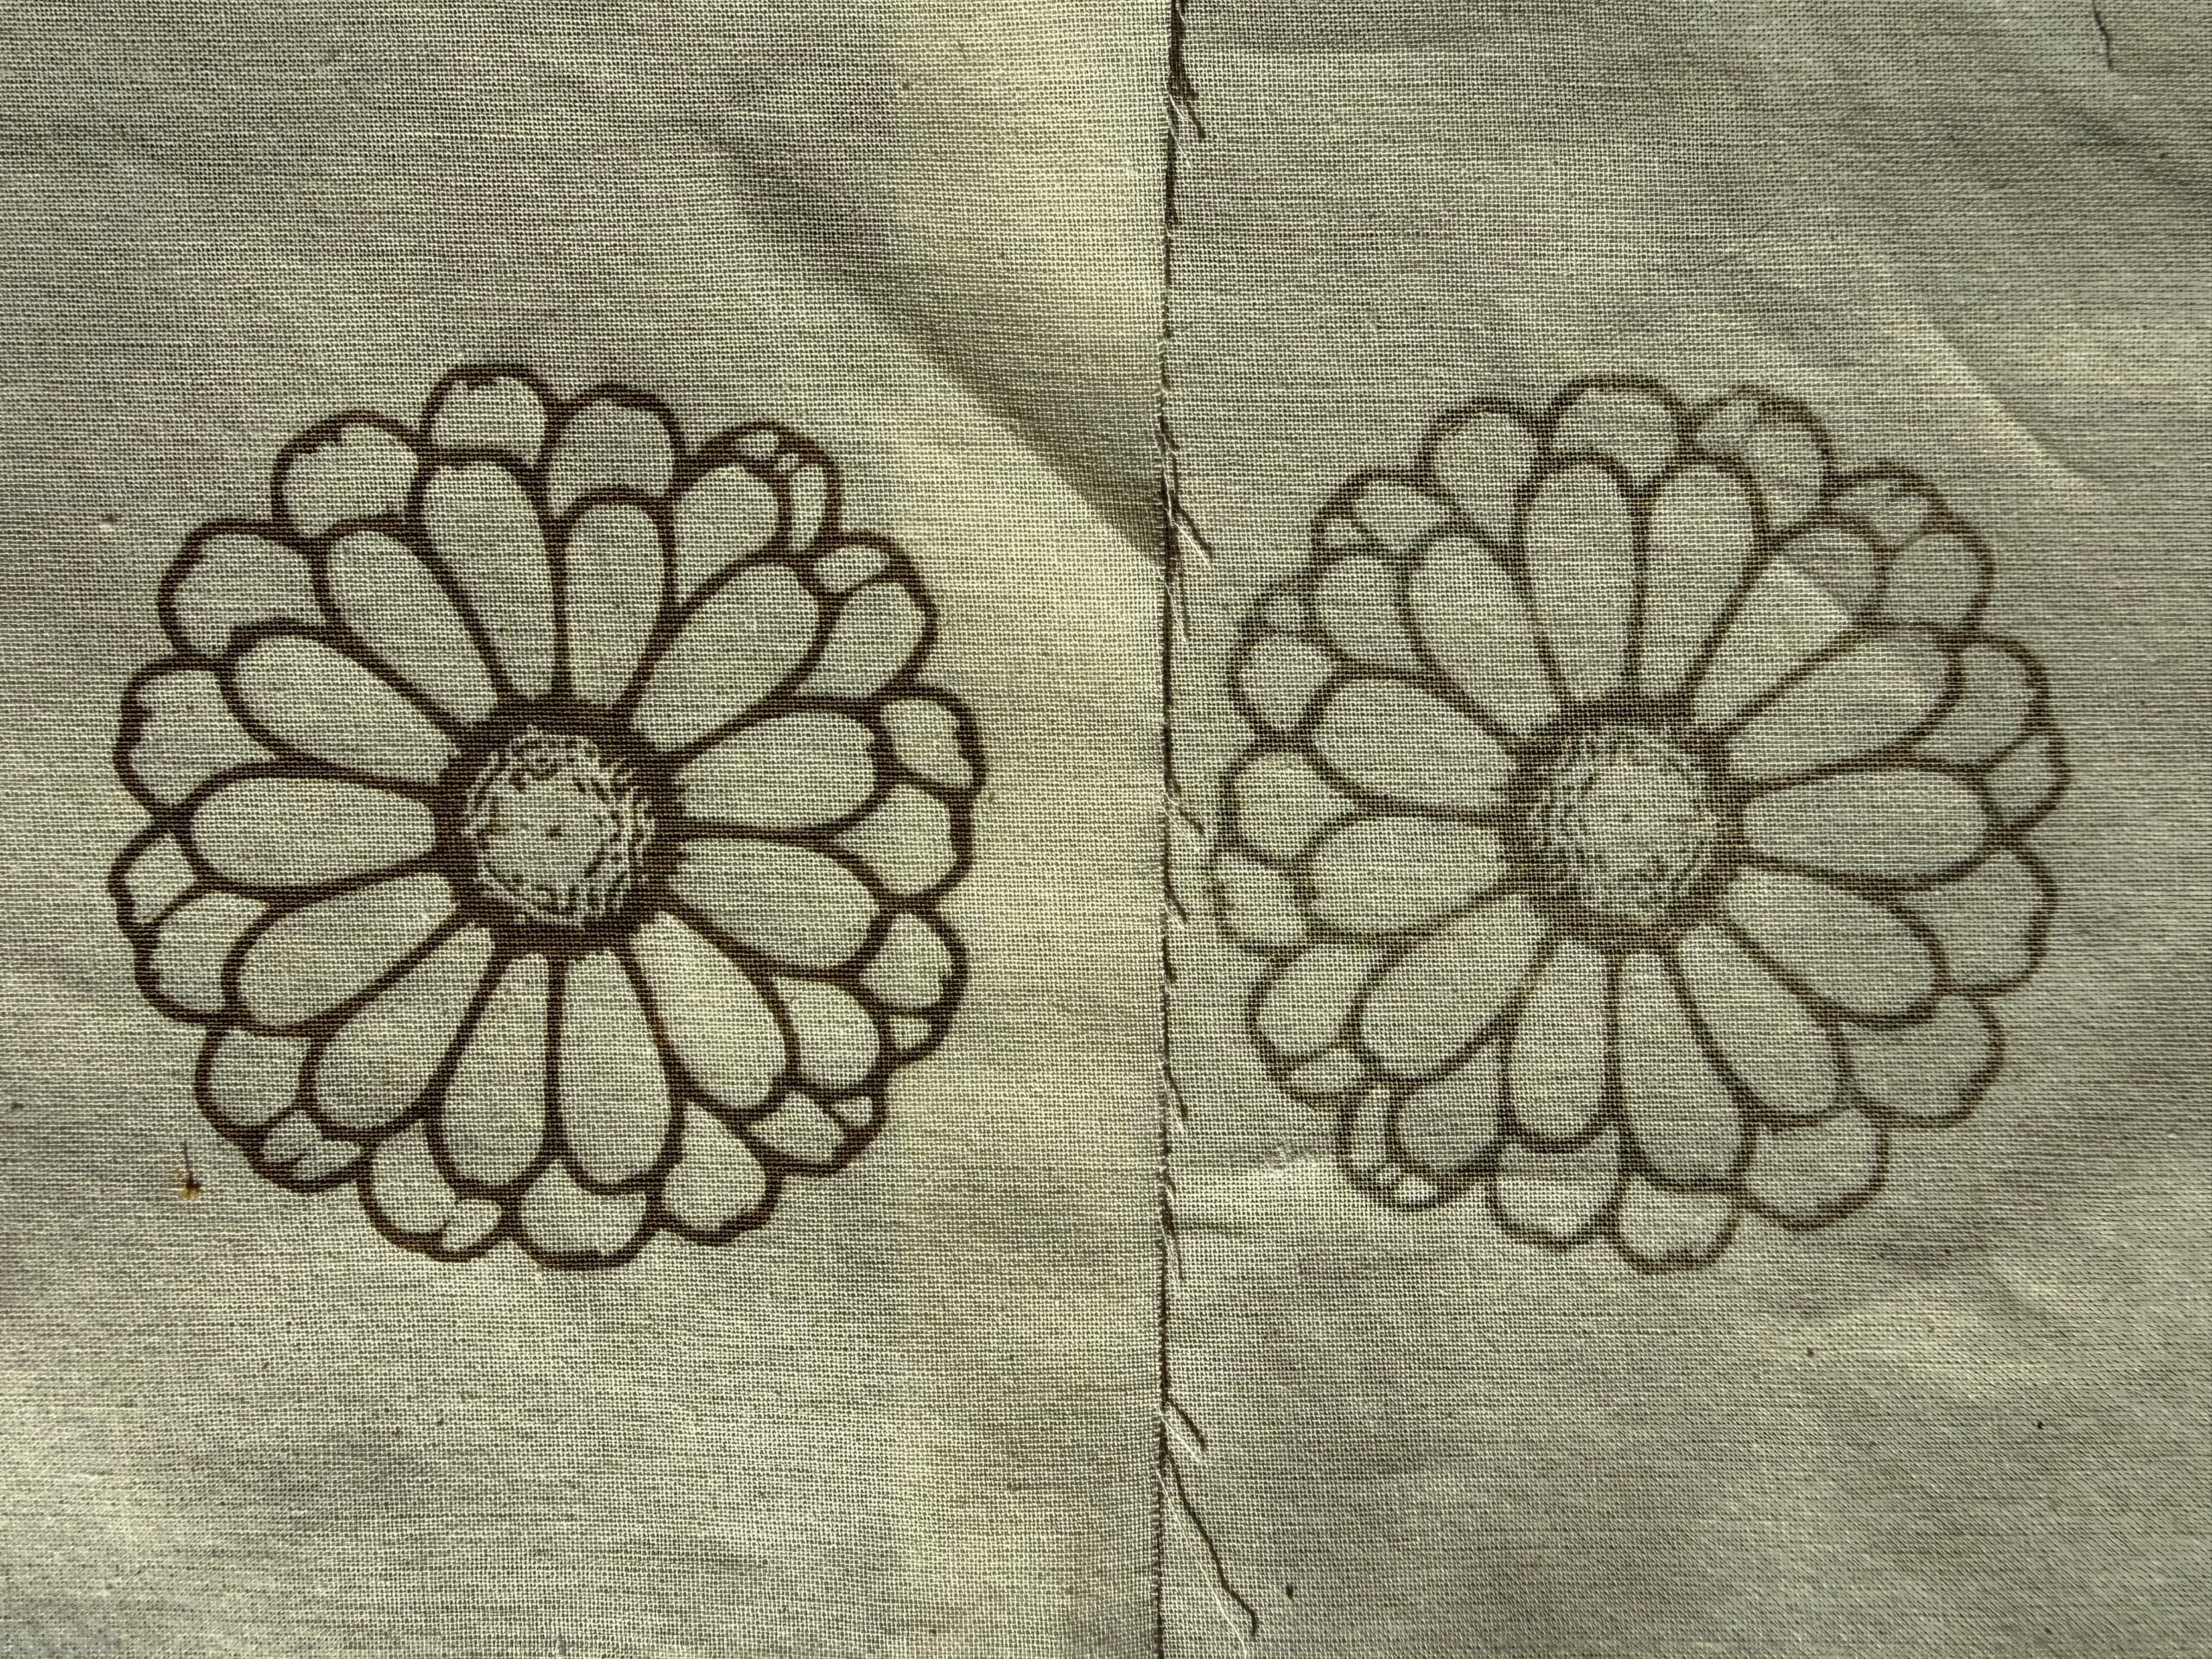
Cotton at 35 percent (left) and 25 percent (right), both at 10,000 mm/min. I did not think clothing would be a thing to do. It is.
Test 4: slate, three times
I engraved our company logo on black slate three times, because the first attempt was not good enough and the third taught me something. Slate works the opposite way round from wood: the engraved area turns light grey and the untouched stone stays black. The logo has a subtle drop shadow, so I split it into three layers by colour, switched the white background layer off, and gave the two blues their own settings.
Run one, the stone preset at 35 percent and 5,000 mm/min: it marked, but shallow and grey, and the two tones collapsed into one. Run two, both layers at 4,000 mm/min, the main field at 55 percent and the shadow at 35: brighter, deeper, and the shadow back as a distinct tone. Run three, the infrared module, which I had been told would do little on stone: the cleanest of the three, with sharper edges than either 10 W attempt. I will say more about that below, because it changed my view of what the infrared module is for. In all three cases, wipe the slate with a damp cloth and let it dry before you judge it. It looks dusty and grey until you do, and then it snaps into contrast.
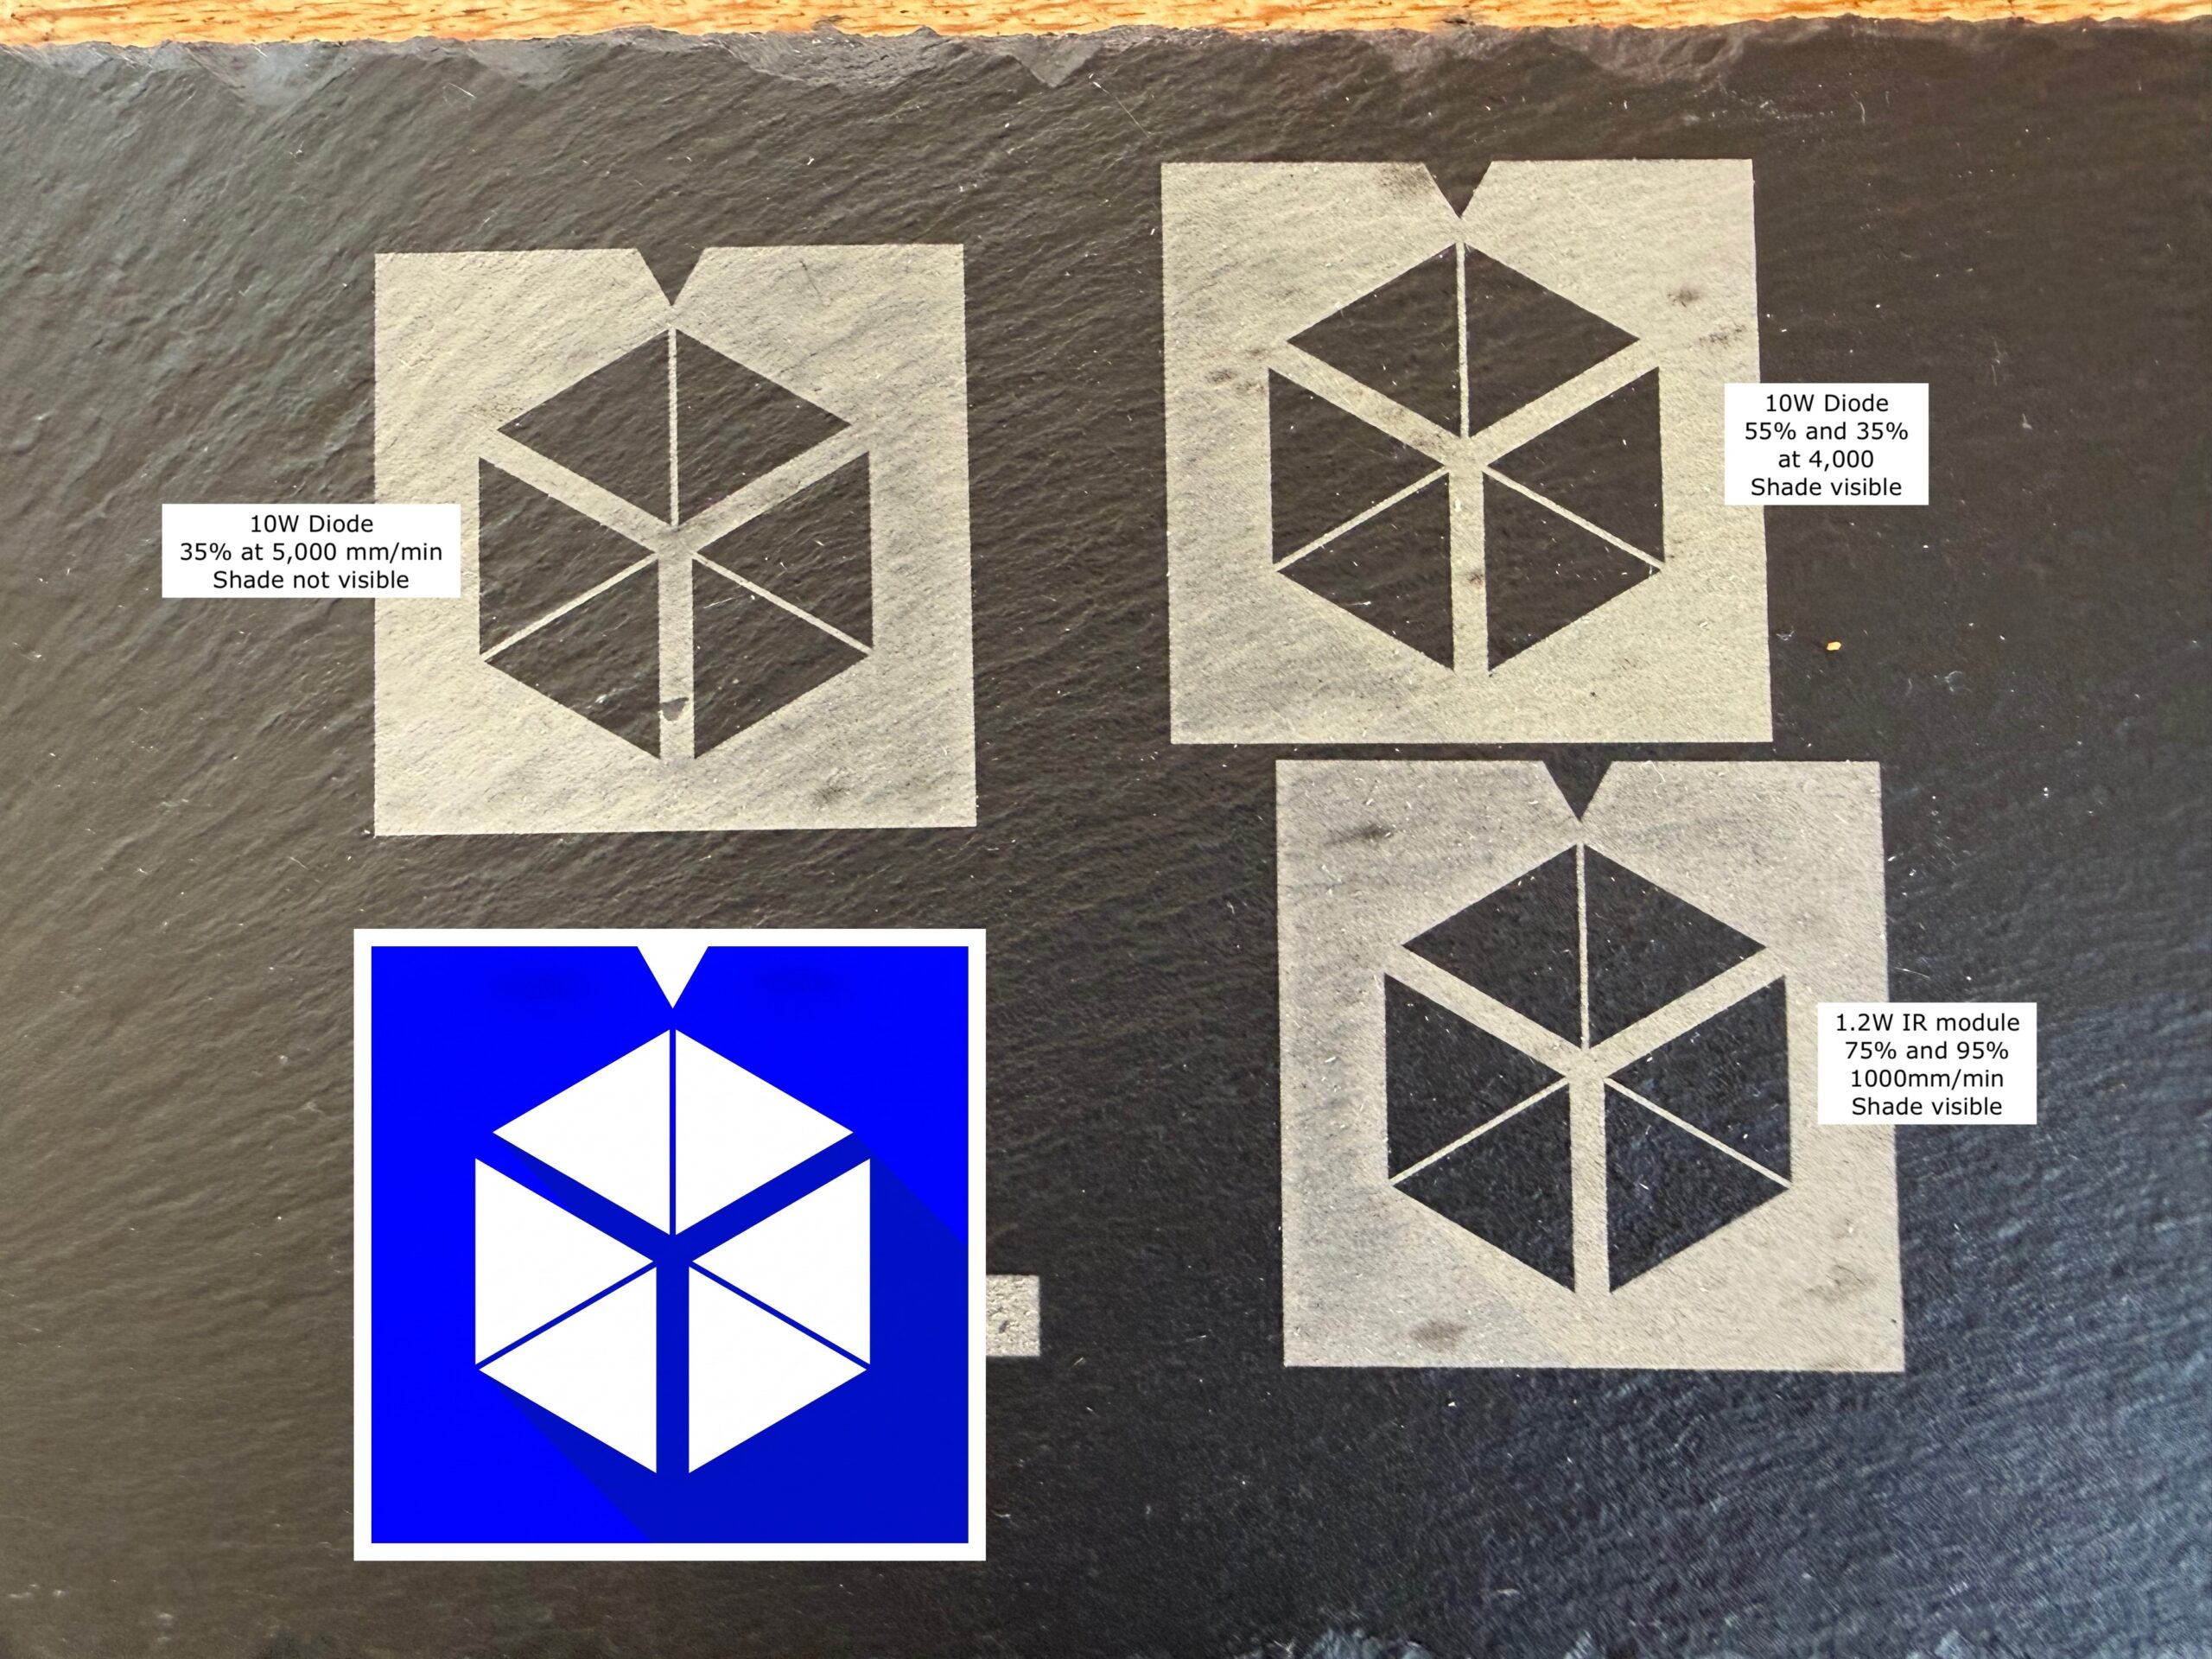
Bottom left, the original logo. Top left: stone preset, 35 percent at 5,000 mm/min. Top right: 55 and 35 percent at 4,000. Bottom right: the 1.2 W infrared module.
Test 5: marble, twice
A polished white marble coaster did not work with either module. The surface is dense and reflective and there is nothing for the beam to bite into; it did not leave so much as a trace. I include it because it is exactly the kind of thing a beginner will try; marble coasters are everywhere, which is precisely why I reached for one. The white marble won. A black marble coaster, on the other hand, engraved well with the infrared module, which made me realise the first result was about the colour of the stone, not the stone. My reading of it is that dark absorbs and white reflects, and that the mark on marble is the surface turning chalky, which shows on dark and has nothing to show against on white. I gave the black marble the same photo engraving I had done on plywood, the picture of two friends you will see in Test 7, and it came out really well: the stone held the fine detail and the tones, which is not something I expected to write about a 1.2 W module and a piece of marble. I did not get a photo of it, so you will have to take my word for that one.
Test 6: bare metal, and the module I had underestimated
Swapping the laser module is as easy as Creality says, and easier than I expected. Power down, unclip one, clip in the other: under 30 seconds, no tools. The software then asks you to run the autofocus again, which is reasonable, and to recalibrate the camera, which is reasonable too and which nothing explains.
The infrared module exists for bare metal, and on a brushed stainless steel cover it is the best result in this review. The job ran for about half an hour (and, for once, the estimate was within seven seconds). The logo went on as a dark square with the cube left as bare steel, and the subtle drop shadow in the logo, the thing I had fought for on the slate, is right there in the metal as a slightly different dark. It looks like it was done in a factory. At 1.2 W the module marks rather than engraves; there is no depth to it, but on metal you do not need depth, you need contrast, and this has it.
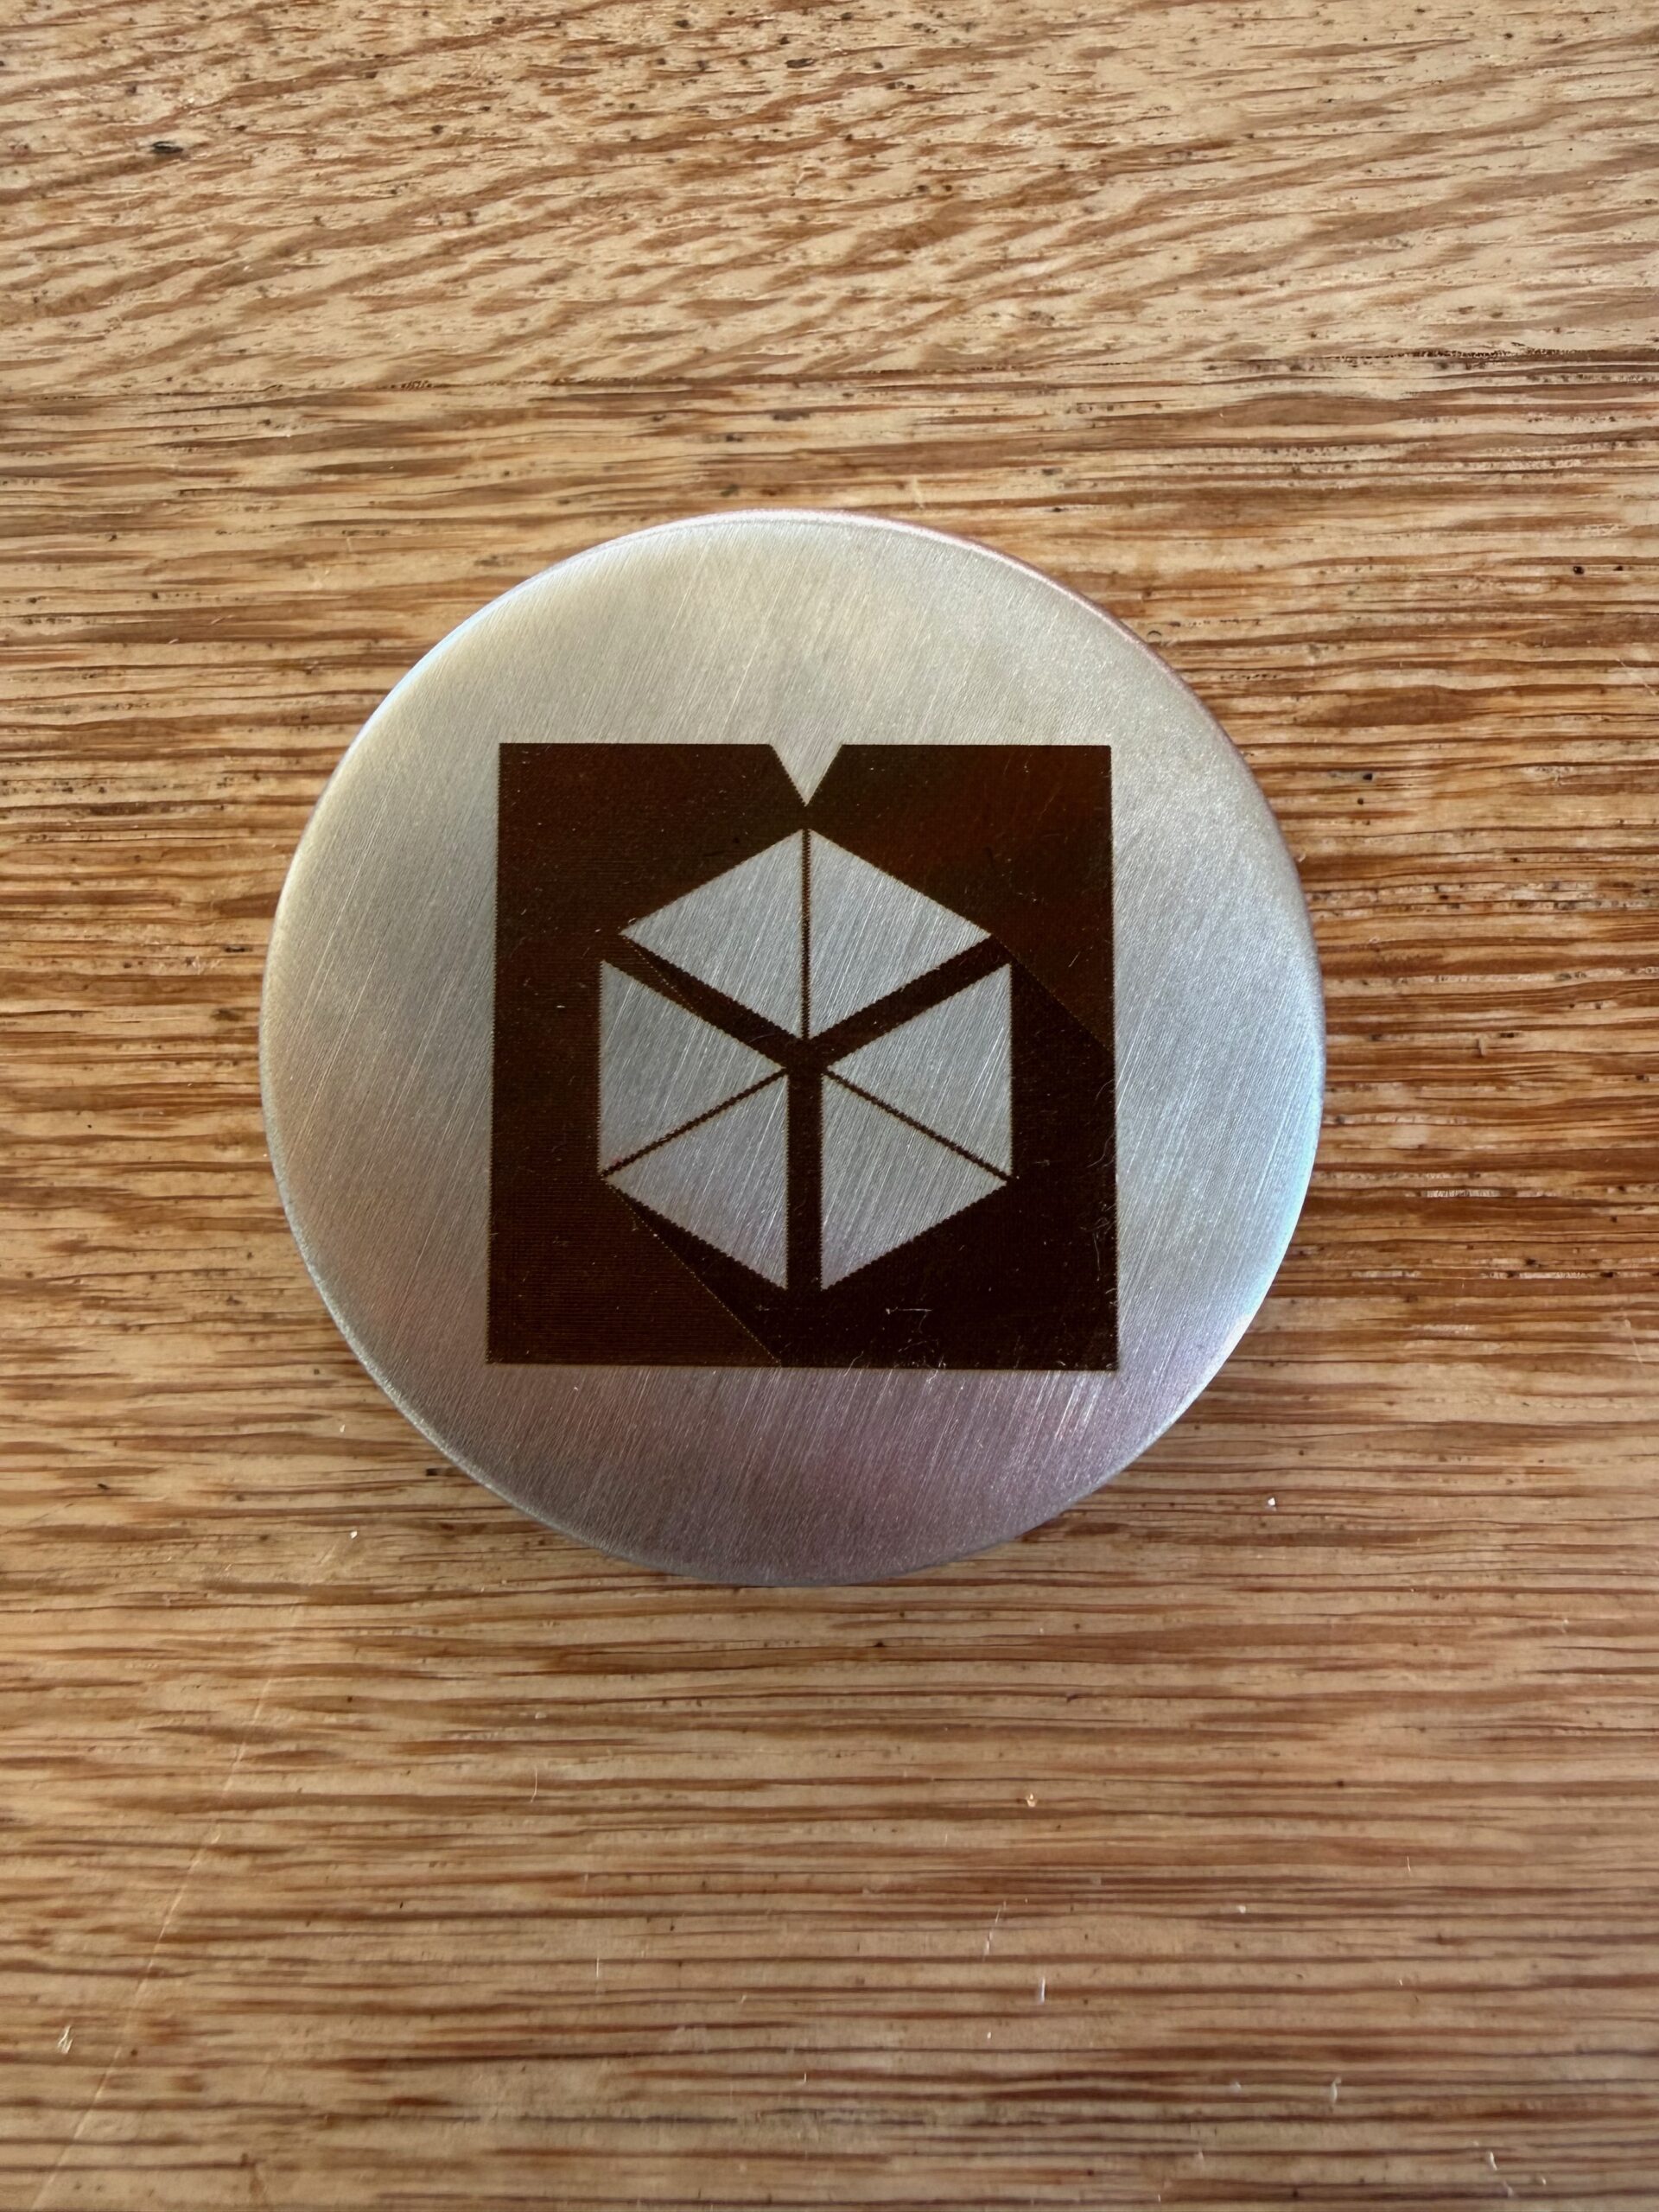
Brushed stainless, infrared module. The drop shadow to the right of the cube comes through as a slightly different tone, as designed.
What I had not expected is how much else the infrared is good for. It beat the 10 W on slate. It did the dark marble the blue diode could not. If you are weighing up whether to add the module, the honest answer is that it is sold as the metal module and it is really the dark things module: metal, dark stone, and, by reputation, dark plastics, which I did not test. What it is not for is anything the blue diode does: wood, cork, cloth and paper are the diode’s job, and I did not try the infrared on them.
Test 7: a photo on plywood
Photo engraving is the test people judge a laser on, so I gave it a real one: a composite picture of two friends in Mario Kart costume, made as a gift, which I ran on the black marble above and on plywood. On the Creality plywood the result is better than I had any right to expect from a 10 W diode. The faces read, the moustaches read, the fabric of the shirts has texture, the chequered flags behind them are distinct and the lettering is clean. There is real tonal range in it, not just dark and light. I did not note the settings for this one and I wish I had, so take it as a demonstration of what the machine can do rather than a recipe.
The piece in the photo is not my cleanest run, and I have included it on purpose. I made fully successful versions of this engraving; this one shows what happens when the surface is not flat. The sheet had a slight bow in it that I did not notice when I started the job, and the autofocus measures one point, so where the wood sat higher or lower than that point the beam was out of focus and the engraving changed tone. It was not obvious at the start. By the end it was obvious from across the room. The lesson is the same one the coasters taught me: check the piece is flat before you focus, and if it is not, weigh it down or focus on the area that matters most.
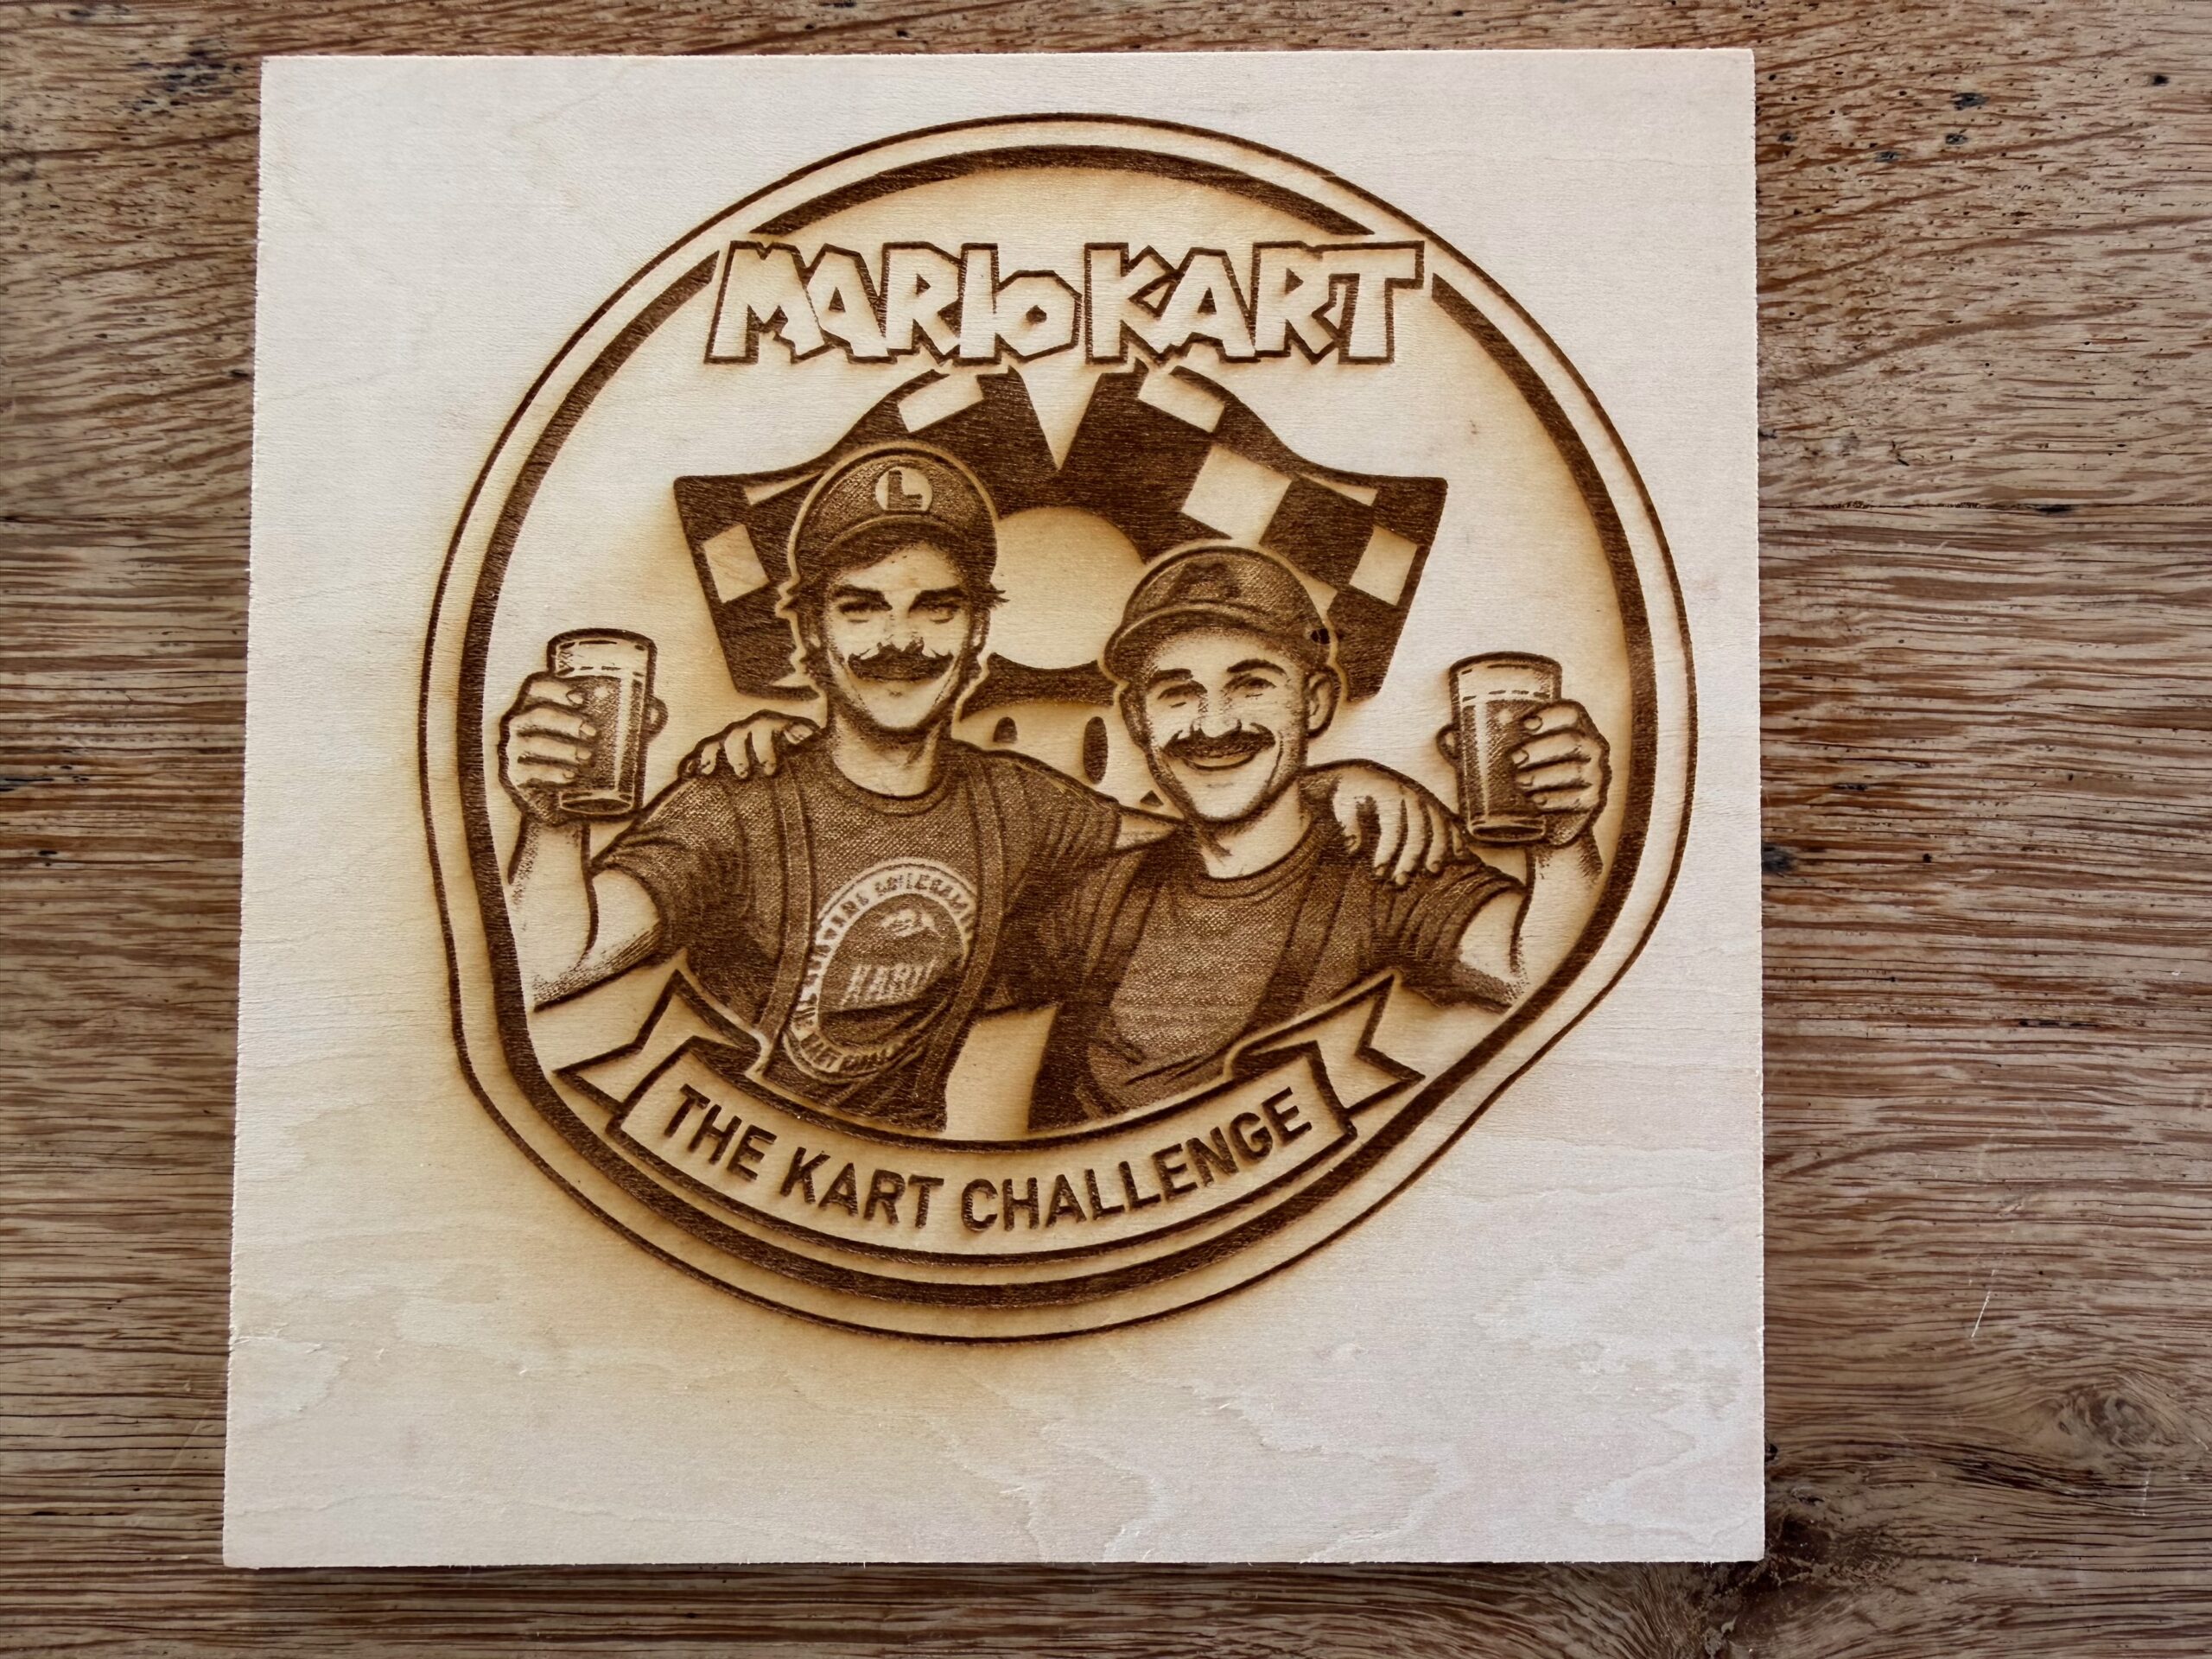
A personal gift, engraved as a photo on the Creality 5 mm plywood. Note the texture in the shirts and the tone in the faces, and the uneven tone across the piece, which is the sheet not being flat rather than the laser.
Cutting, and the number Creality will not give you
Creality publishes no cut-through figure for the A1C, so here is mine. On the 5 mm plywood Creality supplied, the basswood 5 mm preset, 90 percent power at 300 mm/min, one pass, went through. Just. The pieces released, but it was not a cut with anything to spare. The 3 mm preset at the same power and 450 mm/min did not get through the 5 mm sheet, which tells you two things: the presets are tuned to the thickness they claim, with very little margin either way, and 5 mm plywood is as far as a single pass at the preset will take you, not a comfortable working thickness. I did not try a second pass, a slower speed or anything thicker, so a patient cut through thicker stock may well be possible; I cannot tell you where it stops. For coasters, tags and name plates in 3 mm, it has plenty. If cutting thick material is the point of your purchase, this is not the machine, and the 150 by 150 millimetre bed is the harder limit anyway.
The cut that mattered in this house was a name plate for my daughter’s bedroom door, which was demanded once the keychain had been seen. It is a design from Creality’s Craftseek library, a circle with a tiger cub and a name bar, cut from the 5 mm plywood, with the cub line-engraved and the name filled. It went through in one pass, the inner shapes dropped out cleanly, and the waste piece came out as a tiger-shaped silhouette, which is its own small pleasure.

The door sign, cut and engraved from 5 mm plywood in one job. Design: “Personalisiertes Holzschild Tigerbaby” by Zeka Amintire on Craftseek.
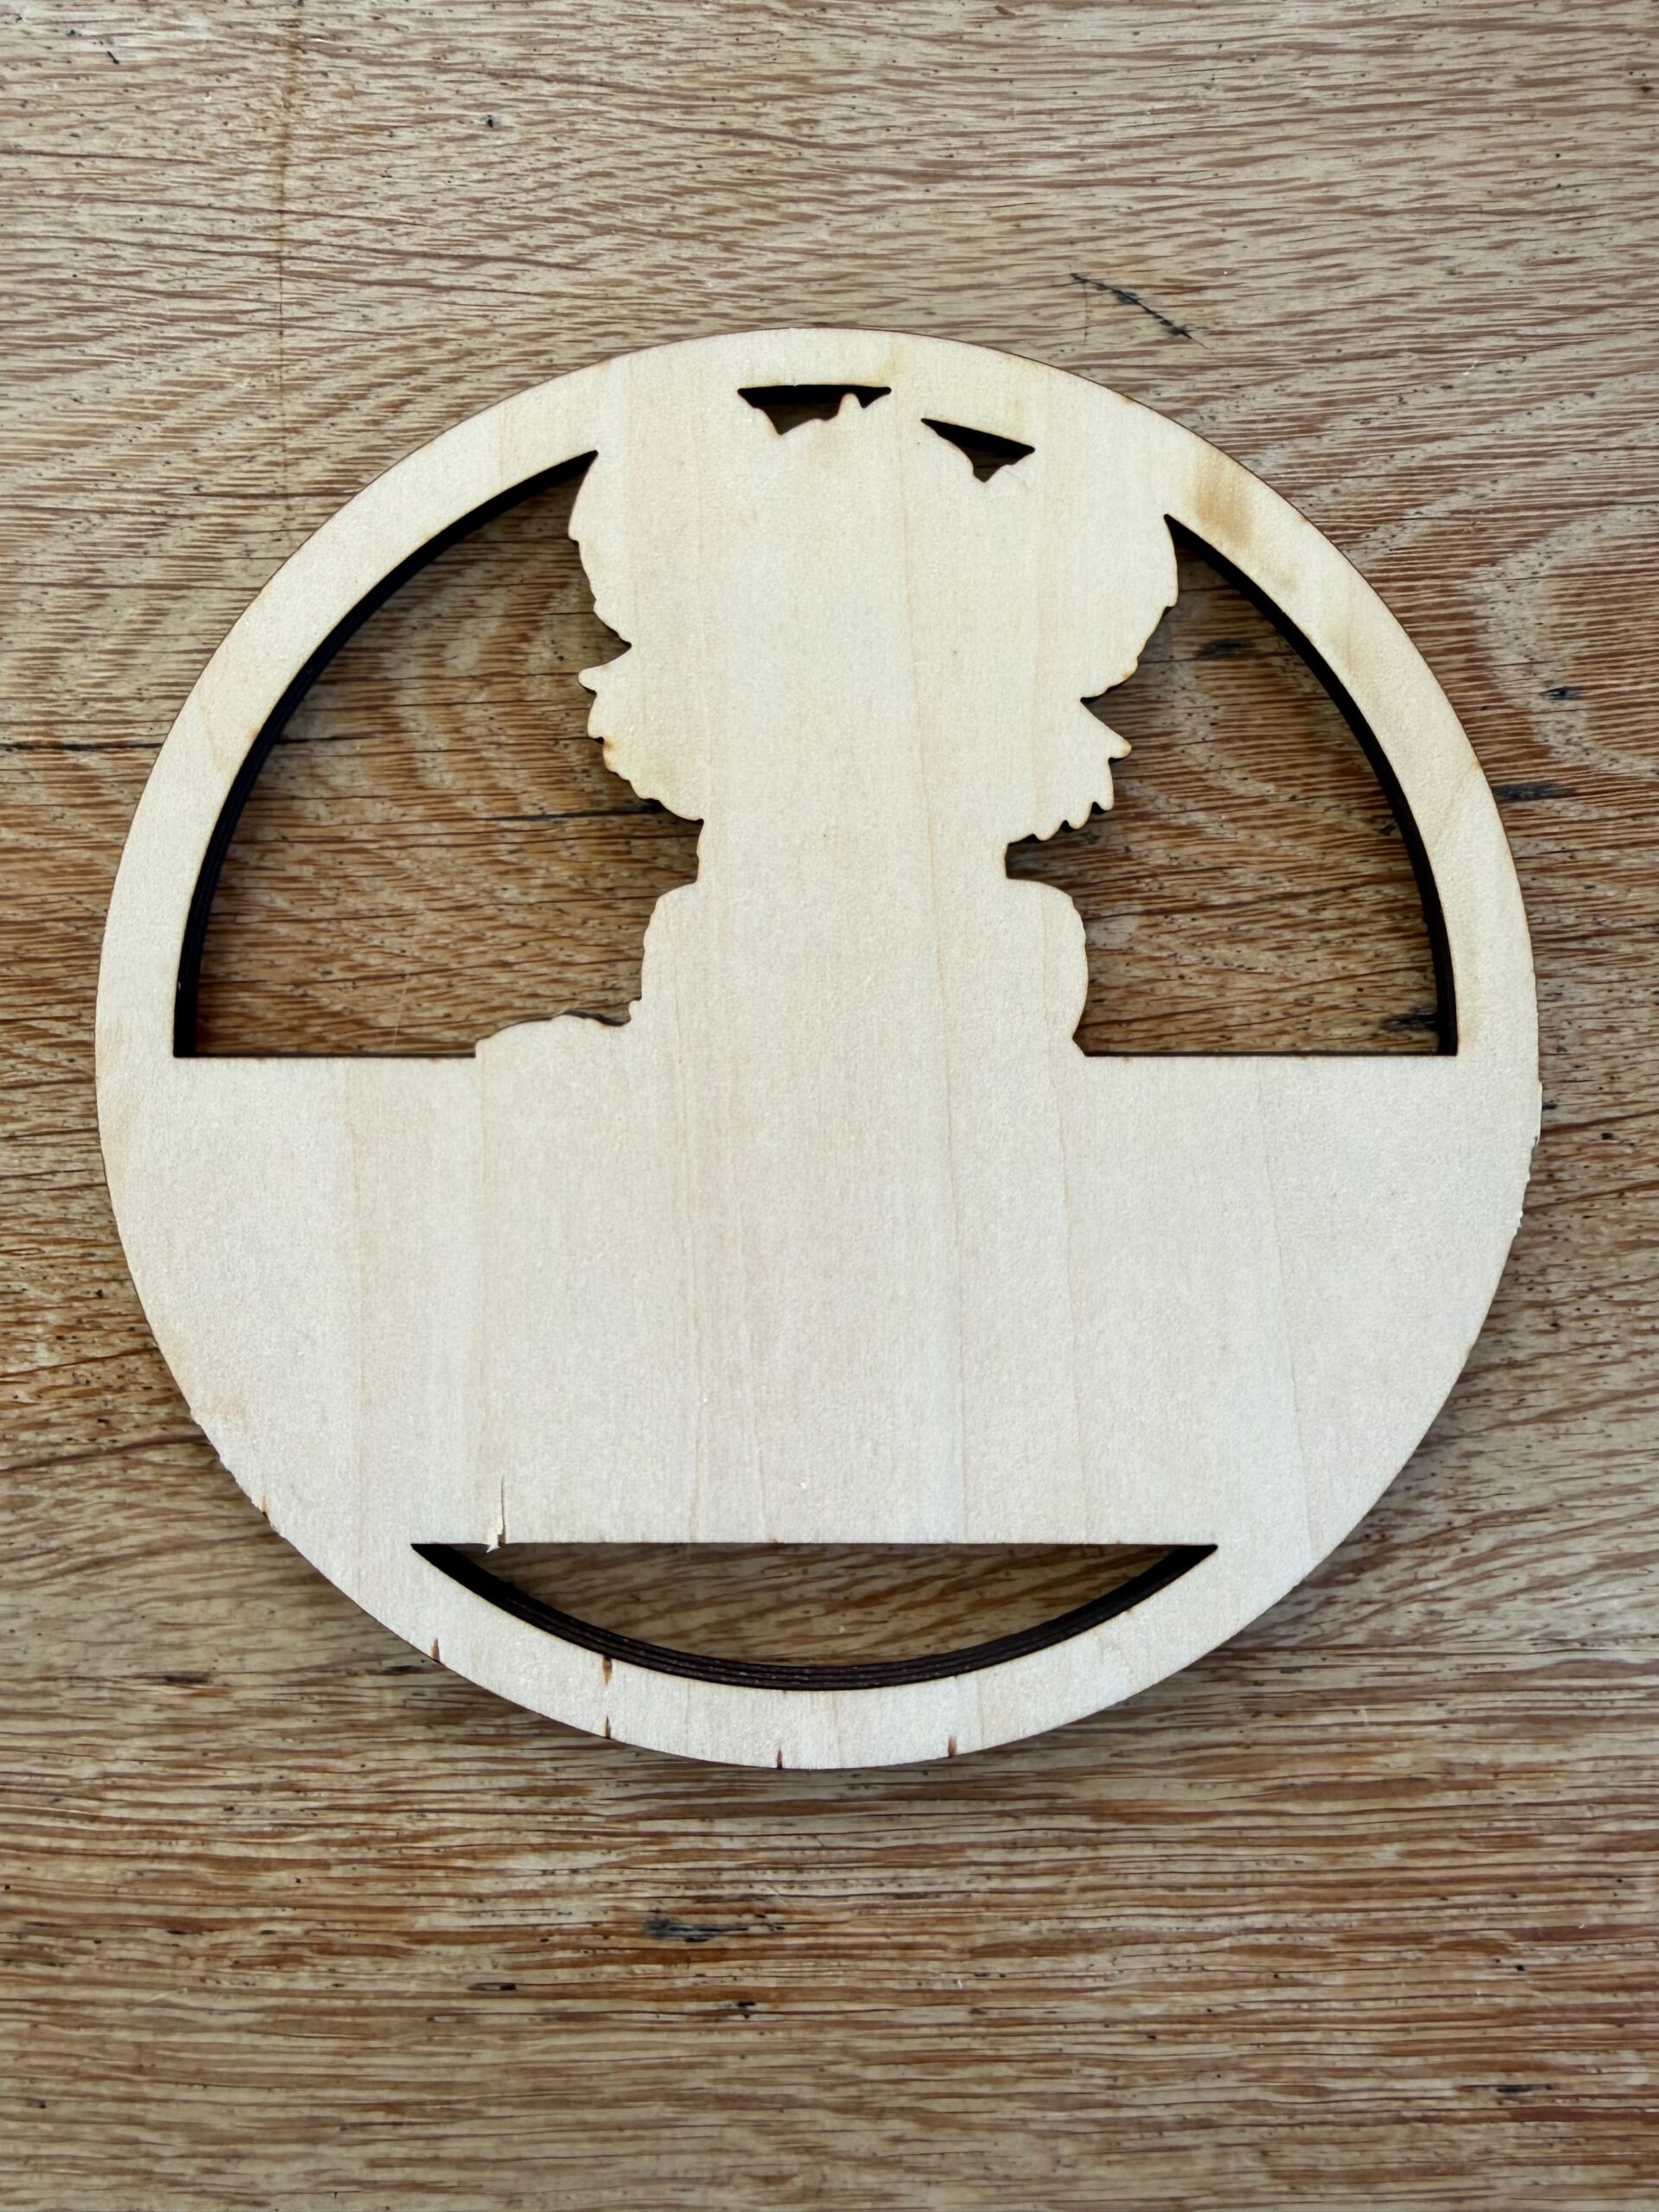
The offcut. The edges are clean, with only light scorching on the inside of the cut.
What I did not test
In the interest of saying so plainly: I did not run our house benchmark cards on this machine, because they were written during this review and were not ready in time; every laser from here on will get them. I did not deliberately trigger the lid interlock, the tilt sensor or the flame detector, and I would not recommend anyone tries the last one. TechRadar tested the emergency stop and everything shut down. I did not measure noise, power draw or particulates. And the brass padlock I had lined up for the infrared module stayed on the bench. Those gaps are gaps, and the scores below allow for them.
Tips beyond the manual
Things I learned the hard way that the documentation does not tell you.
- Run the autofocus before every job, including a second job on the same piece with the same settings. The machine does not keep it, and it will not stop you starting without it. Blurry, wide lines mean you forgot.
- If your material is thicker than a coaster and smaller than the bed, put it over the home corner of the machine. A scrap of the same thickness in that corner should do the same job, though I did not test that. The head does not lift after focusing, and it will drive into anything tall on its way home.
- Install the phone app first, before you do anything else. Wi-Fi setup and the camera both depend on it, the unlabelled button on the side is its pairing button, and the network must be 2.4 GHz. The desktop software will not tell you any of that.
- If the camera says Disconnected even though the machine is on Wi-Fi, power it down, open the lid and check that the camera cable is seated in its connector before you try anything else. Mine had shipped loose, and I spent a month on router settings instead.
- Put a scrap of plywood under cloth, paper and anything else thin. The beam goes through and marks the bed.
- For plain cotton, use the denim preset. There is no cotton preset, and denim at 35 percent and 10,000 mm/min worked on a light cotton without going through. Test a corner first on anything thinner.
- If an imported image has a white background that hides your piece in the camera view, run Image Tracing with Detail Restoration at maximum and “layer by colour” on. The default trace is not good enough; that setting is.
- Wipe slate with a damp cloth before you judge it. It looks like a failure until you do.
- Skip white polished marble. Dark marble, yes, with the infrared module. Slate, yes, and the infrared is the better tool for it.
- Find designs at webapp.craftseek.com in a browser rather than inside the desktop app. The catalogue is bigger and the search works.
- When macOS asks whether the software can use your webcam, it means your laptop’s camera, not the laser’s. Allow it or deny it, it makes no difference to the machine.
- Leave the lid shut for a minute or two after a job finishes. The fan stops when the laser does, and the enclosure is full of smoke at that moment.
- Sort out where the exhaust hose is going before the machine arrives, not after. It needs to reach outside.
Wishlist
- Autofocus at the start of every job, or at the very least a warning when none has been run. This is the one change that would most improve the beginner experience.
- Lift the head after focusing, before it travels to home. A machine sold on its height clearance should not jam on a bowl.
- One sentence in the quick start saying that Wi-Fi and the camera are set up through the phone app. This would have saved me an evening and it costs Creality nothing.
- A troubleshooting entry for a camera that reports Disconnected, and a lid camera connector that stays put in transit.
- A starter pack of materials in the box, beyond plywood. A couple of cork and bamboo coasters and a scrap of slate would show a beginner what the machine can do on day one.
- A published cut-through thickness. Our answer is 5 mm plywood in one pass with no margin; Creality’s should be on the product page.
- A fan run-on timer after the job ends.
- A job history in the software. Everything I made is gone the moment I close the design.
- Search that works in the design library, and the same catalogue on the desktop as on the web.
- Camera calibration remembered per laser module, and a sentence explaining why it is asked for after a swap. A calibration card the exact size of the bed would help too.
- Job time estimates that account for multiple layers. Seven seconds out on one job and four minutes out on another is not an estimate, it is a mood.
- A cotton preset. Denim is not the only fabric people own.
- A label on the pairing button. Even a small one.
- Support for 5 GHz Wi-Fi, or at the very least a clear warning that it is 2.4 GHz only.
Buy it if, don’t buy it if
Buy it if
- This is your first laser and you want the beam contained in a box rather than out in the open. The enclosure and the safety features are the best reason to choose this over a cheaper open-frame machine.
- You make small things: coasters, tags, gifts, name plates, personalised bits and pieces. The 150 by 150 bed is exactly that size, and the results on cork, bamboo, slate and plywood are better than the price suggests.
- You will be placing designs on objects rather than on blank sheets. That is what the camera is for, and having used the machine without it for a month, it is worth the 30 dollars several times over.
- You have somewhere to run a hose outside. If you do not, keep reading before you buy anything.
Don’t buy it if
- You need to cut anything bigger than 150 by 150 millimetres, or thicker than 5 mm plywood. Five got through in one pass, only just, and we did not test beyond it.
- You want to engrave bowls, mugs or anything with a raised edge. The height is there; the autofocus and homing routine will fight you for it.
- You want to set it up from a desktop computer alone. You need the phone app, and nothing tells you that until you have already failed.
Earlier Creality reviews on 3DPrinting.com
This is our first Creality laser, so there is no earlier wishlist to check it against; the next one will be measured against this. On the printer side we have tested Creality before: see our hands-on review of the Creality Ender 5 S1.
Verdict
I enjoyed this machine. That is not a sentence I expected to write after the first month, and it is the one that matters most, so it goes first. The Falcon A1C is intuitive, it is not complex, and it has quite possibly started a new hobby. Friends and family can expect personalised items on birthdays from now on, whether they want them or not.
The basics are right. It arrives assembled and is engraving on the first day. The results on the materials people actually buy it for, cork, bamboo, slate, cloth and plywood, are better than the price suggests, and the photo engraving on plywood is a step beyond what I expected from a 10 W diode. The infrared module turned out to be far more useful than its “metal” billing: it did the best slate of the three attempts, it marked a stainless steel cover well enough to pass for factory work, and it handled dark marble the blue diode could not. Cutting is where the limit is. The machine gets through 5 mm plywood in one pass with nothing to spare; I did not test thicker, and the 150 by 150 millimetre bed is the limit you will hit first.
The trouble is the things the machine does not tell you. Wi-Fi setup depends on a phone app the box never mentions. The camera, the feature that justifies the extra 30 dollars, spent a month reporting itself Disconnected because its cable had shipped loose, and nothing in the documentation would have led me to look. The autofocus works but has to be run every single time, and the software lets you start without it. A bowl jammed the head because the machine lowers for focus and then drives sideways at that height. Every one of these has a five minute fix that Creality has not written down, and together they are the gap between “beginner-proof” and “beginner-friendly”. This machine is the second. Once the camera was working, it earned its money every time I put a coaster under it; positioning went from guesswork with the Frame button to simply right.
On cost: the 10 W with the camera is 399 dollars or 429 euro, and the camera is the easiest 30 dollars you will spend on it. The infrared module takes the kit to 647 dollars or 707 euro at list, 519 dollars or 629 euro on the current offer, and I would add it, because the dark stone and metal results are the ones people will ask you to make. I did not need LightBurn; the free software did the job. I did need a way to get the hose outside, and if you do not have one, Creality’s purifier is a real part of the price. Budget the hose route or the purifier on top.
Who is it for? A first-time laser owner who wants a contained, safe machine for small personal projects, who has a phone, a 2.4 GHz network, and a way to vent outside. Who is it not for? Anyone who needs size, anyone who needs to cut thick material, and anyone who wants to engrave things with a rim without first reading the tips above.
Scores out of 5, in half points. Editor’s Choice is awarded from 4.5.
Pros
- Fully enclosed and Class 1, with a complete set of safety features, at a price where that is rare
- Arrives assembled and is engraving on day one
- Excellent results on cork, bamboo, slate, cloth and plywood, and a photo engraving that surprised me
- The infrared module is worth far more than its metal-only billing
- Camera positioning that makes placing a design on an object simply work
- Module swap in under 30 seconds, no tools
Cons
- Autofocus must be run before every job and the software lets you start without it
- The head does not lift after focusing, so a bowl jammed it
- The camera cable shipped loose, and nothing in the documentation would lead you to check it
- Wi-Fi and camera setup depend on a phone app the documentation does not mention, and 2.4 GHz only
- No job history, poor library search, unreliable time estimates
- 5 mm plywood in one pass with nothing to spare; thicker untested
Frequently asked questions
How thick can the Creality Falcon A1C cut?
Creality does not publish a figure. In our testing the 10 W A1C cut through 5 mm plywood in one pass at 90 percent power and 300 mm/min, with very little margin; the 3 mm preset at 450 mm/min did not get through the 5 mm sheet. We did not test thicker material or multiple passes. Treat 5 mm plywood as the single-pass limit and 3 mm as the comfortable working thickness.
Do you need laser goggles with the Creality Falcon A1C?
Not in normal use. The A1C is a Class 1 laser device, which means the enclosure and the tinted lid are designed to contain the beam, and Creality states that goggles are not required with the lid closed. Never bypass the lid interlock, and note that blue-diode goggles do not protect against the invisible 1064 nm beam of the infrared module.
Do you need the phone app to use the Falcon A1C?
For basic engraving over USB, no. For Wi-Fi and the AI camera, yes. In our testing, Wi-Fi could only be set up through the phone app over Bluetooth, and the camera only works over Wi-Fi, so the phone app is the gateway to both. The machine also needs a 2.4 GHz network.
What do you do if the Falcon A1C camera says Disconnected?
First make sure the machine is on Wi-Fi, because the camera does not work over USB. If it is on Wi-Fi and still shows Disconnected, power the machine down, open the lid and check that the cable from the lid camera is seated in its connector. On our review unit it had come loose in transit, and reconnecting it fixed the camera immediately.
Can the Creality Falcon A1C engrave marble and slate?
Slate, yes, with either module; in our testing the 1.2 W infrared module gave the sharpest result. Dark marble, yes, with the infrared module. Polished white marble did not leave a trace with either module; the light, reflective surface seems to give the beam nothing to work with.
Is the infrared module for the Falcon A1C worth it?
If you want to mark metal, yes; our stainless steel result was the best in the review. It also outperformed the 10 W diode on slate and handled dark marble the diode could not, so it is more useful than its metal billing suggests. It is a marking module, not a cutter, and wood, cork, cloth and paper remain the blue diode’s job; we did not try the infrared on them.